Make It Monday | Flirty Flamingo

Make It Monday using Pop of Paradise from Stampin' Up! UK

Make It Monday with Stampin' Up!

Hello! Oh, this is such a BIG week here at StampinByHannah! On Wednesday I have a heap of stuff to post as the 2016 Annual Catalogue goes live! I am so excited to shop with you from this awesome new book. I do have a couple of days of sneaky peaks before we get there though….

Starting with today’s Make It Monday!

Make It Monday using Pop of Paradise from Stampin' Up! UKThis card is so fun! I will admit that this Flamingo stumped me when I first came across it in the catalogue. I have had the catalogue in my hands since mid-April, when I attended Stampin’ Up! On Stage, and the girls I was sat with that day will tell you I have absolutely no idea what happened on the stage as I couldn’t pull my eyes away from the catalogue, pen in hand, making notes of things for all of you! But this flamingo, which comes in a set that also includes a Pineapple, had me baffled! And then it appeared in the very short list available for demonstrators available to pre-order, and I didn’t buy it, but then my Facebook and Pinterest feeds filled up with Flamingos, and somehow this dude ended up on my stamp shelf! So, I have it, I MUST use it!

So, this is one of my first cards featuring the Flamingo. But I had this card in my head, particularly the technique I have used on the Flamingo itself.

Flirty Flamingo Pop of Paradise from Stampin' Up! UK
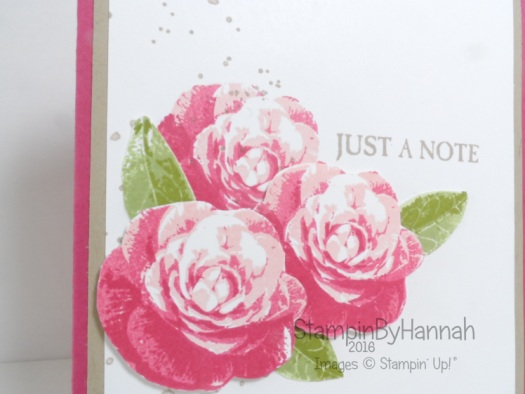
The Flamingo was coloured using the In-Colour Stampin’ Write markers in Flirty Flamingo and Peekaboo Peach. I did a test stamp onto Whisper White, and this effect was just gorgeous, I will probably share that at some point – but not today. The Designer Series Paper on the side of the watercolour paper comes from two different packs (sorry!) the Black stripes are from the Neutrals Designer Series Paper Stack, and the other piece with the beautiful gold confetti is from the new Pop of Pink Speciality Designer Series Paper, so super pretty.

I hope you enjoyed my waffle-y video today, I have to apologise that I won’t be posting a Fancy Fold Friday this week, but I do have several other videos coming this week instead!


Shop Now button-001Join my team button-001

To purchase any of the items featured in my projects please use the links above. To join my team of Stampin’ Friends select ‘Join My Team’ or send me a message!

Please support StampinByHannah, and join my Code Club, by using the Hostess code featured in the top right hand of my blog. For orders of over £150 please do not use this code, as you are entitled to your own Hostess benefits!

Sign up to my newsletter here – http://eepurl.com/2if59

Hannah McCurley

Stampin’ Up! UK Independent Demonstrator

Fancy Fold Friday | Split Panel Card

Fancy fold friday video tutorial split panel card using birthday blooms from Stampin' Up!

Fancy Fold Friday

Now, I will admit that this week I am pushing the boundary’s of ‘fancy fold’ but I keep seeing this style of card on Pinterest, and just HAD to give it a go!

Fancy fold friday video tutorial split panel card using birthday blooms from Stampin' Up!
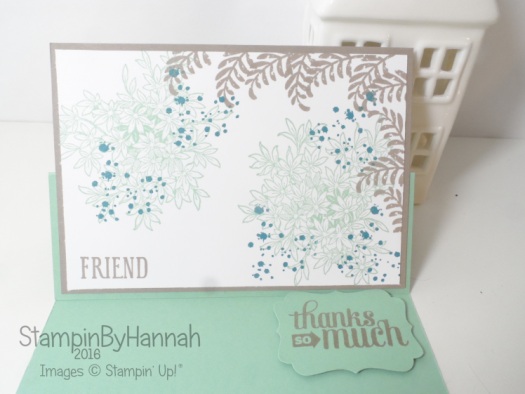
I am not going to waffle too much today, I do plenty of that in the video tutorial. This card really is simple to create, it really just comes down to cutting and sticking in the right places!
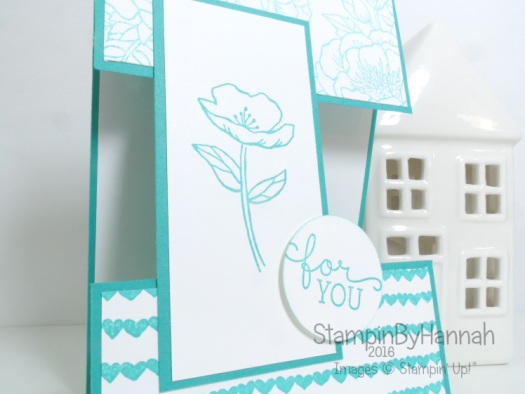
I wanted to keep this card simple – seeing as it is a simple faux fancy fold – and so sticking to one colour and one stamp set were the way to go for me! I am still loving finding new ways to use Birthday Blooms, an absolute MUST OWN set! and it is carrying over in the new catalogue too!

Before I finish with the measurements of this card, I just want to remind you that the current catalogues both end on the 31st May! don’t forget to check out the retiring list before your favourite stamps leave us forever!

Fancy Fold Friday Split Panel Card using Birthday Blooms from Stampin' up! UkMeasurements:

Card Base – Bermuda Bay – Half A4 (10.5 x 29.8 cm)

Insert the Card Base into your Stamping trimmer with the long side at the top, score at 14.8 cm and cut at 19.6 and 24.8 cm

Whisper White -4.3 x 10 cm, and 2 pieces 4.5 x 10 cm


Stampinbyhannah Stampin' Up! Annual Catalogue Launch Event 2016


Product List


Shop Now button-001Join my team button-001

To purchase any of the items featured in my projects please use the links above. To join my team of Stampin’ Friends select ‘Join My Team’ or send me a message!

Please support StampinByHannah, and join my Code Club, by using the Hostess code featured in the top right hand of my blog. For orders of over £150 please do not use this code, as you are entitled to your own Hostess benefits!

Sign up to my newsletter here – http://eepurl.com/2if59

Hannah McCurley

Stampin’ Up! UK Independent Demonstrator

Make It Monday | Creating Backgrounds with small stamps

Make It Monday video tutorial creating backgrounds will small stamps featuring Endless Thanks from Stampin' Up!

Make It Monday with Stampin' Up!

This is technique that I use often to get the most out of the small stamps we often find in our stamp sets, using those small stamps to create fabulous backgrounds for our cards. I have a heap of this type of card in planning (mostly still in my head, but I’m sure they will find their way onto the blog at some point!)

Make It Monday video tutorial creating backgrounds will small stamps featuring Endless Thanks from Stampin' Up!

There are several techniques going on on this card. Firstly, I am still obsessed with Masking (class coming soon!) before I got to creating my own background. I first stamped the Thank You from Endless Thanks in Basic Grey, and then stamped it again onto a sticky note. This sticky note then became a Mask as I punched out the Thank You with a 1 3/8″ circle punch. The second mask was a strip of sticky note tape laid on the diagonal across the card.

Enjoy the video tutorial, and keep watching for me making a mistake as per usual! I think I recovered it pretty well though….

The key to making backgrounds with small stamps is the order in which you stamp. I find the easiest way to do this is stamp the largest image first, and the use smaller and smaller stamps to fill in the gaps. I do of course break this rule in my video tutorial, however there is a reason for my madness! I stamped the Watermelon Wonder flowers first, and then the Crushed Curry ones, before I went back to a larger stamp (the leaves) to fill in the gaps –  the reason being that I didn’t want all the leaves to be the same length. I used more masked to cover the flowers, and allow me to stamp shorter leaves.

Make it Monday Endless Thanks small stamps background using Stampin' Up! products

Measurements:

Card Base – Island Indigo – Half A4, folded in half

Basic Grey – 13.8 x 9.5 cm

Whisper White – 13.3 x 9 cm


Don’t forget to shop using the Code Club Code to receive some great FREE product!

BZNJV4Y4

I will be closing this order on the 30th May 2016


Product List


Shop Now button-001Join my team button-001

To purchase any of the items featured in my projects please use the links above. To join my team of Stampin’ Friends select ‘Join My Team’ or send me a message!

Please support StampinByHannah, and join my Code Club, by using the Hostess code featured in the top right hand of my blog. For orders of over £150 please do not use this code, as you are entitled to your own Hostess benefits!

Sign up to my newsletter here – http://eepurl.com/2if59

Hannah McCurley

Stampin’ Up! UK Independent Demonstrator

Fancy Fold Friday | Corner Fold Card

Fancy Fold Friday Video Tutorial Corner Fold Card featuring Number of Years from Stampin' Up! UK

Fancy Fold Friday

When I first made this card last year it took me ages to work out the cutting and scoring, I had found a tutorial from an awesome American fellow Stampin’ Up! demonstrator and just had to make this card, but the US don’t use A4 card stock, so I had to convert the measurements. It has taken me so long to revisit this style of card after the trauma of that day, but following my own instructions I had the card finished in a flash!

Fancy Fold Friday Video Tutorial Corner Fold Card featuring Number of Years from Stampin' Up! UK

I love the fact that this card has its own level of dimension, although you could really burnish the fold lines to get the card to be flatter. I have also seen this style of fancy fold embossed with an embossing folder after the fold has been created which looks awesome! but I opted for tone on tone stamping today

This card features the Number of Years stamps and dies – which is currently available as a 15% bundle, but the bundle retired on the 31st May, although the stamps and dies will still be available they will cost more – grab them today for a bargain!

Fancy Fold Friday Corner Fold Card featuring Number of years from Stampin' Up! Uk

Have you spotted my colour combination inspiration today? Yes, this card is made in my blog colours; Soft Sky, Marina Mist and Melon Mambo!

Measurements:

Card Base – Marina Mist – Half A4, folded in half (14.8 x 21, scored on the long side at 10.5 cm)

Insert you card base into your Stampin’ Trimmer with the long side at the top, line up the left hand edge at 13 cm –  using the measurements printed on the cutting arm of the Stampin’ Trimmer cut from 2 cm down to 8 cm.

Turn your card base so the short edge is at the top, line up the left hand edge of your card stock at 8 cm, and cut again from 2cm to 8 cm – you should have created a corner cut in the middle of your card front.

Then fold the top right hand edge of the card front down, ensure that you don’t fold the centre square that will appear, burnish this score line well to ensure you card front sits flat.


Don’t forget to shop using the Code Club Code to receive some great FREE product!

BZNJV4Y4

I will be closing this order on the 30th May 2016


Product List


Shop Now button-001Join my team button-001

To purchase any of the items featured in my projects please use the links above. To join my team of Stampin’ Friends select ‘Join My Team’ or send me a message!

Please support StampinByHannah, and join my Code Club, by using the Hostess code featured in the top right hand of my blog. For orders of over £150 please do not use this code, as you are entitled to your own Hostess benefits!

Sign up to my newsletter here – http://eepurl.com/2if59

Hannah McCurley

Stampin’ Up! UK Independent Demonstrator

Make It Monday | 2 Step Stamping

Make It Monday Video Tutorial 2 Step Stamping Picture Perfect from Stampin' Up! UK

Make It Monday with Stampin' Up!

Welcome to another week of Make It Monday!

I have been loving playing with the Picture Perfect stamp set recently, and have a few cards to share with you using this stamp set over the next week or so. I am so pleased that this stamp set is in our new Annual catalogue too. (I do have a few spare catalogues, let me know if you want one!)

Make It Monday Video Tutorial 2 Step Stamping Picture Perfect from Stampin' Up! UK

How pretty is this rose? Little known fact about me, one of my middle names is Rose – I rebelled against it for a LONG time, but these days I love it and really embrace the Rose in my name. James went through a period a few years ago of buying me heaps of Roses (flower not chocolates, although he has bought me plenty of those too!) but recently I haven’t had any flowers, maybe I should send him this blog post as I reminder!

Video Tutorial featuring Picture Perfect from Stampin' Up!

Back to the stamping …. These roses look really complex, but are super simple to stamp. They are a 3 layer stamped image, which means that there are 3 stamps stamped one on top of the other, in different colours to create the full flower. The leaves are the formed in the same way. You can see exactly how to stamp these in the video tutorial below

I adore this colour combination, Rose Red and Crumb Cake. The roses are stamped in Blushing Bride and Rose Red, while the leaves are a combination of Pear Pizzazz and Old Olive.

Make It Monday Featuring Stampin Up Picture Perfect Video Tutorial

I arranged the flowers before I stuck everything down, I do this a lot when I’ve fussy or die cut elements, just to check my composition works. I found that this card was missing something, Stampin’ Up! have some great stamp sets for this event, but Gorgeous Grunge is my favourite! So I added some Crumb Cake spatter using Gorgeous Grunge, and that was the card complete!

Measurements:

Card Base – Rose Red – 14.85 x 21 cm (half a sheet of A4) Scored at 10.5 cm

Crumb Cake Layer – 14.3 x 10 cm

Whisper White Layer – 13.8 x 9.5 cm


Stampinbyhannah Stampin' Up! Annual Catalogue Launch Event 2016


Product List


Shop Now button-001Join my team button-001

To purchase any of the items featured in my projects please use the links above. To join my team of Stampin’ Friends select ‘Join My Team’ or send me a message!

Please support StampinByHannah, and join my Code Club, by using the Hostess code featured in the top right hand of my blog. For orders of over £150 please do not use this code, as you are entitled to your own Hostess benefits!

Sign up to my newsletter here – http://eepurl.com/2if59

Hannah McCurley

Stampin’ Up! UK Independent Demonstrator

Fancy Fold Friday | Simple Easel Card

Fancy Fold Friday Easel Card Video Tutorial using Stampin' Up! UK products

Fancy Fold Friday

Welcome to Fancy Fold Friday! Today I thought I would share my most commonly made Fancy Fold Card! A Simply Easel – I love doing a twist on the Easel card but today I’m heading back to basics and keeping it simple!

Fancy Fold Friday Easel Card Video Tutorial using Stampin' Up! UK products

I am still totally in love with this stamp set too! Awesomely Artistic is a great layering stamp set, and you can see me layer these stamps in the video tutorial below!

Easel cards are super simple, but require one very key component – the stopper! This is the part of the card that makes the card front stand up. Here I have used the Decorative Label punch to create my stopper, popping my punched out sentiment on a dimensional.

Easel card using Awesomely Artistic from Stampin' Up! Uk

Measurements:

Card Base: Mint Macaron – 21 x 14.8 cm, Scored on the long side at 10.5 cm and 5.2 cm

Card Layers: Tip Top Taupe – 10 x 14.2 cm and Whisper White – 9.5 x 13.8 cm

Don’t forget that you will also need a scrap of Mint Macaron card stock for the stopper.


Stampin' up! Uk retiring list 2016


Product List

Awesomely Artistic Clear-Mount Stamp Set

£18.00
2015-2017 In Color A4 Cardstock

£6.50
Mint Macaron Classic Stampin' Pad

£6.00
Tip Top Taupe Classic Stampin' Pad

£6.00
Island Indigo Classic Stampin' Pad

£6.00
Decorative Label Punch

£16.00
B.Y.O.P. Photopolymer Stamp Set

£23.00
Stampin' Dimensionals

£3.75


Shop Now button-001Join my team button-001

To purchase any of the items featured in my projects please use the links above. To join my team of Stampin’ Friends select ‘Join My Team’ or send me a message!

Please support StampinByHannah, and join my Code Club, by using the Hostess code featured in the top right hand of my blog. For orders of over £150 please do not use this code, as you are entitled to your own Hostess benefits!

Sign up to my newsletter here – http://eepurl.com/2if59

Hannah McCurley

Stampin’ Up! UK Independent Demonstrator

Make It Monday | Large Numbers Birthday Card

Large Numbers Birthday card Video Tutorial Featuring Stampin' Up! UK products

Make It Monday with Stampin' Up!

Hello! Welcome to another Make It Monday! As soon as I spotted the Large Numbers Framelits Dies in this years Spring/Summer catalogue this card sprang into my head! Yes, it has taken me an AGE to get around making it, but I thought I would share making it with you!

Large Numbers Birthday card Video Tutorial Featuring Stampin' Up! UK products
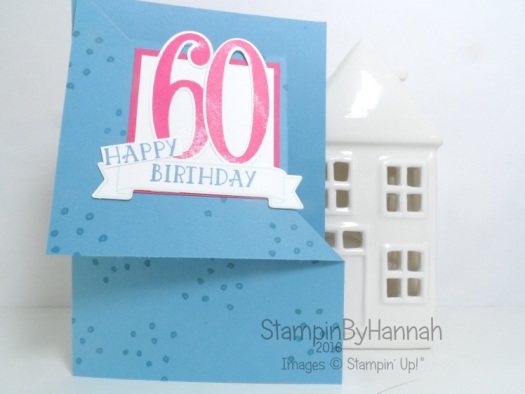
This card was super simple to make! This would be a great boys birthday card (maybe not with the pink!) or men’s cards too.

My top tips for this card are to use Tombow glue to adhere the numbers, as to adhere the numbers in a random way; upside down, and off the edges. This technique is also known as faux embossing because the numbers are the same colour as the card stock underneath, however this card could be really cool in rainbow!

Birthday card using Large Numbers Framelits from Stampin' Up! UK

Measurements:

Card base: Basic Grey – 21 x 14.8 cm

Layer: Basic Grey – 10 x 14.2 cm

Numbers: Basic Grey Scraps

Melon Mambo: scrap, approx 6.5 x 6.5 cm


Don’t forget to shop using the Code Club Code to receive some great FREE product!

BZNJV4Y4

I will be closing this order on the 30th May 2016


Product List

Large Numbers Framelits Dies

£28.00
Big Shot

£99.00
Basic Gray A4 Card Stock

£6.50
Melon Mambo A4 Card Stock

£6.50
Liquid Multipurpose Glue

£3.75
Stampin' Dimensionals

£3.75
Paper Snips Scissors

£9.00


Shop Now button-001Join my team button-001

To purchase any of the items featured in my projects please use the links above. To join my team of Stampin’ Friends select ‘Join My Team’ or send me a message!

Please support StampinByHannah, and join my Code Club, by using the Hostess code featured in the top right hand of my blog. For orders of over £150 please do not use this code, as you are entitled to your own Hostess benefits!

Sign up to my newsletter here – http://eepurl.com/2if59

Hannah McCurley

Stampin’ Up! UK Independent Demonstrator

Fancy Fold Friday | Diagonal Double Pocket Planner Insert

Fancy Fold Friday Diagonal Double Pocket Fold Planner Insert

Fancy Fold Friday

I am loving being back with my Fancy Fold Fridays! I hope you are too!

I am not going to limit myself though just to cards, I know I love a fancy fold card as much as the next crazy paper lady however I am going to include some other folding projects too, and this is one of those.

Fancy Fold Friday Diagonal Double Pocket Fold Planner Insert

Pinterest has a LOT to answer for here! I have a whole board of fancy fold ideas, and this popped up one day, I love the idea but the measurements are for 8 1/2 x 11″ card stock AKA: American sized paper! which when you live an A4 sized world is really annoying. But I chopped down a piece of 12×12 Designer Series Paper to give it ago anyway, and chucked it into my planner – I store heaps of cards and ideas in my planner including prototypes – and I had an epiphany, what an AWESOME planner insert! Plus, trying to cut a piece of 12×12 Designer Series Paper down to A4 is a bit of a nuisance.

I use an Erin Condren Life Planner (LOVE!) but you could totally fit these into other types planners just by punching the appropriate holes. They are a great place to store tickets, receipts, business cards and other important bits of paper.

Diagonal Double Pocket Planner Insert Erin Condren Planner using Stampin' Up! UK Designer Series Paper

The insert I am currently using uses the retiring English Garden Designer Series Paper which is so super pretty, but the one in the video uses a piece of the Neutrals Designer Series Paper stack, which includes pieces of Gold and Silver (so lovely) that would make gorgeous planner inserts!

Stampin' Up! UK Designer Series Paper used to create a Diagonal Double Pocket Planner Insert Fancy Fold Friday


Don’t forget to shop using the Code Club Code to receive some great FREE product!

BZNJV4Y4

I will be closing this order on the 30th May 2016


Product List


Shop Now button-001Join my team button-001

To purchase any of the items featured in my projects please use the links above. To join my team of Stampin’ Friends select ‘Join My Team’ or send me a message!

Please support StampinByHannah, and join my Code Club, by using the Hostess code featured in the top right hand of my blog. For orders of over £150 please do not use this code, as you are entitled to your own Hostess benefits!

Sign up to my newsletter here – http://eepurl.com/2if59

Hannah McCurley

Stampin’ Up! UK Independent Demonstrator

Make It Monday | Watercolour Lifting

Make It Monday Watercolour Lifting Using Crazy About You from Stampin' Up! UK

Make It Monday with Stampin' Up!

I loved making this card! You all know how much I love playing with ink and water, but this technique is super cool! I cannot take any credit for this, the wonderful Jennifer McGuire showcased this one a couple of months ago, and it has taken me this long to get round to having a go!

Make It Monday Watercolour Lifting Using Crazy About You from Stampin' Up! UK

I finally managed to work out what went wrong with my camera last week! I had somehow managed to change the focus setting to Macro – so nothing was in focus! sorted now, but I am still playing about with the White Balance settings so be prepared for some more interesting photography!

Luckily the ‘movie’ setting has been working just great this week, so are you ready for the video tutorial?!

As you can see the watercolour lifting technique is super simple.

  1. Watercolour a piece of Watercolour Paper, get creative use multiple colours if you fancy!
  2. Leave your Watercolour Paper to dry or speed up the process using a heat tool but make sure it is totally dry before moving on to Step 3!
  3. Stamp your desired images onto your Watercoloured piece in VersaMark ink and cover in Clear Embossing Powder, use your Heat Tool to melt the embossing powder.
  4. Grab your Stampin’ Spritzer and cover your Watercolour Piece with water, grab a few layers of Kitchen roll (or other paper towel type stuff!) and press over, this wicks away that water taking some ink with it. You can repeat this several times, to create a more dramatic effect.

Watercolour Lifting Video Tutorial using Stampin' Up! inks

Sorry for the short post today, but I will admit to having to rush to get the the video uploaded and post written today! Bank holiday weekend is always a little bit mental but I have spent most of the morning (I’m writing this on Sunday!) trying to sort my final end of year accounts, organising and packaging my April Customer thank you cards and gifts, and I still have to make a Congratulations card for my brother and sister in law before 3pm! So, time to get on. Speak again soon


Product List


Shop Now button-001Join my team button-001

To purchase any of the items featured in my projects please use the links above. To join my team of Stampin’ Friends select ‘Join My Team’ or send me a message!

Please support StampinByHannah, and join my Code Club, by using the Hostess code featured in the top right hand of my blog. For orders of over £150 please do not use this code, as you are entitled to your own Hostess benefits!

Sign up to my newsletter here – http://eepurl.com/2if59

Hannah McCurley

Stampin’ Up! UK Independent Demonstrator

Fancy Fold Friday | Z Fold Card

Fancy Fold Friday Z fold birthday card using Number of Years from Stampin' Up! Uk

Fancy Fold Friday

Its Back!

Yes, I am bring back Fancy Fold Friday! As I have previously discussed, I attended a team training event a few weeks ago and my lovely friend Heidi put together this whole inspiration station of Fancy Fold Cards as well as 3 wonderful make and takes that were also fancy folds. I had forgotten how much I LOVE making fancy fold cards! So, in the spirit of doing what we love I have brought back Fancy Fold Friday.

Now, there is a video this week but I cannot promise a video tutorial every week (they are a whole heap of work!) but I will promised to ensure that each week comes with written instructions and measurements

Fancy Fold Friday Z fold birthday card using Number of Years from Stampin' Up! Uk

I just love this stamp set! Number of Years is a great excuse to make numbered birthday cards. Saying that I don’t have a 24th birthday to send this card to – so if you do, let me know and I will send this card to you!

This style of card is awesome for birthdays as you get plenty of room inside for your lovely birthday message

Fancy Fold Friday Number of Years Birthday Card Video tutorial

Card Measurements:

Card Base: 29.6 x 10.5 cm, scored on the long side at 7.5 and 14.85 cm

Inside Layers:

Designer Series Paper – 14.3 x 10 cm

Whisper White – 13.8 x 9.5 cm

Front Layers:

Card Stock – 11.8 x 7.5 cm

Whisper White – 11.3 x 7 cm

Designer Series Paper : 7 x 10 cm


Don’t forget to shop using the Code Club Code to receive some great FREE product!

7AXEMZNA

I will be closing this order on the 30th April 2016


Product List


Shop Now button-001Join my team button-001

To purchase any of the items featured in my projects please use the links above. To join my team of Stampin’ Friends select ‘Join My Team’ or send me a message!

Please support StampinByHannah, and join my Code Club, by using the Hostess code featured in the top right hand of my blog. For orders of over £150 please do not use this code, as you are entitled to your own Hostess benefits!

Sign up to my newsletter here – http://eepurl.com/2if59

Hannah McCurley

Stampin’ Up! UK Independent Demonstrator