Make It Monday | Tag Topper Chocolate Pockets

Make It Monday Chocolate pocket using the Tag Topper Punch from Stampin' Up! UK

Make It Monday with Stampin' Up!

Hello! Wow, where did last week go?! Oh, well, it’s Monday again – time for Make It Monday!

I spent the weekend with a group of awesome women; crafting, eating and having heaps of fun! I have rambled for hours about how much I LOVE Stampin’ Up! and this weekend was a prime example of why I love it. This weekend wasn’t a Stampin’ Up! organised event, but a team event, organised by one of my lovely Stampin’ friends. Someone I would NEVER have met without this company, and I spend the whole weekend crafting (how often to we get to do that!), it was great to reset, take time for me, and I am so ready for what the next few weeks will bring!
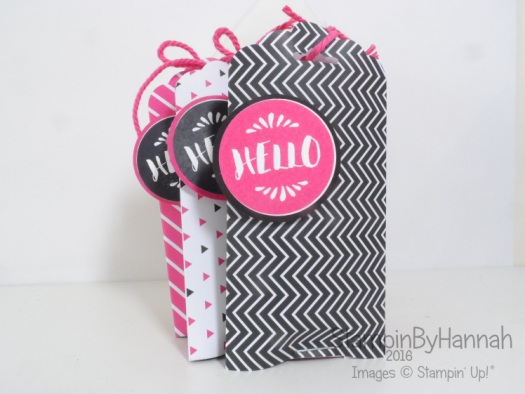
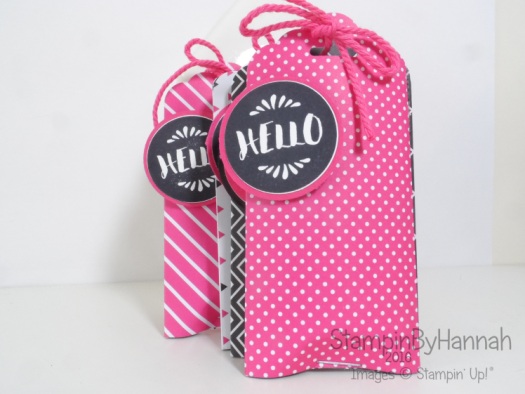
Pop of Paradise Tag Topper Team Swap using Stampin' Up! UK productsHow cute are these! One of the things that we do when we get together is share and swap projects – we call them swaps, and its a massive part of any Stampin’ Up! event. Now, when I go to Stampin’ Up! organised events I make maybe 50 swaps, but because this was a smaller team event I made a swap for each person – so this time I made 22 of these. Actually I made 24, but that meant that I could leave a couple to say Thank You to the housekeepers / receptionist etc at the Hotel we stayed at.

Aren’t they super cute! Each pocket contains a bar of children’s chocolate (the same brand as those eggs with the toy in the middle!) – because chocolate / sweeties are another BIG theme at these events. James laughs at me, he always knows when I’m prepping for a crafty weekend away (he never remembers, no matter how many times I tell him I’m going!) when he sees the bags and bags of sweets sat in the office!

Make It Monday Chocolate pocket using the Tag Topper Punch from Stampin' Up! UK

These pockets use the Pop of Pink Speciality Designer Series Paper and coordinating Pop of Paradise Stamp set. I did also make some using the Fruit Stand Designer Series Paper too, seeing as I managed to cut enough paper for 18 pockets and then ran out of paper – Math isn’t my strong point!

Measurements:

Designer Series Paper – 4 x 4 1/2″ (10 x 12 cm)

Score on the long side at 2 and 4″ (5 and 10 cm)
Tag Topper Punch Chocolate Pocket using Stampin' Up! UK products

The pockets are super simple to put together (as you can tell, a 5 minute Make It Monday video! even with my rambling is a miracle!). They are finished with the Tag Topper Punch at the top, and a staple at the bottom. Like I said I made 24 of these and it took me about an hour, from start to finish.

I would LOVE to welcome you to our next crafty weekend! Have you ever thought about joining Stampin’ Up! and becoming a part of my team of Stampin’ Friends? check out my Join My Team page, or drop me a message today, I am sure you won’t regret it!


Don’t forget to shop using the Code Club Code to receive some great FREE product! 

E23UG3WK

I will be closing this order on the 30th August 2016


Product List

Pop Of Pink Specialty Designer Series Paper

£11.75
Pop Of Paradise Clear-Mount Stamp Set

£17.00
Melon Mambo Thick Baker's Twine

£3.25
Melon Mambo Classic Stampin' Pad

£6.00
Basic Black Archival Stampin’ Pad

£6.50
Simply Scored

£27.00
Tag Topper Scalloped Punch

£21.00
Handheld Stapler

£9.00


Shop Now button-001Join my team button-001

To purchase any of the items featured in my projects please use the links above. To join my team of Stampin’ Friends select ‘Join My Team’ or send me a message!

Please support StampinByHannah, and join my Code Club, by using the Hostess code featured in the top right hand of my blog. For orders of over £150 please do not use this code, as you are entitled to your own Hostess benefits!

Sign up to my newsletter here – http://eepurl.com/2if59

Hannah McCurley

Stampin’ Up! UK Independent Demonstrator

Make It Monday | Faux Metal Embellishments

Make it monday metal embellishments video tutorial using Christmas pines and Rose Garden from Stampin' Up! UK

Make It Monday with Stampin' Up!

I have a special Make It Monday for you this week, I am taking part in a challenge (nothing new there) set by the lovely Michelle Last for her team of Pinkies! The theme this month is heat embossing, and you can check out heaps of Heat Embossing ideas over on Michelle’s blog tomorrow – and vote for your favourite!

Make It Monday Faux Mental Embellishments Christmas Card using Christmas pines from Stampin' Up!

This technique looks really fancy, but is really really simple. Check out the video for all the details:

Top tips:

  • Detailed die cuts look best, I’m loving uses Rose Garden and Pretty Pines
  • Use Metal tone Embossing powder; Gold, Silver or Copper
  • Make sure your heat tool is good and hot before melting your embossing powder

Make It Monday Video tutorial faux metal embellishments using Christmas Pines and Rose Garden from Stampin' up! UK

I hope you have enjoyed this Make It Monday, don’t forget to pop over to Michelle Last’s blog tomorrow and vote for your favourite Heat Embossed card!


Don’t forget to shop using the Code Club Code to receive some great FREE product!

2V6P3MWH

I will be closing this order on the 30th September 2016


Product List


Shop Now button-001Join my team button-001

To purchase any of the items featured in my projects please use the links above. To join my team of Stampin’ Friends select ‘Join My Team’ or send me a message!

Please support StampinByHannah, and join my Code Club, by using the Hostess code featured in the top right hand of my blog. For orders of over £150 please do not use this code, as you are entitled to your own Hostess benefits!

Sign up to my newsletter here – http://eepurl.com/2if59

Hannah McCurley

Stampin’ Up! UK Independent Demonstrator

Pootlers Blog Hop | Christmas Pines

Pootles Blog Hop Autumn Winter Stampin Up! Catalogue Christmas Pines

bog hop-001

Hello! Welcome to our fabulous Pootler’s Team Blog Hop! We have 19 wonderful ladies blogging together today to show you heaps of great project ideas using new products from the Stampin’ Up! Autumn / Winter catalogue. Please use the Next and Previous buttons to navigate to the next blog in the chain, and remember to leave some comment love on your travels!

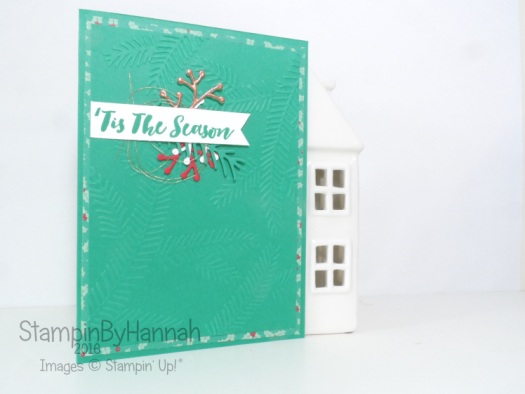
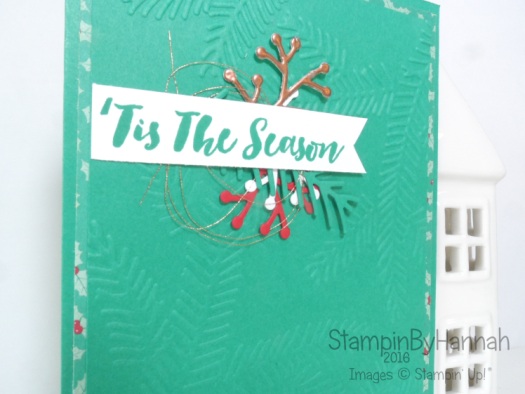
Simple Christmas Card using Christmas pines from Stampin' Up! UkI have been having so much fun play with the Present and Pine-cones Suite from the new catalogue (page 18-22), and am totally in love with the idea of an Emerald Envy Christmas this year! I am not usually a green and red sort of person, I love a cool Christmas of blues, purples and silver, but this colour might just have me converted!

The Suite includes the Christmas Pines stamp and die bundle, as well as Designer Series Paper, Washi Tape, Ribbons, a great embossing folder and some super cute mini pine-cone embellishments.

Pootles Christmas Card using Stampin' Up! Uk Christmas PinesThe front panel of this card was embossed twice using the Pine Bough Embossing Folder to create an almost fully embossed panel. Really this card is pretty simple, with a few die cuts and some copper embossing (more of that on Monday!), but I think this would be a super easy card to make a few of for friends and colleagues for Christmas

bog hop_2-001bog hop_2_2-001


Product List


Shop Now button-001Join my team button-001

To purchase any of the items featured in my projects please use the links above. To join my team of Stampin’ Friends select ‘Join My Team’ or send me a message!

Please support StampinByHannah, and join my Code Club, by using the Hostess code featured in the top right hand of my blog. For orders of over £150 please do not use this code, as you are entitled to your own Hostess benefits!

Sign up to my newsletter here – http://eepurl.com/2if59

Hannah McCurley

Stampin’ Up! UK Independent Demonstrator

August Thank You Cards

Merriest Wishes Christmas Card using Stampin' Up! UK products

Around the end of every month I send out Thank You cards to my online customers (If you place an order for collection you get your card with your order!). This past month I had a stack of cards to make and send, along with class kits for my Stamp of the Month Club too

Simple Christmas Card using Merriest Wishes from Stampin' Up! UK

Now, the cards I sent had a slightly different sentiment, in that they were ‘Thank You’ cards, rather than Christmas ones, but seeing as I used the Thank You stamp from the Thoughtful Branches stamp set that has now sadly retired (although I do have a used copy available if anyone wants one!) I thought I would change it up for the blog.

The background and sentiment are taken from Merriest Wishes. I’m loving this stamp set, and it is my current Stamp of the Month too!

Gold Christmas Card using This Christmas and Merriest Wishes from Stampin' Up! UK

The card is finished with a piece of the This Christmas Designer Series Paper and a strip of Gold Sequin Trim. Very pretty.

Right, I’m off shopping today, need to get some bits and pieces ready for my Stamping trip away next weekend! Yay!


September Stamp of the Month Club Online Card Class using Merriest Wishes from Stampin' Up! UK


Product List


Shop Now button-001Join my team button-001

To purchase any of the items featured in my projects please use the links above. To join my team of Stampin’ Friends select ‘Join My Team’ or send me a message!

Please support StampinByHannah, and join my Code Club, by using the Hostess code featured in the top right hand of my blog. For orders of over £150 please do not use this code, as you are entitled to your own Hostess benefits!

Sign up to my newsletter here – http://eepurl.com/2if59

Hannah McCurley

Stampin’ Up! UK Independent Demonstrator

Pinkies Blog Hop | Shadow Box Card

Pinkies Team Blog Hop using Christmas Pines from Stampin' Up! UK

blog hop logo (1)Thank you for joining us on another Pinkies Blog Hop! We’re showcasing lots of gorgeous projects using products from the new Stampin’ Up!® Autumn/Winter Seasonal Catalogue. Simply use the buttons at the end of each post to keep hopping!

Wow, I’m loving this new Autumn / Winter catalogue, there are just so many great products and ideas. I thought I would make a special card for the Pinkies Blog Hop this time. I’m usually a pretty simple card maker, but this style of card has caught my eye recently (during my hours of scrolling through Pinterest!) and I just had to have a go at making my own!

Christmas Pines Shadow Box Card using Stampin' Up! UK Products

My favourite bundle in this years catalogue is Christmas Pines; I just love the collection of sentiments and the fabulous detailed die cuts. I will admit that you will be seeing a whole lot of this stamp set in the coming weeks, but that’s a story for another day!

Pinkies Team Blog Hop using Christmas Pines from Stampin' Up! UK

Measurements:

Card base: Basic Black card stock, 10.5 x 22 cm, scored on the long side at 10.5 and 11.5 cm. You will also need a piece of card stock that measures 6.5 x 6.5 cm

Using the scoring blade on you Stampin’ Trimmer, draw a square on the front of your card base; line up the card stock at 2 cm and score from 2 cm down to 8.5 cm – do this on all 4 sides of the card front.

Using a ruler, draw  diagonal lines from corner to corner of the square you have just created. The use these lines as a guide to score another square 1 cm smaller than the previous. You should now have one square inside the other. Then, using a ruler and a  craft knife, cut along the diagonal lines. Fold on the score lines, creating your shadow area in the middle of your card.

For this card, I stamped and heat embossed the sentiment on the 6.5 cm x 6.5 cm card stock using the new Emerald Envy Glitter Stampin’ Emboss powder before adhering it to the centre of the card.

Christmas Card Shadow Box using Christmas Pines from Stampin' Up!

The problem with this style of card is that it doesn’t fit or fold flat into a standard envelope. So I have also created a box for it to go in.

Measurements:

Box Base; 14 x 14 cm, scored on all four sides at 1.5 cm

Box Lid; 13.2 x 13.2 cm, scored on all four sides at 1 cm.

Both the card and the box are finished with the Presents and Pinecones Designer Series Paper and die cuts from the Christmas Pines bundle.

Thanks so much for stopping by, check out Anna’s blog and her fabulous projects by using the Next button.

nextprevious


September Stamp of the Month Club Online Card Class using Merriest Wishes from Stampin' Up! UK


Shop Now button-001Join my team button-001

To purchase any of the items featured in my projects please use the links above. To join my team of Stampin’ Friends select ‘Join My Team’ or send me a message!

Please support StampinByHannah, and join my Code Club, by using the Hostess code featured in the top right hand of my blog. For orders of over £150 please do not use this code, as you are entitled to your own Hostess benefits!

Sign up to my newsletter here – http://eepurl.com/2if59

Hannah McCurley

Stampin’ Up! UK Independent Demonstrator

Make It Monday | Ambassador’s Chocolate Box | Revisited

Ferrero Rocher Chocolate box using Stampin' Up! UK Products for Make It Monday

Make It Monday with Stampin' Up!

Wow, this is a requested video, although it has taken me a little longer than I had planned to get this one out! I always love hearing from you all, do you have a suggestion for me? Let me know and I will see what I can do

Make it monday video tutorial chocolate box using This Christmas from Stampin' Up!

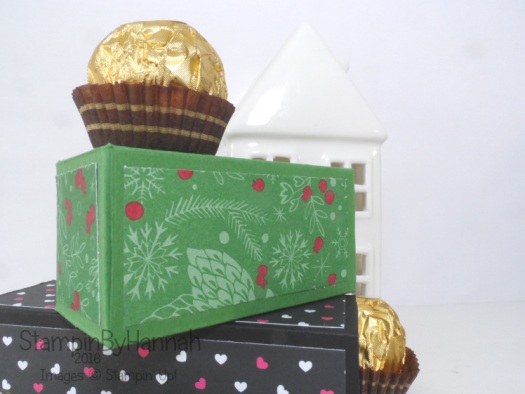
I made the original box about 18 months ago, it holds 3 chocolates but the request I had recently asked for a similar box to hold just 2.

The black box uses the original measurements and the Pop of Pink Designer Series Paper, while the Garden Green version has a festive feel with This Christmas DSP.

Ferrero Rocher Chocolate box using Stampin' Up! UK Products for Make It Monday

Measurements:

Card stock – 7 x 6 1/2″ (18 x 17 cm)

Score on the long side at 1/2, 2, 5 and 6 1/2″ (1, 5, 3 and 17 cm)

Score on the short side at 1/2, 2, 3 1/2 and 5″ (1, 5, 9 and 13 cm)

Designer Series Paper – 4 pieces that measure 3 x 1 1/4″ (6.5 x 3.5 cm) and 2 that measure 1 1/4 x 1 1/4 (3.5 x 3.5 cm)


September Stamp of the Month Club Online Card Class using Merriest Wishes from Stampin' Up! UK


Product List


Shop Now button-001Join my team button-001

To purchase any of the items featured in my projects please use the links above. To join my team of Stampin’ Friends select ‘Join My Team’ or send me a message!

Please support StampinByHannah, and join my Code Club, by using the Hostess code featured in the top right hand of my blog. For orders of over £150 please do not use this code, as you are entitled to your own Hostess benefits!

Sign up to my newsletter here – http://eepurl.com/2if59

Hannah McCurley

Stampin’ Up! UK Independent Demonstrator

Thoughtful Branches at Christmas

Christmas Card using Thoughtful Branches From Stampin' Up! UK

I am so ready to start making Christmas cards; its probably something to do with the weather, seeing as it has rained ALL DAY! I know it’s still only August, but really, I’m feeling rather Autumnal and almost Festive!

Christmas Card using Thoughtful Branches From Stampin' Up! UK

I have really enjoyed using the Thoughtful Branches Bundle, quite sad that it wont be available after the 31st August. There is still time for you to get your hands on it, but you better move quick. This card though, I am so excited about, I’ve been trying to get a ribbon of paper onto a card for ages, and I’ve finally done it!

The card uses a base of Garden Green, with a matt of This Christmas Designer Series Paper, and another layer of Very Vanilla. The main focal point of the card is the ‘For You’ sentiment, stamped in Cherry Cobbler. I’ve been reaching for this punch combination a lot recently, it’s the 1 1/4″ circle and the 1 3/8″ circle layered on top of one another, and its the perfect combination for a sentiment.

Christmas Card for you using Thoughtful Branches from Stampin' Up! UK

The paper ribbon is super simple to do with the This Christmas Specialty Designer Series Paper – because its thin but strong, it curls really nicely. I created the loops of paper and stuck them together with glue dots before attaching the whole piece to the card with Fast Fuse. I really wanted to add a splash of Gold onto this card, so one of the leaves has a touch of Gold Wink of Stella, but that wasn’t quite enough, so I added some Gold splatter and a trio of Gold Enamel Shapes.

Before I go, I just want to remind you that if you order this fabulous bundle before the 31st August, I will send you a FREE card kit and Exclusive video tutorials in September!


ThoughtfulBranches_Share-3_Jul0516_SP_UK


Product List


Shop Now button-001Join my team button-001

To purchase any of the items featured in my projects please use the links above. To join my team of Stampin’ Friends select ‘Join My Team’ or send me a message!

Please support StampinByHannah, and join my Code Club, by using the Hostess code featured in the top right hand of my blog. For orders of over £150 please do not use this code, as you are entitled to your own Hostess benefits!

Sign up to my newsletter here – http://eepurl.com/2if59

Hannah McCurley

Stampin’ Up! UK Independent Demonstrator

Make It Monday | Customer Thank You Gifts!

Make It Monday featuring Fruit Stand Designer Series Paper from Stampin' Up! UK for Summer Customer Thank You Gifts

Make It Monday with Stampin' Up!

Hello! Welcome to Make It Monday, the day of the week I release an awesome new video tutorial for you lovely people! Yay!

I am so excited about today’s post, mainly because I’m hoping that the first batch of these have arrived with the lovely people that shopped with me last month, but also it’s my 1st wedding anniversary today! I’m off to Newcastle for the day with my lovely husband who surprised me a few weeks ago by getting tickets for Chicago the Musical for tonight! 😀

Right, so what have I got for you today? Customer Thank You gifts!

Make It Monday featuring Fruit Stand Designer Series Paper from Stampin' Up! UK for Summer Customer Thank You Gifts

These super cute envelopes each contain a wrapped tea bag! I took delivery of these teabags a few weeks ago, and the smell that filled my office when I opened the box was delightful, so I’m really hoping that you enjoy them as much I as I did!

So far I have two different styles of these, but I can see me making a whole heap of these over the coming weeks and months, using different Designer Series Papers, stamps and colours of card stock! The one with the pears uses the Fruit Stand Designer Series Paper while the other is the Affectionately Yours Speciality DSP.

They are so easy to make with the Envelope Punch Board. I really don’t use this fabulous tool as much as I should! super handy for those awkward sized cards where a standard envelope just wont do.

Summer Customer Thank You Gifts Teanbag envelopes Make it Monday Video tutorial using Stampin' Up! UK Designer Series Paper

Measurements:

Designer Series Paper – 5 3/4 x 5 3/4 – I’m sticking with Imperial Measurements for this one, its just easier on the EBP!

Make your first punch and score at 2 5/8″ and then follow the instructions on the board, super simple!

Card stock – 1″ x 7″ for the belly band, plus a few scraps for the punching.


Product List


Shop Now button-001Join my team button-001

To purchase any of the items featured in my projects please use the links above. To join my team of Stampin’ Friends select ‘Join My Team’ or send me a message!

Please support StampinByHannah, and join my Code Club, by using the Hostess code featured in the top right hand of my blog. For orders of over £150 please do not use this code, as you are entitled to your own Hostess benefits!

Sign up to my newsletter here – http://eepurl.com/2if59

Hannah McCurley

Stampin’ Up! UK Independent Demonstrator

A Fruity Thank you….

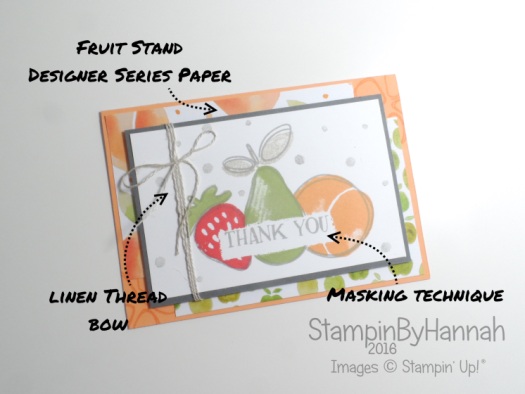
Simple Thank You card featuring Fresh Fruit from Stampin' Up! UK

Hey folks, sorry for the lack of a Make It Monday this week, but the last few weeks have been totally crazy here! For a bit of back story, I’m a nurse, but I have recently changed jobs (for the 4th time in 7 months) and am now in a management role (which I am absolutely LOVING!) but I’m working some crazy long shifts over the summer and its not leaving me a whole heap of time for you guys – so August might be a quiet affair around here; however, I’m not going anywhere, my shop is open 24/7 as always and I am always here to answer any questions you may have, just understand it might take me a couple of hours to get back to you. Right, thats enough of that, lets get on with a card shall we?!

Fresh Fruit Thank you card using Stampin' Up! UK products

This card is super simple to put together, even though it looks complex. The card base is in Peekaboo Peach, and is stamped in Peekaboo Peach on the corners. I’m loving this Designer Series Paper too, very fresh and summery, those apples are so cute!

Simple Thank You card featuring Fresh Fruit from Stampin' Up! UK

I’ve been playing with masking again on this card, I stamped the Thank You first, and then stamped the fruits over the top in Watermelon Wonder, Pear Pizzazz, and Peekaboo Peach with Smoky Slate outlines and dots.

My Online Card Class using this stamp set closes at 9PM tonight! I am so excited about getting this one out to you lovely people, my plan is to get it out to you over the weekend, so hopefully by this time next week you’ll be making fabulous cards like this one!


Fresh Fruit From Stampin' Up! Online Card Class from StampinByHannah


Product List


Shop Now button-001Join my team button-001

To purchase any of the items featured in my projects please use the links above. To join my team of Stampin’ Friends select ‘Join My Team’ or send me a message!

Please support StampinByHannah, and join my Code Club, by using the Hostess code featured in the top right hand of my blog. For orders of over £150 please do not use this code, as you are entitled to your own Hostess benefits!

Sign up to my newsletter here – http://eepurl.com/2if59

Hannah McCurley

Stampin’ Up! UK Independent Demonstrator

Love and Affection Birthday Card

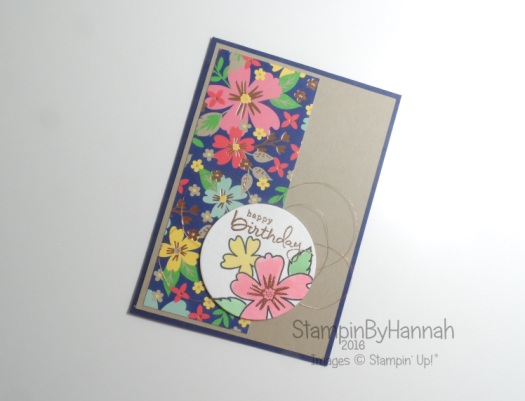
Birthday card using Love and Affection from Stampin' Up! UK

Ok, so some of my email subscribers may have already seen this blog post as it went live on Saturday morning as part of the Simply Sketched Saturday Challenge Blog Hop, however at the time of it going live I was sat in the middle of a field camping with my family and wasn’t able to deal with an issue. So, instead I thought I would post it this evening. If you would like to see what the other ladies made with this fab sketch you can hop from Anna’s blog HERE!
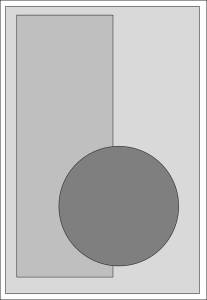
Simply Sketched Saturday Challenge Sketch June 2016This months sketch is brought to us by the fabulous Keren Howell from Tuppence Coloured. I cannot wait to get home and see what the girls have done with it!
Birthday card using Love and Affection from Stampin' Up! UK

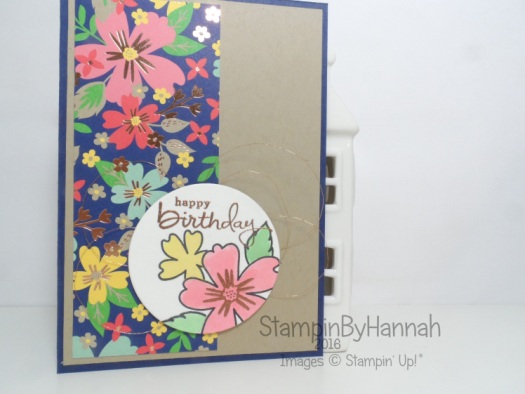
I’ve been using the Love and Affection stamp set and the Affectionately Yours Speciality Designer Series Paper a lot this month as it has featured as my Stamp of the Month. I’m still loving the colour combination in the papers and the gorgeous flowers in the stamp set.

Anyone has visits my blog on a regular basis knows that I’m a bit of a watercolour addict (although I haven’t done any of a little bit, too distracted by shiny new stamps!) and so they won’t be too shocked to find that I have watercolored the flowers and leaves on this card

Simply Sketched Saturday Challenge Love and Affection Birthday Card Stampin' Up! UkThe Designer Series Paper features flowers in Flirty Flamingo and Daffodil Delight, so I have mirrored that on my piece, and added some leaves in Cucumber Crush. The Designer Series Paper also features some gorgeous copper accents, which I have also picked out on my card with some loops of the stunning new copper metallic thread and some copper heat embossing.

The sentiment, as it goes, isn’t from the Love and Affection stamp set, but is from Endless Birthday Wishes – I am a sucker for a pretty font, and I love the combination of these two, the cute little happy, and the swirly birthday. So pretty.


Love and Affection Online Card Class using Stampin' Up! UK Products


Product List


Shop Now button-001Join my team button-001

To purchase any of the items featured in my projects please use the links above. To join my team of Stampin’ Friends select ‘Join My Team’ or send me a message!

Please support StampinByHannah, and join my Code Club, by using the Hostess code featured in the top right hand of my blog. For orders of over £150 please do not use this code, as you are entitled to your own Hostess benefits!

Sign up to my newsletter here – http://eepurl.com/2if59

Hannah McCurley

Stampin’ Up! UK Independent Demonstrator