Christmas Chocolate Treat Bags!

Another 3D project for you today! I have been LOVING making treat bags and gift packaging recently. I have made a whole heap of them for people at work!

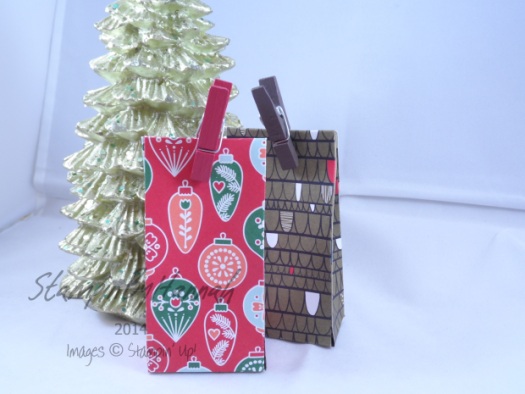
Stampin' Up! UK Chocolate Treat bags for Christmas


These bags are so cute! The original (the back one) uses the Santa and Co. DSP, while the other uses Nordic Noel, and both the bags are held closed with pegs from the Tag a Bag Accessory Kit!

Measurements –

DSP – 6 x 6″ (15.2 x 15.2cm)

Score the 1st side at – 1, 2 3/4, 3 3/4, and 5 1/2″ ( 2.5, 7, 9.5, 14 cm)

Score the 2nd side at – 1 and 4 1/2″ (2.5 and 11.5 cm)


Hannah Wilks

Stampin’ Up! UK Independent Demonstrator

If you like the project, or any of the products used, would like a catalogue, or to join my team, please contact me, or click on the ‘Shop NOW’ button at the top of the page. You can also find me on Twitter, Facebook, YouTube, Google+, About.me, and Tumblr (Links in the sidebar)

Sign up to our newsletter here – http://eepurl.com/2if59

Thank you for stopping by www.www.stampinbyhannah.co.uk today

x
Christmas Baubles!

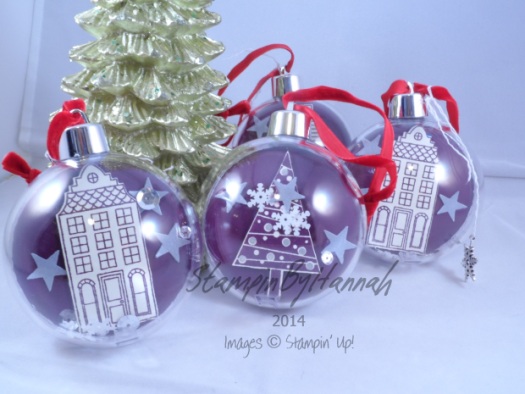
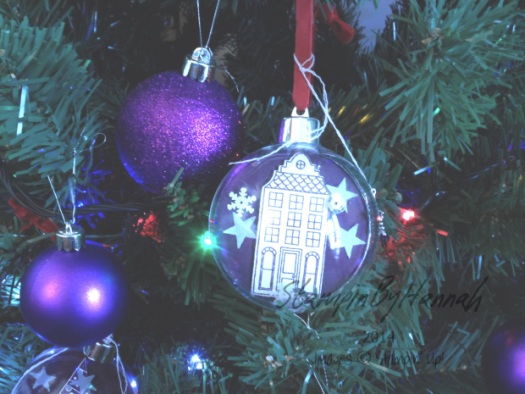
I love Christmas (can you tell!) and one of my absolute favourite things is to customise my Christmas decorations. Each year I add something crafty to my home. A couple of years ago I made my own Christmas wreath, but this year I found some Baubles in Home Bargains perfect for customising!

Stampin' Up! UK Christmas Baubles


These baubles (£3.99 for 4) are designed for putting your families photos in, but they are also great for using with  scraps of cardstock and stamps!

My Christmas Tree has a colour scheme (yes, I’m one of those people, it has to match AND I’ll know if you moved something on it!), and for the last couple of years my Tree has been covered in Purple and Silver baubles (no other ornaments need bother!). So, when it came time to make my bauble inserts there was only one colour for me! Blackberry Bliss!

Unfortunately, when I measured the bauble inserts that came with the baubles, the piece needed was 2 and 5/8″ (a size Stampin’ Up don’t have in a punch), so I used my electronic die cutter to cut the circles. The stamps I used are Holiday Home (and the matching Framelits), and Festival of Trees.

They look awesome on my tree!

Christmas Tree


Hannah Wilks

Stampin’ Up! UK Independent Demonstrator

If you like the project, or any of the products used, would like a catalogue, or to join my team, please contact me, or click on the ‘Shop NOW’ button at the top of the page. You can also find me on Twitter, Facebook, YouTube, Google+, About.me, and Tumblr (Links in the sidebar)

Sign up to our newsletter here – http://eepurl.com/2if59

Thank you for stopping by www.www.stampinbyhannah.co.uk today

x
Chocolate Money Wallet

I love chocolate! I mean, there really is a reason why I am overweight, and right now, its Christmas and chocolate is everywhere! (I WILL loose weight in the new year – have to fit into that wedding dress! eeek!)

I found chocolate coins and notes in Tesco’s last week, and just had to make a project for them! There are loads of tutorials for chocolate coins, but the notes?! well, I’d never seen them before!

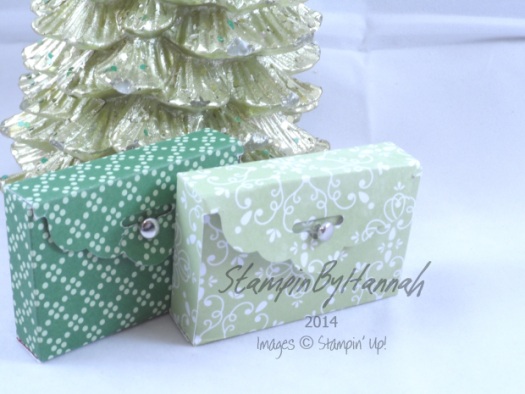
Stampin' Up! UK chocolate money wallet

These are just so tiny!

The original uses the Trim the Tree DSP, but the one in front is the gorgeous All is Calm paper (so sad to see it leave us soon!), and its that Scalloped Tag Topper Punch again!


Measurements:

Cardstock = 6 x 3 1/2″ (9 x 15.5 cm) (the metric version is slightly bigger)

Score on the long side at: 1/2, 2 3/4, 3 1/4 and 5 1/2″ (1.5, 7, 8.2, 14 cm)

Score on the short side at: 1/2, 2 and 2 1/2″ (1.5, 5, 6.5 cm)


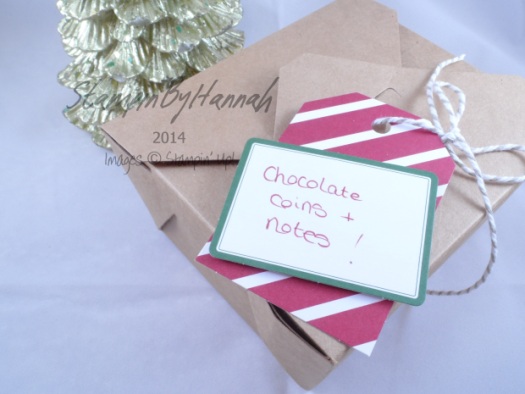
Before I go today, it just had to pop in a picture of the box I used to store these chocolate in (that was before they were all eaten of course!)

Stampin' Up! UK chocolate box takeout boxIts one of the lovely Takeout boxes, with a tag made from the Under the Tree tag a bag accessory kit!

Lovely!


Hannah Wilks

Stampin’ Up! UK Independent Demonstrator

If you like the project, or any of the products used, would like a catalogue, or to join my team, please contact me, or click on the ‘Shop NOW’ button at the top of the page. You can also find me on Twitter, Facebook, YouTube, Google+, About.me, and Tumblr (Links in the sidebar)

Sign up to our newsletter here – http://eepurl.com/2if59

Thank you for stopping by www.www.stampinbyhannah.co.uk today

x
 

Christmas Wishes Pocket Project

I do love a cute Christmas make – and this would be great to make for you children and grandchildren to remember why they love Christmas, why Christmas is so special, or to teach them a little bit about the Christmas story.

Before you watch the video, I recorded this a couple of weeks ago (and I forgot all about it!) and so I’m sorry for a waffle at the beginning about the Good Greetings offer which has sadly now ended.


I found a similar looking item in my local Craft Superstore, however, I thought I could totally make something similar at home.

Stampin' Up! UK Christmas Wishes Pocket

The measurements:

Cardstock = 8 x 4 1/2″ (20.4 x 11.5 cm)

A piece of cardstock that measures 3 1/4″ x 3 1/4″ (9.5 x 9.5 cm)

and 10 stripes that measure 3/4″ x 5″ (2 x 12.7 cm)

Score the short side at – 1/2″ and 4″ ( 0.6 and 10.2cm)

Score the short side at – 4 1/2″ (11.5cm)

Now, I think this would be a really cute idea to add to your Project Life or December Daily! but the pocket is too big!

So, to make a pocket which fits your project life: You need a piece of cardstock that measure = 6 1/2 x 4″ (16.5 x 10.2 cm), score the short side at 1/2″ and 3 1/2″ (1.2cm and 9cm), and the long side at 4″ (10.2 cm)


Hannah Wilks

Stampin’ Up! UK Independent Demonstrator

If you like the project, or any of the products used, would like a catalogue, or to join my team, please contact me, or click on the ‘Shop NOW’ button at the top of the page. You can also find me on Twitter, Facebook, YouTube, Google+, About.me, and Tumblr (Links in the sidebar)

Sign up to our newsletter here – http://eepurl.com/2if59

Thank you for stopping by www.www.stampinbyhannah.co.uk today

x
Gift packaging options from Stampin’ Up! UK

Stampin' Up! UK Gift Packaging Options

Christmas is coming! eek! I’m sure your all like me and completely disorganised when it comes to Christmas gifts! I try really hard to find the perfect present for each person, but most of the time I run out of time and people end up with gift cards and novelty items! This year I’m really hoping to be better, I’m just starting to write my lists, and organise my gift wrap, tags, and cards.

I thought I would take you on a little tour of the gift packaging items available from Stampin’ Up! this year, both from the annual and seasonal catalogues.

As well as the items I mentioned, there are also some Dies available to create your own boxes and gift card pockets, as well as the Gift Box Punch Board (and Envelope Punch Board) which make gift wrapping super easy and loads of fun! Who knew the wrapping could be as much fun as the present inside!


Hannah Wilks

Stampin’ Up! UK Independent Demonstrator

If you like the project, or any of the products used, would like a catalogue, or to join my team, please contact me, or click on the ‘Shop NOW’ button at the top of the page. You can also find me on Twitter, Facebook, YouTube, Google+, About.me, and Tumblr (Links in the sidebar)

Thank you for stopping by www.www.stampinbyhannah.co.uk today

x
 

Fancy Fold Friday – Halloween Card in a Box!

Happy Halloween!

and Happy Fancy Fold Friday!

This week I thought I would knock things up a gear and give you a card in a box!

I love these cards! When I’ve made them for people, everyone is always stunned by them!

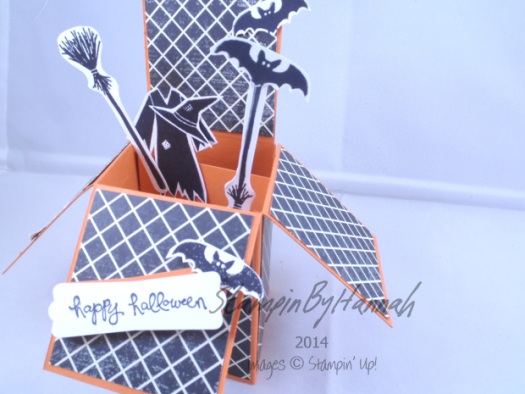
Stampin' Up! UK Card in a Box Halloween

Isnt it fab!

Ok, So the measurements for this fab project:

Cardstock = 9 x 5 inches (23 x 13 cm) and two pieces measuring 3 x 2″ (8 x 5cm)

DSP = 4 3/4 x 1 7/8″ (12 x 4 1/2cm), 4 pieces that measure 2 x 2 1/8″ (5 x 5.2cm) and 3 pieces that measure 2 x 2 5/8″ (5 x 6.5cm)

Score the Cardstock on the short edge at 2 3/4″ (7cm) and on the long side at 2 1/8″, 4 1/4″, 6 3/8″ and 8 1/2″ (thats every 5.2cm!)

I’ve used Tangelo Twist (I LOVE that orange!) and Flashback DSP for this box, and have fussy cut the images from the Tee-Hee-Hee stamp set for the embellishments! (how cute are those bats!) All the stamping is done using Staz-on Ink

Check the video for full instructions!


DISCLAIMER – I work in Inches, all metric measurements are approximate!

The sentiment used on this card is from Good Greetings – which is still available for FREE with an qualifying order placed before the end of October!

Hannah Wilks

Stampin’ Up! UK Independent Demonstrator

If you like the project, or any of the products used, would like a catalogue, or to join my team, please contact me, or click on the ‘Shop NOW’ button at the top of the page. You can also find me on Twitter, Facebook, YouTube, Google+, About.me, and Tumblr (Links in the sidebar)

Thank you for stopping by www.www.stampinbyhannah.co.uk today

x

Halloween Treat Bags!

Well, its Halloween week and I have a few spooky projects for you!

Today, I have a really cute treat bag – great for Halloween, Party favours, or just a simple thanks!

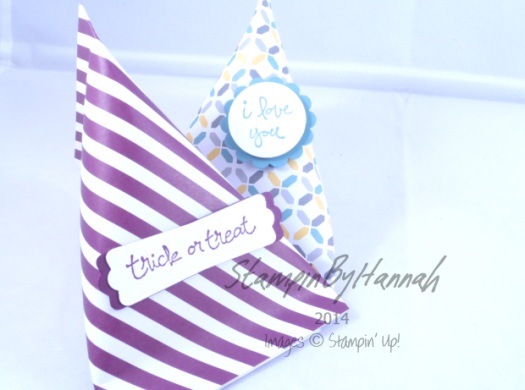
Stampin' Up! UK Halloween Treat sweet bags

They are super simple too!

These ones use the Moonlight DSP paper stack! and require not cutting or scoring! Awesome!

The measurements are: 6.5″ x 4.5″ (16.5 x 11.5cm)

Check out the video for full instructions


Hannah Wilks

Stampin’ Up! UK Independent Demonstrator

If you like the project, or any of the products used, would like a catalogue, or to join my team, please contact me, or click on the ‘Shop NOW’ button at the top of the page. You can also find me on Twitter, Facebook, YouTube, Google+, About.me, and Tumblr (Links in the sidebar)

Thank you for stopping by www.www.stampinbyhannah.co.uk today

x


Halloween Cards and Box Project

So, its nearly Halloween, as I have previously mentioned, its not really something I celebrate – but these papers and stamps were just so adorable I had to make a project with them!

The Stampin’ Up! Autumn Winter Catalogue for this year has a few Halloween themed stamp sets, including ones with matching framelits as well as really cute monsters, but I’m sucker for a sweet witch (I think its got something to do with my favourite book as a child – the worst witch!) so these cards feature Tee-Hee-Hee. The Motley Monsters DSP features Basic Black, Burmuda Bay, Crushed Curry, Sahara Sand, Tangerine Tango, and Whisper White – for a super bright and fun colour pallet that I am so going to re-visit time and again and again.

Stampin Up UK Motley Monsters Halloween


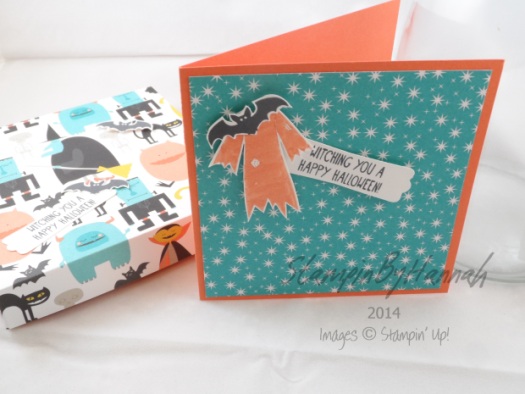
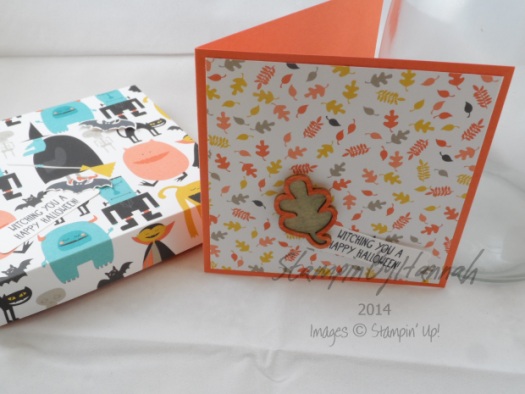
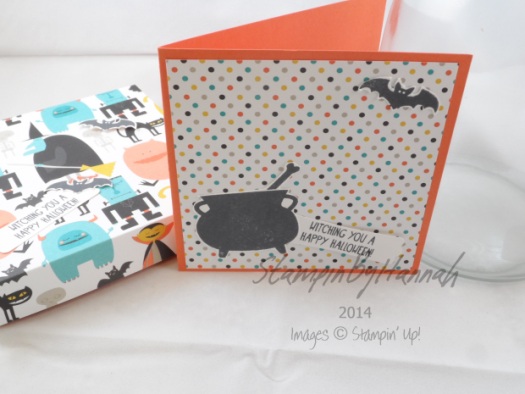
I made 4 cards, all in 4×4 inch size, using Tangerine Tango as the card base, and a 3.75 x 3.75″ piece of Motley Monsters DSP as the card front.

Stampin Up UK Motley Monsters Halloween

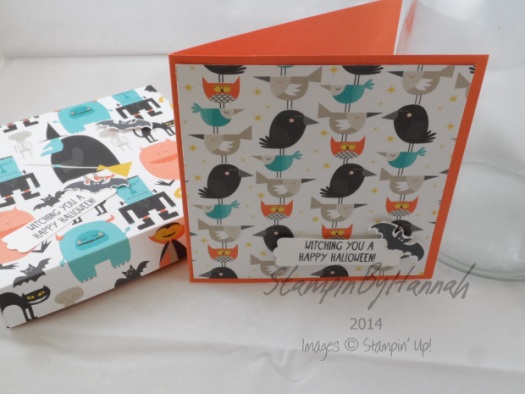
Each of the cards is subtly different, using a different piece of the paper, a different stamp, or embellishment.

Stampin Up UK Motley Monsters Halloween

I love wooden elements! These leaves are so super cute! I used two of the Autumn Wooden Elements here, colouring the outline element with my Tangerine Tango Stampin’ Write Marker

Stampin Up UK Motley Monsters Halloween All the cards use the same sentiment from the Tee-Hee-Hee stamp set, and all the stamped images are fussy cut (such a shame there arent any framelits for this stamp set 🙁 )

I also used the same cardstock and DSP to create a box to gift these cards and their envelope together

I loved making this project, you never know, maybe I’ll do some more Halloween crafting next year!


Hannah Wilks

Stampin’ Up! UK Independent Demonstrator

If you like the project, or any of the products used, would like a catalogue, or to join my team, please contact me, or click on the ‘Shop NOW’ button at the top of the page. You can also find me on Twitter, Facebook, YouTube, Google+, About.me, and Tumblr (Links in the sidebar)

Thank you for stopping by www.www.stampinbyhannah.co.uk today

x

How To: make your own desk bin!

What is the most annoying thing about craft? all those little bits of paper; the backs of dimentionals, the red carrier tape of sticky strip, little bits of off cuts… and they all float around your desk, making a mess, and getting in the way!

That is until now!

Make your own desk bin, from an old jar, but… please make it pretty!

How to make a desk bin

I used an old jar (think it was lemon curd if your that curious!). First, measure around your jar. use this measurement to measure a length of DSP, but add an inch to give an overlap. The best way I have found of attaching your DSP is with sticky strip – I didnt take the label off my jar, instead it make it easier to line up your DSP to ensure its straight around your bin. Then, add some ribbon (measured in the same way) also with sticky strip. I had to add some more bling! before it looked finished – the sentiment is a stamp from Remember This (one of the Project Life by Stampin’ Up! sets), stamped in Pool Party (to match the DSP), and then I’ve added hearts using the Sweetheart and Itty Bitty Accents punches, and some jewels I had laying around!

Its so damn cute, and a great addition to any craft desk

x


Hannah Wilks

Stampin’ Up! UK Independent Demonstrator

If you like the project, or any of the products used, would like a catalogue, or to join my team, please contact me, or click on the ‘Shop NOW’ button at the top of the page. You can also find me on Twitter, Facebook, YouTube, Google+, About.me, and Tumblr (Links in the sidebar)

Thank you for stopping by www.www.stampinbyhannah.co.uk today

x


Sticky Note Holder

Here we are, a lovely little sticky note holder, a quick and easy project for a friday evening!

Sticky note holder stampin up

This project is super simple, using one piece of cardstock and a bit of DSP! I Love the new In Colours, Blackberry Bliss inparticular, and the MoonLight DSP Stack shows it off so well I had to use it too….

The trick is to measure your sticky notes!

I’ve attempted to explain in the video, however, I do like written instructions for fiddly projects like this….

You need to measure your notes, across the width and height (this will give you a square measurement, the front of your holder), and then measure the depth of the pad. Then, you need to take the height of the front and the height of the back (hopefully this is the same number!) and add them together, along with the depth. I’m hoping I’m making sense here ….. maybe time for a diagram.

sticky note measurements

So, to get the lenght of the cardstock you need: 3″ for the font, 3″ for the back, and 5/16″ for the depth. Now, if you can accurately cut to 5/16″ great, I cant, so I’ve cut mine to 3/8″. This gives me a piece of Cardstock 6 3/8″ by 3″.

The DSP is a 1/4″ shorter and narrower than the front of your sticky notes eg: 3×3″ notes, 2 3/4″x2 3/4″ DSP

The rest of the cover is decorated with petite petals cut from that gorgeous Blackberry Bliss, and a sentiment from A Dozen Thoughts, punched with the Modern Label Punch.


Hannah Wilks

Stampin’ Up! UK Independent Demonstrator

If you like the project, or any of the products used, would like a catalogue, or to join my team, please contact me, or click on the ‘Shop NOW’ button at the top of the page. You can also find me on Twitter, Facebook, YouTube, Google+, About.me, and Tumblr (Links in the sidebar)

Thank you for stopping by www.www.stampinbyhannah.co.uk today

x