3D Friday | Giant Milk Carton

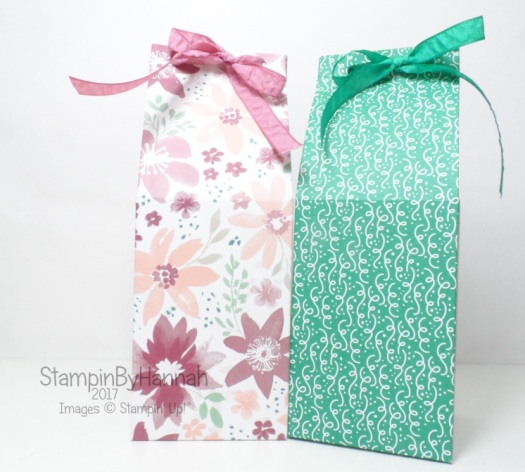
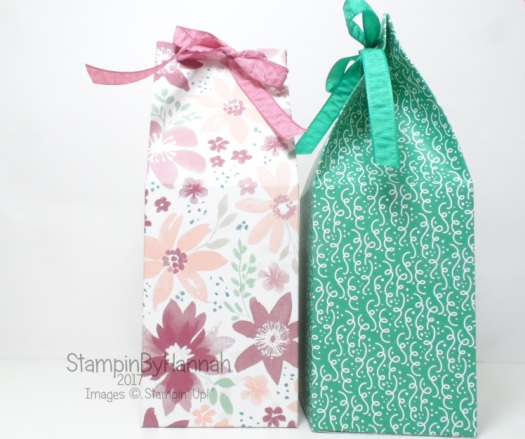
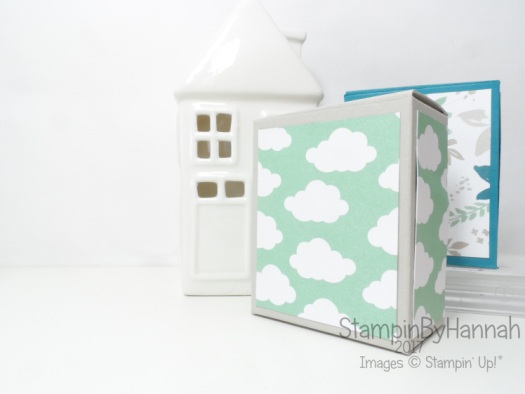
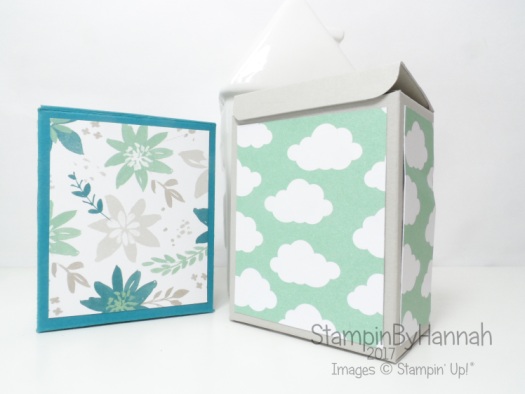
3D Friday Giant Milk Carton Video Tutorial using Designer Series Paper from Stampin' Up!

I have another quick and easy video for you today, seriously, this video is less that 10 minutes long! but I think these would be great for holding some cute Easter treats….

3D Friday Giant Milk Carton Video Tutorial using Designer Series Paper from Stampin' Up!

Aren’t they fab! I’m sure that if you made these out of card stock rather than Designer Series Paper you could use them for candles, or hand creams, or bath bombs …. although my brain always goes to chocolates!

Measurements:

Designer Series Paper; 10 1/2 x 12″ (26 x 30 cm)

Score on the long side at – 2 3/4, 5 1/2, 8 1/4 ad 11″ (7, 14, 21, and 28 cm)

Score on the short side at – 2 3/4, 7 and 9 3/4″ (7, 18 and 24 cm)

3D Friday Giant Milk Carton Video Tutorial using Designer Series Paper from Stampin' Up!

The green bag uses the Party Animal Designer Series Paper, which you could choose as your FREE item during Sale-a-bration (which ends today at 11PM!) so grab your pack now! I have LOVED Sale-a-bration this year, and am so sad that it is over! However, I am off to Amsterdam next week for Stampin’ Up! OnStage so I can’t be sad for too long, particularly as I am about to get a sneak peak of the new Annual Catalogue!!! So Exciting!!!


Sale-a-bration Random Acts of Kindness


Product List


Shop Stampin' Up! UK Teesside North East Stockton on Tees

Joining Stampin' Up! UK Starter Kit

To purchase any of the items featured in my projects please use the links above. To join my team of Stampin’ Friends select ‘Join My Team’ or send me a message!

Please support StampinByHannah, and enter G2CDA7EA. For orders of over £150 please do not use this code, as you are entitled to your own Hostess benefits!

Sign up to my newsletter here – http://eepurl.com/2if59

Hannah McCurley

Stampin’ Up! UK Independent Demonstrator

3D Friday | Teabag Box Video Tutorial

Cute gift box video tutorial using Blooms and Bliss floral patterned paper from Stampin' Up!

Yay! back with a video… even if it was the one that was supposed to go live last Friday!

3D Friday video tutorial cute giftbox for teabags candles sweeties chocolate using Carried away designer series paper from Stampin' Up!

I love a cute gift box, but I love them more when they are simple to make. This one holds 4 individually wrapped tea bags, but you could put any variety of things in this one; I’m thinking cute candles, mini bath bombs, sweeties, handmade chocolates….. the list goes on.

Measurements:

Card stock; 8 1/2 x 6 1/2″ (23 x 17 cm)

Score on the long side at 1 1/2, 4, 5 1/2, and 8″ (4, 10.5, 14.5, and 21 cm)

Score on the short side at 1 1/2, 4 1/2, and 6″ (4, 12 and 16 cm)

Designer Series Paper: 2 pieces that measure 2 1/4 x 2 3/4″ (6 x 7.5 cm) and 2 pieces that measure 1 1/2 x 2 3/4″ (3.5 x 7.5 cm)

Cute gift box video tutorial using Blooms and Bliss floral patterned paper from Stampin' Up!

Ok, that’s all from me today folks! I hope you have a great Friday and an even better weekend!


Product List


Shop Stampin' Up! UK Teesside North East Stockton on Tees

Joining Stampin' Up! UK Starter Kit

To purchase any of the items featured in my projects please use the links above. To join my team of Stampin’ Friends select ‘Join My Team’ or send me a message!

Please support StampinByHannah, and enter G2CDA7EA. For orders of over £150 please do not use this code, as you are entitled to your own Hostess benefits!

Sign up to my newsletter here – http://eepurl.com/2if59

Hannah McCurley

Stampin’ Up! UK Independent Demonstrator

Simply Sketched Saturday Challenge | February 2017

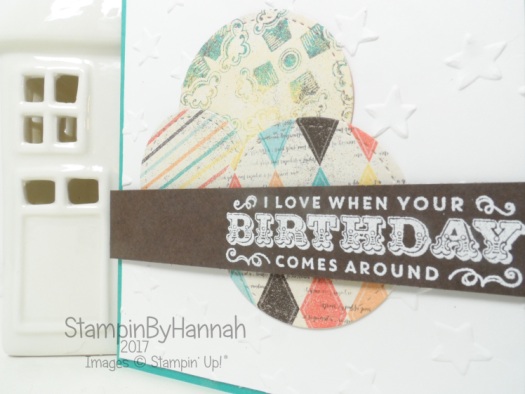
Simply Sketched Saturday Challenge Birthday Card using Cupcakes and Carousels from Stampin' Up! UK

Stampin' Up! Sketch Challenge

Oh I am so excited to be back hopping with my girls again this week! We took January off, things were just crazy busy for all of us, but we are BACK this week with a fabulous sketch from the lovely Sam Charlton!

Simply Sketched Saturday Challenge Stampin' Up!

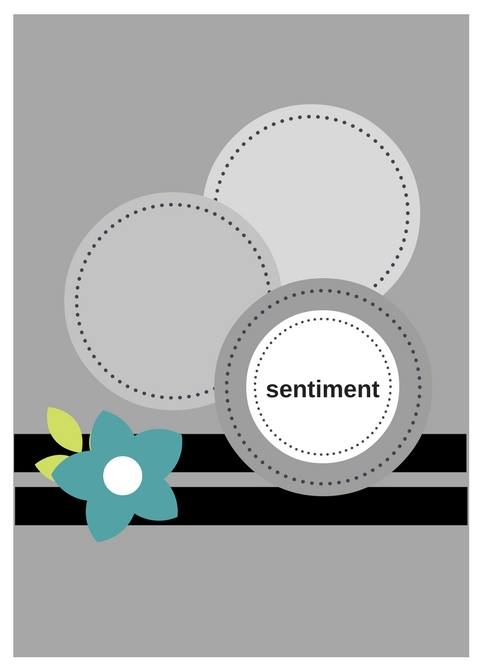
I knew exactly were I wanted to go with this sketch as soon as I saw it! Unusual for me, usually the girls set us a challenge…but this sketch is just lovely, although I have left off a couple of the elements. That’s one of the things I love about creating with a sketch, selecting the bits you love and changing the ones you’re not such a fan of!

Simply Sketched Saturday Challenge Birthday Card using Cupcakes and Carousels from Stampin' Up! UK

I haven’t played with the Cupcakes and Carousels paper for a few months. This was one of the items I got to play with early as a Display Stamper for OnStage Local back in November, and I think I sort of over-dosed myself with it… and bit of time and separation later and I am back in love with it again, and paired with this sentiment from Carousel Birthday this card was almost finished!

Simply Sketched Saturday Challenge Cupcakes and Carousels Birthday Card using Carousel Birthday from Stampin' Up! UK

but there was something missing, and I couldn’t stick anything down, until I had reached for the Lucky Stars embossing folder…and my card as done.

Simply Sketched Next

Simply Sketched Previous


Question of the day: What do you do reach for when you card needs an extra something?

I will often grab an embossing folder, Enamel shapes, or sometimes the Gorgeous Grunge stamp set!


Product List


Shop Stampin' Up! UK Teesside North East Stockton on Tees

Joining Stampin' Up! UK Starter Kit

To purchase any of the items featured in my projects please use the links above. To join my team of Stampin’ Friends select ‘Join My Team’ or send me a message!

Please support StampinByHannah, and enter MK42UXHG. For orders of over £150 please do not use this code, as you are entitled to your own Hostess benefits!

Sign up to my newsletter here – http://eepurl.com/2if59

Hannah McCurley

Stampin’ Up! UK Independent Demonstrator

3D Friday | 5 Sided Twist 'n' Close Box

3D Friday Video Tutorial Pootles inspired Twist and close box using Stampin' Up! UK Products

3d-friday

Welcome to a brand new series of blog posts and videos! I am so looking forward to this… although I am a little nervous!… 3D items aren’t always my friends, however I am giving it a go… and there might be a couple of Fancy Fold Cards from time to time too…but this week I thought we would kick off with something a bit special (and inspired by my friend Sam aka: the 3D queen!)

3D Friday Video Tutorial 5 sided twist and close box using Inside the Lines from Stampin' Up! UK

This adorable little box uses less than half a sheet of A4 card stock, and the measurements mean that you could totally make this using US paper sizes too! I love a cute box, but sometimes getting them closed (and to stay shut) is a bit of a challenge, not with this one… it stays closed all by itself, just by the action of the card stock!

Measurements:

Card stock – 8 x 4 1/2″ (21 x 12 cm)

Score on the long side at 1 1/2, 3, 4 1/2, 6 and 7 1/2″ (4, 8, 12, 16, and 20 cm)

Mark the card stock on the same long side at 3/4, 2 1/4, 3 3/4, 5 1/4 and 6 3/4″ (2, 6, 10, 14 and 18 cm)

Score on the short side at 1 1/2 and 3″ (4 and 8 cm)

Designer Series Paper – 1 x 8″ ( 2.5 x 21 cm)

3D Friday Video Tutorial Pootles inspired Twist and close box using Stampin' Up! UK Products

The Designer Series Paper I have used on this one is FREE! as part of Sale-a-bration… Inside the Lines is designed to be coloured in, but I have to say I am enjoying using it as it is!


Question of the day: What will you make this box for?

I had intended it for lip balm, but actually you could fit loads of different things in here, and I can already see a even smaller version for a posh chocolate!


Product List


Shop Stampin' Up! UK Teesside North East Stockton on Tees

Joining Stampin' Up! UK Starter Kit

To purchase any of the items featured in my projects please use the links above. To join my team of Stampin’ Friends select ‘Join My Team’ or send me a message!

Please support StampinByHannah, and enter MK42UXHG. For orders of over £150 please do not use this code, as you are entitled to your own Hostess benefits!

Sign up to my newsletter here – http://eepurl.com/2if59

Hannah McCurley

Stampin’ Up! UK Independent Demonstrator

Global Design Project #074 | Special Reason for a Sketch

Global Design Project 074 Sketch challenge Special Reason Love Card using Stampin' Up! products

Hello!

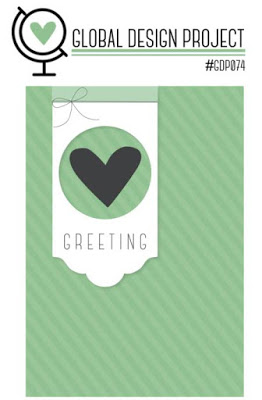
Yes, once again I am playing along with the Global Design Project. I like to get these onto my blog during the first half of the week normally, but this week my scheduling went a bit peculiar and so here we are on a Thursday! This weeks Global Design Project Challenge is a sketch, and a lovely sketch it is too…

gdp074

I am having great fun at the moment playing with the Special Reason bundle … so much so that it is my current Online Card Class! Yay! I have altered the sketch a little, in that I needed to change the shape of the bottom of the banner, but otherwise I have kept fairly true to sketch (unusual for me!)

Once I had cut and shaped the banner, using the Triple Banner Punch, I used one of the dies from the Stylish Stems die set (bundled with Special Reason) to cut this pretty flower. This set of dies is special… it cuts the inside shape of the flower, leaving it inside the cardstock. So, I then cut it again in Pool Party and used the out-line die to cut out the flower. To adhere the two together I sponged the middle of the back of the Pool Party flower with Tombow to give me a bit of wiggle room and allowing me to get both flowers perfectly lined up!

Global Design Project 074 Wedding Love Congratulations Card using Special Reason from Stampin' Up! UK

The stripy background is a regular feature of a GDP sketch,  and I almost re-created it with ink… but I had a lovely delivery of Designer Series Paper this week, and so went with polka dots instead. The Pool Party Designer Series Paper is taken from the Subtles Designer Series Paper stack, a mountain of paper in four generic prints; dots, stripes, script and floral – very pretty. The only other colour here is Tip Top Taupe for the heart and the sentiment.

Global Design Project Love Card using Special Reason from Stampin' Up! UK

Thanks so much for checking out my blog today. If you live in the UK and don’t have a Demonstrator I would LOVE you to order from me, let me know if you want a catalogue and sign up for my latest Online Card Class using the link below


online-card-classes


Product List


Shop Stampin' Up! UK Teesside North East Stockton on Tees

Joining Stampin' Up! UK Starter Kit

To purchase any of the items featured in my projects please use the links above. To join my team of Stampin’ Friends select ‘Join My Team’ or send me a message!

Please support StampinByHannah, and enter MK42UXHG. For orders of over £150 please do not use this code, as you are entitled to your own Hostess benefits!

Sign up to my newsletter here – http://eepurl.com/2if59

Hannah McCurley

Stampin’ Up! UK Independent Demonstrator

Sale-a-bration Wednesday | Inside the Lines with a gorgeous Butterfly

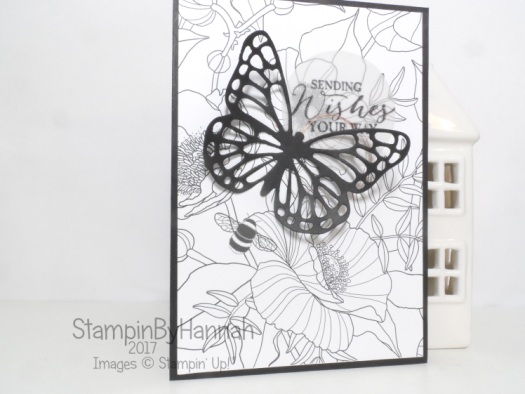
Sale-a-bration 2017 Inside the Lines Designer Series Paper Sending Wishes Card Stampin' Up! UK

Sale-a-bration from Stampin' Up! UK

Oh yes, it is Wednesday… and time to talk some more about Sale-a-bration! oh how I LOVE this sale! It is just awesome!

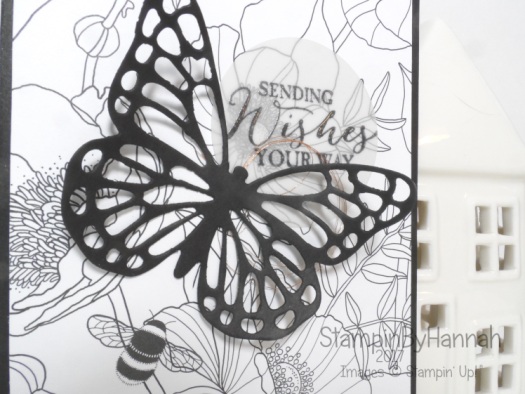
Now, I know that the Inside the Lines Designer Series Paper is totally designed for you to colour in…. but I am loving using it as it is – I will have to have a go at colouring soon though, I’m sure this card would look AMAZING with the paper coloured…..

Sale-a-bration wednesday Sending Wishes card using Inside the Line and Butterfly Basics from Stampin' Up! UK

Did you know that you can get this fabulous Designer Series Paper for FREE? just by spending £45 before the end of March! Isn’t that just so cool, and how often to you get to choose your own free gift…. not often enough!

The stamp set and the die I have used on this card come from the Annual Catalogue, they are firm favourites of mine but haven’t had much use recently. The Butterfly Basics stamp set coordinates perfectly with the Butterflies thinlits dies, and that butterfly is stunning die cut from Basic Black card stock. I have manage a pop of metallic on this card with some loops of Copper Metallic Thread.

Sale-a-bration 2017 Inside the Lines Designer Series Paper Sending Wishes Card Stampin' Up! UK

Did you get chance to check out my Sale-a-bration bundles post from last week? I though I would share it with you again, it shows perfectly what you might choose in order to get one of the fabulous Sale-a-bration items!

How fabulous are those items! I had to put an order in last week (I had run out of Fast Fuse!!!! I know, I couldn’t believe it either!!!) and so choose the gorgeous Advant Garden stamp set… I cannot wait to have a play with it!


Question of the day: What colours would you colour this fabulous paper?

I’m reaching for my watercolour pencils…. so I might do an Old Olive and Melon Mambo combo!


Product List


Shop Stampin' Up! UK Teesside North East Stockton on Tees

Joining Stampin' Up! UK Starter Kit

To purchase any of the items featured in my projects please use the links above. To join my team of Stampin’ Friends select ‘Join My Team’ or send me a message!

Please support StampinByHannah, and enter MK42UXHG. For orders of over £150 please do not use this code, as you are entitled to your own Hostess benefits!

Sign up to my newsletter here – http://eepurl.com/2if59

Hannah McCurley

Stampin’ Up! UK Independent Demonstrator

Make It Monday | Sending Love Hearts …. January Thank You Gifts

Make It Monday Love Hearts Mini Gift Bags January Thank you Valentines using Sending Love Designer Series Paper from Stampin' Up! UK

Make It Monday

My Make It Monday has two parts this week… yes, it carries on into Tuesday! That means that I have videos for you today and tomorrow, Yay! oh, and something special coming on Friday too.

Each month, at the end of the month, I send every single person who has shopped with me a little something to say ‘Thanks’, I have changed up my gift packs for 2017 and they now include a hand-stamped card, a treat and my monthly update. I am really enjoying putting these together, and cannot wait to get started on my February ones!

Make It Monday Video Tutorial Valentines Love Hearts Gifts using Sending Love Designer Series Paper from Stampin' Up! UK

These cute mini gift bags contained packs of Mini Love Hearts sweeties. They use a tiny piece of the gorgeous Sending Love Designer Series Paper from the Spring Summer Catalogue. Now, I’m sure you are thinking, ‘Yes Han, its lovely, but its almost Valentines day, and I am never going to use all that paper!’ well, I challenge you to grab a pack, because I can be sure that you will use this paper for all sorts of occasions. One side of each piece is love-themed, but the other is more of a generic print; dots, stripes etc. and even the paper that I have used today could be used outside of Valentines season, its just so pretty. I can actually see some of the patterns used a Christmas… Seriously, a pack of paper for all year!

Measurements:

Designer Series Paper – 14 x 7.5 cm (5 1/2 x 3″)

Score on the long side at 2, 6, 8 and 12 cm (3/4, 2 3/8, 3 1/8, 4 3/4″)

Score on the short side at 2 cm (3/4″)

Make It Monday Love Hearts Mini Gift Bags January Thank you Valentines using Sending Love Designer Series Paper from Stampin' Up! UKThe sentiment is taken from the So In Love stamp set (that comes bundled with the most gorgeous thinlits dies!) and is stamped in Real Red, and punched out with my favourite punches. You can find the details of these in the product links below

All of the ones that I sent out were closed with a bow, I think this is my favourite way of closing cute bags like this one… even though I am definitely bow challenged!


Have you checked out my Sunday Colour Splash Challenge? This week we are creating cards with a fabulous Colour Combination…. you can check it out and enter HERE!


Product List


Shop Stampin' Up! UK Teesside North East Stockton on Tees

Joining Stampin' Up! UK Starter Kit

To purchase any of the items featured in my projects please use the links above. To join my team of Stampin’ Friends select ‘Join My Team’ or send me a message!

Please support StampinByHannah, and enter MK42UXHG. For orders of over £150 please do not use this code, as you are entitled to your own Hostess benefits!

Sign up to my newsletter here – http://eepurl.com/2if59

Hannah McCurley

Stampin’ Up! UK Independent Demonstrator

Bonus Class | Cool Treats!

I am super excited to be releasing a special BONUS card class this week! Did you know, I release 2 Online Card Classes every month? You can find all the details for my current class over on the Online Card Class Page

395b88af-86a2-42bd-8dc1-7ea11519a1b5

But this week I am releasing a special EXTRA class, featuring the Cool Treats suite. This class makes 8 fabulous cards, 2 of each of 4 designs PLUS envelopes!

Suggested Extras

Class costs £49, plus postage and packing. All my classes come complete with all the cards and embellishments you will need to complete your projects, as well as video instructions.

[contact-form to=’[email protected]’ subject=’Cool Treats Class’][contact-field label=’Name’ type=’name’ required=’1’/][contact-field label=’Email’ type=’email’ required=’1’/][contact-field label=’Address’ type=’textarea’ required=’1’/][contact-field label=’Do you want a copy of the current Stampin%26#039; Up! catalogue to?’ type=’select’ options=’Yes,No’/][/contact-form]


Shop Stampin' Up! UK Teesside North East Stockton on Tees

Joining Stampin' Up! UK Starter Kit

To purchase any of the items featured in my projects please use the links above. To join my team of Stampin’ Friends select ‘Join My Team’ or send me a message!

Please support StampinByHannah, and enter MK42UXHG. For orders of over £150 please do not use this code, as you are entitled to your own Hostess benefits!

Sign up to my newsletter here – http://eepurl.com/2if59

Hannah McCurley

Stampin’ Up! UK Independent Demonstrator

Make It Monday | Guys Birthday Card using the Nailed It Bundle

Make It Monday Male Birthday Card using Nailed It From Stampin' Up! UK

Make It Monday

Welcome back to Make It Monday! I LOVE making these videos, I hope you enjoy watching them too. This week I thought I would share a male birthday card I made recently for my Father-In-Law.

Make It Monday Male Birthday Card using Nailed It From Stampin' Up! UK

Male birthday cards can be tricky, especially when you’re like me and most of your stamp collection seams to be flowers or butterflies! I prefer a ‘pretty’ style, and so guy cards can be a challenge, however, Stampin’ Up! have made guy cards super easy with the Nailed It bundle. Not only does it include a selection of tool (no I cannot name them, my husband will be very disappointed in me!) but handy extras like screws, and a great hexagon. I LOVE Stampin’ Up! bundles, they come with the stamp and the coordinating die set, and when you buy the bundle (rather than the separate items) you save 10% ! Win Win!

The Nailed It bundle also coordinates with some other great items in the Spring Summer catalogue; I am having heaps of fun with the Hexagon Dynamic Embossing folder, and I might have to grab a second pack of the Urban Underground Designer Series Paper! I have recently received a pack of the Urban Underground embellishments too, and I cannot wait to get those on a card!


Question of the Day: What is your favourite method of tackling a Men’s card?

I try and find a theme; tools, cars, or failing that a cool embossing folder and a big sentiment! anything to get back to making pretty cards with flowers and butterflies!


Sale-a-bration from Stampin' Up! UK


Product List


Shop Stampin' Up! UK Teesside North East Stockton on Tees

Joining Stampin' Up! UK Starter Kit

To purchase any of the items featured in my projects please use the links above. To join my team of Stampin’ Friends select ‘Join My Team’ or send me a message!

Please support StampinByHannah, and enter MK42UXHG. For orders of over £150 please do not use this code, as you are entitled to your own Hostess benefits!

Sign up to my newsletter here – http://eepurl.com/2if59

Hannah McCurley

Stampin’ Up! UK Independent Demonstrator

Love Hearts Week | Origami Box

Love Hearts Week Origami Box Video Tutorial using Sending Love Designer Series Paper from Stampin' Up! UK

Love Hearts sweets Video tutorials

Oh my goodness, this box looks really complicated but it is SO easy! The tutorial I found for this was on the Gathering Beauty blog, and I have re-made it using 6 x 6 Designer Series Paper.

Sending Love Designer Series paper Origami Box Stampin' Up! UK

This cute box holds two mini rolls of Love Hearts, but you could make it with any size paper you like (as long as it is square) to hold what ever you like! how cool!

Instructions:

  1. Fold you piece of Designer Series Paper in half, turn and fold in half again. Then unfold and lay with the print you want on the outside, face down.
  2. Fold the bottom edge to meet the halfway mark, rotate and repeat on the opposite side. Unfold and lay flat, you should now see 8 rectangles
  3. Fold the bottom edge to meet the top fold line, rotate and repeat on the opposide side. Unfold and lay flat, you should now see a further 8 smaller rectangles
  4. Fold the top corners to meet the 2 fold line down, and the bottom corners to meet the 2nd fold line up
  5. Rotate your paper so the fold lines are vertical, and turn your paper over so you can now see the print you want on the outside of your box
  6. Fold the bottom edge to meet the halfway mark, rotate and repeat on the opposite side. Then fold the paper edge back
  7. You have now created two flaps, lift one flap, you should see two triangles, open up the triangle to make a rectangle. Do this on both sides
  8. Turn your paper over again so that the print you want on the outside of the box is face down
  9. You need to bring the flaps you created back over so you can see them. To do this you need to fold so that the edge of the flap meets the edge of the two rectangles that you can currently see (check the video for this bit, it is easier to demonstrate that explain)
  10. To construct the box; raise the flap to create the sides, you should then be able to fold the outside flaps to fold the lids of the box. You need to take the triangles on the flaps (that we got rid of before) and fold them to the second crease on the side of the box. This should pull the top of the box up. Repeat on all four triangles
  11. To close the box you can push one side of the lid into the triangles side the other side of the lid

Love Hearts Week Origami Box Video Tutorial using Sending Love Designer Series Paper from Stampin' Up! UK

You could make a bunch of these and store them flat (so stop at instruction 9). Right I am off to make a bigger one out of a full piece of 12 x 12! Now, which paper to choose…..


Question of the day: What has been your favourite project this week?

I love them all! I LOVE this box, but the ink technique from Wednesday is something I will be playing with again I am sure 🙂


Sale-a-bration from Stampin' Up! UK


Product List


Shop Stampin' Up! UK Teesside North East Stockton on Tees

Joining Stampin' Up! UK Starter Kit

To purchase any of the items featured in my projects please use the links above. To join my team of Stampin’ Friends select ‘Join My Team’ or send me a message!

Please support StampinByHannah, and enter MK42UXHG. For orders of over £150 please do not use this code, as you are entitled to your own Hostess benefits!

Sign up to my newsletter here – http://eepurl.com/2if59

Hannah McCurley

Stampin’ Up! UK Independent Demonstrator