Box Tutorial – Create a bracelet box!

Hey guys and gals, I have a great project for you today!

A couple of weeks ago, a colleague bought me a bracelet back from holiday, and I came in a beautiful long thin box. It’s so simple and elegant, so I thought I would re-create it for you using Stampin’ Up! products


Stampin Up UK Bracelet Box tutorial

This box is a little different from our usual boxes here at StampinByHannah, as it has a separate lid, but it is so easy to make. I used Whisper White for the sample, but the one made in the video is Rich Razzleberry (I love this colour so much! it may be my favourite!)

The measurements for this project are:

IMPERIAL
For the bottom of the box

Cardstock = 3 1/4″ x 10 1/4″

Score at 1″ on all four sides

For the Top of the box

Cardstock = 2 7/8″ x 9 7/8″

Score at 3/4″ on all four sides


METRIC

For the bottom of the box

Cardstock = 8cm x 26cm

Score at 2.5cm on all four sides

For the top of the box

Cardstock = 7cm x 25cm

Score at 2cm on all four sides


See super simple, right! The box is then free to be decorated as you wish, I kept it simple with 3 punched flowers, using the Petite Petals Punch (no stamping here today!) and 3 medium sized jems from the basic jewel rhinestones pack.

And there you have it. A simple box for gifting jewellery, chocolates, or other small presents


Hannah Wilks

Stampin’ Up! UK Independent Demonstrator

If you like the project, or any of the products used, would like a catalogue, or to join my team, please contact me, or click on the ‘Shop NOW’ button at the top of the page. You can also find me on Twitter, Facebook, YouTube, Google+, About.me, and Tumblr (Links in the sidebar)

Thank you for stopping by www.www.stampinbyhannah.co.uk today

x

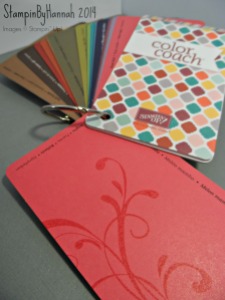
Custom Stampin’ Up! Color Coach!

Stampin Up Custom Color Coach

I recently wrote a post about the Stampin’ Up! Color Coach (See it HERE!) I love it, I think its an awesome tool (and Yes! you definitely need one!), but there was something missing! I’ve customised mine to meet my needs, and I thought I’d give you a peak!

I like the screw fastener the Color Coach comes with, but I like a bit more flexibility (I move the swatches around a lot and I like to be able to have one on its own, which I found a little awkward with the screw), So, I swapped it out for a O ring (most likely found at my local craft-type store, maybe in a mini-album kit, but believe me its been floating around my craft room for a good while!).

I also like to be able to see at a glance which inks I currently own (no, I don’t have them all yet! one day soon hopefully!), and what a tone on tone looks like. So, I stamped the same colour of ink on the card (Eg: Melon Mambo Swatch, stamped on with Melon Mambo ink) using the Everything Eleanor Swirlly stamp.

Now I can move the swatches around much more easily and see which colours I have (and which ones I need to get next!)


Hannah Wilks

Stampin’ Up! UK Independent Demonstrator

If you like the project, or any of the products used, would like a catalogue, or to join my team, please contact me, or click on the ‘Shop NOW’ button at the top of the page. You can also find me on Twitter, Facebook, YouTube, Google+, About.me, and Tumblr (Links in the sidebar) 

Thank you for stopping by www.www.stampinbyhannah.co.uk today

x

Why Stampin Up Ink Pad Labelling Will Change Your Life!

Stampin Up Ink Pads

Stampin’ Up! Inkpads are all very special. The Formulation of the ink is like no other. Its great for line stamping (so for sentiments and images with lots of open space) and for more solid stamping (those stamps that have no open space at all). As Stampin’ Up! ink dries the image ‘flattens’ out so that image you stamped that looked a little blotchy is sudden as smooth the cardstock underneath.

Also all the ink pads have refils available, so you only ever have to buy the inkpad once! and they coordinate with our Stampin’ Write Markers, Blendabilities (Coming soon!), cardstock, designer series papers, Project Life cards, and many embellishments! This means that not only can you stamp great images, but you can fully coordinate your projects!

The thing is however, that the design of the inkpads themselves mean that when they are stacked, or put into a storage system (such as THIS ONE!) you cant see which colour is which! Stampin’ Up! have carefully negotiated this issue by supplying stickers with each pad. Take your shiny new ink pad out of the cellophane and turn it over! There you will find, attached to the bottom of the pad, 4 stickers, stating the colour of the inkpad (one in each of our four main languages; English, Spanish, French, and German). Peel the sticker sheet off of the bottom of the pad, and the select the correct sticker for you! Then is the tricky bit, getting the sticker on the inkpad!

I have found the easiest way to do this is quickly! Hold the sticker at both ends, the inkpad will balance on one end for long enough for you to line up the sticker, making sure its only on the lid of the pad (not across the lid and the base – you’ll never get into the ink!) and press it down firmly.

Now your inkpad is labelled with the colour on the front edge, making for much easier identification!


Hannah Wilks

Stampin’ Up! UK Independent Demonstrator

If you like the project, or any of the products used, would like a catalogue, or to join my team, please contact me, or click on the ‘Shop NOW’ button at the top of the page. You can also find me on Twitter, Facebook, YouTube, Google+, About.me, and Tumblr (Links in the sidebar)

Thank you for stopping by www.www.stampinbyhannah.co.uk today

x