August Stampin’ Techniques Class – Blooming With Kindness

Stampin' Techniques class August 2014Hello!

I know I usually reserve mondays for tips / techniques / hauls etc. but I thought I would take this monday as an opportunity to tell you about the August Stampin’ Techniques Class here at StampinByHannah!

This class is available either online (check it out here!) for a small fee, or FREE! if you live within 25 miles of me (Stockton-on-Tees), as a party or workshop for you and your friends!

The class comes complete with instructional videos and a handout, as well as all the pieces to make the cards. The stamp set is sold seperately (available below)

Class starts August 1st!

I cant wait for you to join me!


Hannah Wilks

Stampin’ Up! UK Independent Demonstrator

If you like the project, or any of the products used, would like a catalogue, or to join my team, please contact me, or click on the ‘Shop NOW’ button at the top of the page. You can also find me on Twitter, Facebook, YouTube, Google+, About.me, and Tumblr (Links in the sidebar)

Thank you for stopping by www.www.stampinbyhannah.co.uk today

x

Box Tutorial – Create a bracelet box!

Hey guys and gals, I have a great project for you today!

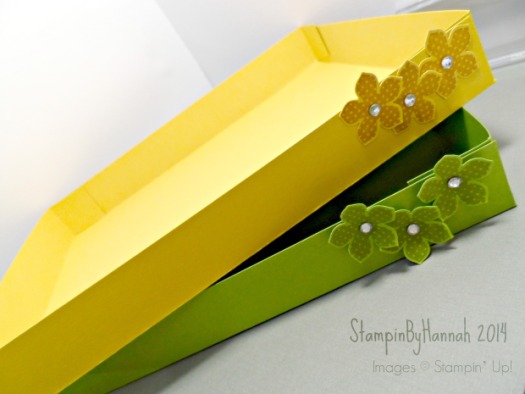
A couple of weeks ago, a colleague bought me a bracelet back from holiday, and I came in a beautiful long thin box. It’s so simple and elegant, so I thought I would re-create it for you using Stampin’ Up! products


Stampin Up UK Bracelet Box tutorial

This box is a little different from our usual boxes here at StampinByHannah, as it has a separate lid, but it is so easy to make. I used Whisper White for the sample, but the one made in the video is Rich Razzleberry (I love this colour so much! it may be my favourite!)

The measurements for this project are:

IMPERIAL
For the bottom of the box

Cardstock = 3 1/4″ x 10 1/4″

Score at 1″ on all four sides

For the Top of the box

Cardstock = 2 7/8″ x 9 7/8″

Score at 3/4″ on all four sides


METRIC

For the bottom of the box

Cardstock = 8cm x 26cm

Score at 2.5cm on all four sides

For the top of the box

Cardstock = 7cm x 25cm

Score at 2cm on all four sides


See super simple, right! The box is then free to be decorated as you wish, I kept it simple with 3 punched flowers, using the Petite Petals Punch (no stamping here today!) and 3 medium sized jems from the basic jewel rhinestones pack.

And there you have it. A simple box for gifting jewellery, chocolates, or other small presents


Hannah Wilks

Stampin’ Up! UK Independent Demonstrator

If you like the project, or any of the products used, would like a catalogue, or to join my team, please contact me, or click on the ‘Shop NOW’ button at the top of the page. You can also find me on Twitter, Facebook, YouTube, Google+, About.me, and Tumblr (Links in the sidebar)

Thank you for stopping by www.www.stampinbyhannah.co.uk today

x

Project Tray

You know, sometimes, when your working on a longer project (mass producing wedding invitations, Project Life by Stampin Up!, making items for craft fairs or fundraising events) you need somewhere to put all your items together, to stop them taking over!

Well, here is your solution! The Project Tray!

Stampin' Up! UK Project Tray

I use these all the time to hold various items and projects in the works, they hold items ready for making / photographing / selling / sending etc. I love them! and I thought I’d share the design with you.

It is super simple (as always, I cant do complicated!)

Here are the measurements:

IMPERIAL

Cardstock = 10″ x 8″

and score at 1″ on all sides

METRIC

Cardstock = 25.5cm x 20.5cm

Score at 2.5cm on all sides

See, told you it was simple!


Hannah Wilks

Stampin’ Up! UK Independent Demonstrator

If you like the project, or any of the products used, would like a catalogue, or to join my team, please contact me, or click on the ‘Shop NOW’ button at the top of the page. You can also find me on Twitter, Facebook, YouTube, Google+, About.me, and Tumblr (Links in the sidebar)

Thank you for stopping by www.www.stampinbyhannah.co.uk today

x

Just for You!

Hello there!

I thought I try something a little different this week. Just like when I’m scrapbooking (something I havent shared much of with you yet – watch this space) I like to push myself and try something new. So, I had a look at a couple of challenges for this week and settled on the Around the World Stamping’ Up! challenge!

This time they have selected three colours to be used: Hello Honey, Blackberry Bliss and Calypso Coral.

Now, this is where I panicked! I don’t have Calypso Coral (yet!  still building my collection over here!). But then I realised something, I have all the Stampin’ Write Markers! So, actually I do have Calypso Coral – just not in a Stampin’ Pad! Silly! Have I mentioned the Stampin’ Write Markers to you guys yet? No? How have you escaped! I Love Them! The great thing about the markers is not only can you colour an image with them, write with them, draw with them, but you can Stamp with them to! Awesome!

Right, back to the Challenge. I looked at the colours, and I looked at my stamps, and I thoughts for about 3 days! and then suddenly, inspiration!

AW20 - challenge entry - Just For You

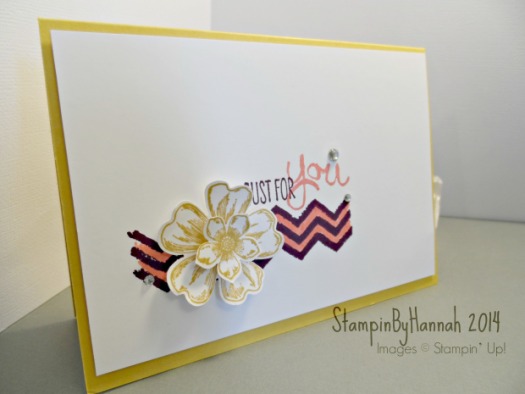
The Work of Art Stamp set has amazing background type images I love to use to ground other stamps on the card. I stamped the zig-zag / chevron image in Blackberry Bliss, before colouring between the lines with my Calypso Coral marker. I used Hello Honey to stamp the flowers, which I punched, and scrunched to give dimension, and then added the Just for You (this time colouring the stamp with that Calypso Coral marker). To finish I added a bit of bling with three jewels <3


Hannah Wilks

Stampin’ Up! UK Independent Demonstrator

If you like the project, or any of the products used, would like a catalogue, or to join my team, please contact me, or click on the ‘Shop NOW’ button at the top of the page. You can also find me on Twitter, Facebook, YouTube, Google+, About.me, and Tumblr (Links in the sidebar)

Thank you for stopping by www.www.stampinbyhannah.co.uk today

x


Why you absolutely NEED the new Stampin’ Up! UK Catalogue!

Sorry this post is up a little later than usual (you can blame my UPS man!) but I was waiting on my order of shiny new things from the new Stampin’ Up! 2014-2015 catalogue

Stampin Up! - New things from the 2014-2015 catalogue

As usual all the new items in the Stampin’ Up! catalogue are gorgeous (and I want them all!) but I had to make a selection and so these are my picks for the next couple of months! Stampin Up! Itty Bitty Accents punch pack

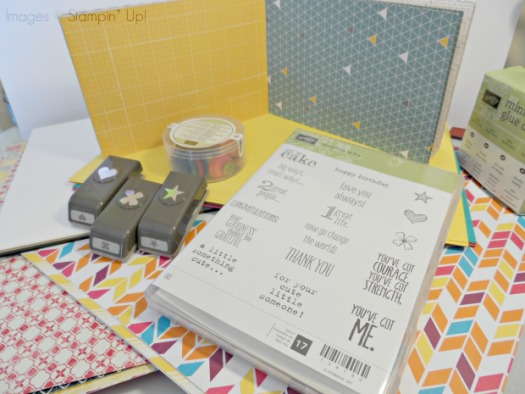
Stampin’ Up! make the most awesome punches, and the small punch packs are always popular, this new offering is no exception! The Itty Bitty Accents Punch Pack coordinates with the Something to Say Stamp Set. The stamped images (a heart, a star, and the flower) fit well in the punches and help you create your own custom embellishments, quickly! I love them!

But I think the most exciting thing for me are the new Designer Series Papers! I ordered two this time: Flashback and Sweet Taffy. As usual the papers use Stampin’ Up! colour collections and In Colours, coordinating with all the cardstock, inks and embellishments already in your stash!

Stampin Up Flashback DSP
Flashback!

Basic Black, Crushed Curry, Pool Party, Real Red, Smokey Slate, Very Vanilla

Stampin Up! Sweet Taffy DSP
Sweet Taffy!


Daffodil Delight, Melon Mambo, Old Olive, Pumpkin Pie, Rich Razzleberry, Tempting Turquoise, Whisper White
Of course I have a video with all this gorgeousness in as well!

and then you can purchase all these items from my shop – by clicking the pretty boxes below!

Hannah Wilks

Stampin’ Up! UK Independent Demonstrator

If you like the project, or any of the products used, would like a catalogue, or to join my team, please contact me, or click on the ‘Shop NOW’ button at the top of the page. You can also find me on Twitter, Facebook, YouTube, Google+, About.me, and Tumblr (Links in the sidebar)

Thank you for stopping by www.www.stampinbyhannah.co.uk today

x

Just because …… Who doesn’t love petals!

Our card for today uses the Petite Petals stamps and punch to give a fully coordinated look


The original card uses the new 2014-2016 In Colours: Blackberry Bliss, Lost Lagoon, and Hello Honey, along with Crumb Cake from the Neutrals collection, I changed it a little for the video, using Brights collection colours; Real Red, Bermuda Bay, and Daffodil Delight.


Stampin Up! Petite Petals in colours 2014


The card uses Whisper White cardstock, cut to 10 x5 inches, and scored at 5 inches, but you could totally adjust that to meet your own needs (and what you might have in your crafty stash)


Don’t forget if you like anything used on this card, you can check out my store at: stampinbyhannah.stampinup.net


Hannah Wilks

Stampin’ Up! UK Independent Demonstrator

If you like the project, or any of the products used, would like a catalogue, or to join my team, please contact me, or click on the ‘Shop NOW’ button at the top of the page. You can also find me on Twitter, Facebook, YouTube, Google+, About.me, and Tumblr (Links in the sidebar) 

Thank you for stopping by www.www.stampinbyhannah.co.uk today

x


Flower Shop

Yesterday we talked about the different ways of using a flower punch, so today I thought I’d put my flower punching skills to good use and make a card!

Stampin Up! Flower shop

This card uses the Flower Shop stamp set from Stampin Up! along with the coordinating Pansy Punch. This combination requires some careful planning as the stamp and punch only line up one way. My suggestion, and the general consensus, is to punch a piece of scrap cardstock, turn the piece over and mark which end is the top and which is the bottom. Then you can lay this over your stamp, the stamp is the correct way round when the punch image fits over it perfectly, then mark which point of your stamp matches the bottom of the punch and make sure to always orientate it on your block this way round.

This time I stamped in Bermuda Bay, Daffodil Delight and Real Red, and used basic black to stamp the sentiment. Unfortunately, this stamp is from a now retiring hostess set, Simply Sketched, but any sentiment would work just as well. The flowers were then punched out using the Pansy Punch, before being layered onto the card, some flat and some on dimentionals. You could add more to this card, some jewels or pearls in the centre of the flowers, or heat embossing the sentiment, but sometimes something simple is just as good

Dont forget to check out the shop for other retiring items

Hannah Wilks

Stampin’ Up! UK Independent Demonstrator

If you like the project, or any of the products used, would like a catalogue, or to join my team, please contact me, or click on the ‘Shop NOW’ button at the top of the page. You can also find me on Twitter, Facebook, YouTube, Google+, About.me, and Tumblr (Links in the sidebar)

Thank you for stopping by www.www.stampinbyhannah.co.uk today

x

10 ways to use a flower punch

There are so many ways to use a simple flower punch (for more than just making flowers too)

1. Use the punch with the coordinating stamp set, the Stampin Up! Pansy Punch and Flower Shop Stamp set for example (beware with this combination though, they only fit one way!) creating a range of beautiful flat flowers in a wide variety of colours (providing you have the inks of course)1. Stamped and Punched Flower

2. cutting into the punched flower and curling the petals to create a dimensional flower, great for the fronts of cards and as decoration on boxes

3. punching out a series of flowers, either with the same punch or different ones, and stacking and crumpling them to create a 3D flower creation

3. 3D flower

4. Cut the all petals off, giving you heart shapes

4. Hearts

5. Cutting one petal out – butterflies anyone!

5. Butterflies

6. Stamped as in point 1. but then cut in half to look like bows great for flat projects

6. Presents

7. as clouds

8. Use those 3D flowers from 3. to create a table centrepiece   http://www.pinterest.com/pin/42150946482093490/ 

9. Vellum! who doesnt love a heat embossed vellum flower everyone once in a while

9. Vellum!

10. As closures on a box ……. tutorial coming soon

10. Flower Box

11. (Hold on, I though this was 10 ways….) 11. create a door wreath with those spare flower punches http://www.pinterest.com/pin/56224695317667973/ 


Hannah Wilks

Stampin’ Up! UK Independent Demonstrator

If you like the project, or any of the products used, would like a catalogue, or to join my team, please contact me, or click on the ‘Shop NOW’ button at the top of the page. You can also find me on Twitter, Facebook, YouTube, Google+, About.me, and Tumblr (Links in the sidebar)

Thank you for stopping by www.www.stampinbyhannah.co.uk today

x