Fancy Fold Friday – Easel Card

HELLO!

Welcome to fancy fold friday!

Once again, trying something new here! I have a few of these posts lined up over the next few weeks, looking at card folds that make your cards stand out from the other cards on the mantel piece. I thought we’d start simple – a easel card

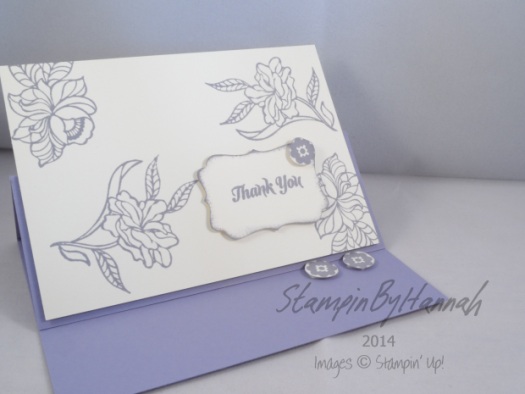
Stampin' Up UK Wisteria Wonder Bouquet Toss Thank You card

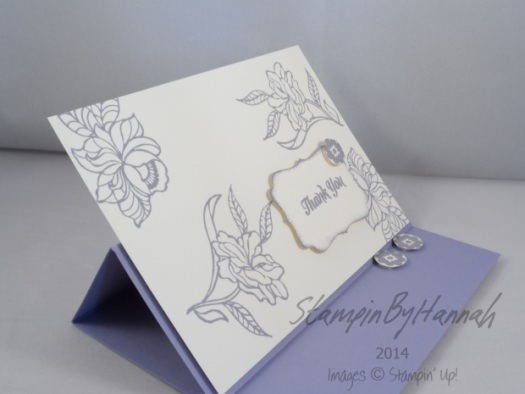
Easel cards are super simple to create. This card base (in Wisteria Wonder) is cut to 8 1/4 by 5 1/2 (about half an A4). The card is scored at 2 1/4 and 4 1/8th, creating a triangle of cardstock. Another piece of cardstock (this time in Very Vanilla) is attached to one of the short sides of the triangle to create a taller card. The stamp set used here is Bouquet Toss – a set that, although designed for weddings (and that ties into the Always and Forever wedding stationary templates in MDS), is a lovely feminine stamp set for Thank You cards, Birthdays, and Congratulations cards. The small flowers (although fussy cut here) work wonderfully with the 1/2″ circle punch, to create ‘pegs’ to hold the card up when displayed.

Stampin' Up UK Wisteria Wonder Bouquet Toss Thank You card


I’m really loving simple colour combinations at the moment, and have found myself making a lot of cards with only two or maybe three colours!

Can’t wait to see you again next week!


Hannah Wilks

Stampin’ Up! UK Independent Demonstrator

If you like the project, or any of the products used, would like a catalogue, or to join my team, please contact me, or click on the ‘Shop NOW’ button at the top of the page. You can also find me on Twitter, Facebook, YouTube, Google+, About.me, and Tumblr (Links in the sidebar)

Thank you for stopping by www.www.stampinbyhannah.co.uk today

x

October Product of the Month!

Hello!

sorry this post is a little late (you’ll understand why over the next few days! *world card making day is on saturday!*)

But I’m back to announce the StampinByHannah Product of the Month for October!

Stampin' Up! UK Good Greetings FREE Stamps

This stamp set – Good Greetings! – is a set of 19 gorgeous handwritten style sentiment stamps, Perfect for your holiday cards over the next few months! It covers Christmas and New Year, Halloween, Valentines, and also includes a number of generic sentiments too! I love this stamp set, its so handy!

However, you wont find this set in the catalogue! Good Greetings is available to you, for FREE! when you either: place an individual order of more than £200, or host a party which exceeds £200! AND its only available until the end of October!

So you better be quick, grab your today!

I have lots of projects coming up over the next few weeks featuring Good Greetings, so subscribe to the blog now so you don’t miss anything – believe me I have lots of new projects and ideas coming this way very soon!


Hannah Wilks

Stampin’ Up! UK Independent Demonstrator

If you like the project, or any of the products used, would like a catalogue, or to join my team, please contact me, or click on the ‘Shop NOW’ button at the top of the page. You can also find me on Twitter, Facebook, YouTube, Google+, About.me, and Tumblr (Links in the sidebar)

Thank you for stopping by www.www.stampinbyhannah.co.uk today

x


How To: make your own desk bin!

What is the most annoying thing about craft? all those little bits of paper; the backs of dimentionals, the red carrier tape of sticky strip, little bits of off cuts… and they all float around your desk, making a mess, and getting in the way!

That is until now!

Make your own desk bin, from an old jar, but… please make it pretty!

How to make a desk bin

I used an old jar (think it was lemon curd if your that curious!). First, measure around your jar. use this measurement to measure a length of DSP, but add an inch to give an overlap. The best way I have found of attaching your DSP is with sticky strip – I didnt take the label off my jar, instead it make it easier to line up your DSP to ensure its straight around your bin. Then, add some ribbon (measured in the same way) also with sticky strip. I had to add some more bling! before it looked finished – the sentiment is a stamp from Remember This (one of the Project Life by Stampin’ Up! sets), stamped in Pool Party (to match the DSP), and then I’ve added hearts using the Sweetheart and Itty Bitty Accents punches, and some jewels I had laying around!

Its so damn cute, and a great addition to any craft desk

x


Hannah Wilks

Stampin’ Up! UK Independent Demonstrator

If you like the project, or any of the products used, would like a catalogue, or to join my team, please contact me, or click on the ‘Shop NOW’ button at the top of the page. You can also find me on Twitter, Facebook, YouTube, Google+, About.me, and Tumblr (Links in the sidebar)

Thank you for stopping by www.www.stampinbyhannah.co.uk today

x


Back to Basics Zoo Babies


Seeing as we are now right at the end of September, it time to say goodbye to our Product of the Month (yes, their will be another in October!) but before we do, I thought I would grab it again for one final project!

Stampin' Up! UK Zoo Babies Back to Basics AlphabetHow cute is this card! I used that Back to Basics Alphabet to create a background – almost like a word search, for the front of the card.

The card base is in Marina Mist (LOVE! – it only arrived on friday, I think its a new favourite!), with the word search layer in Soft sky, and inked in Soft Sky ink. Then I’ve used; Calypso Coral, Marina Mist, Pear Pizzazz and So Saffron to stamp the Zoo Babies animals, and the sentiment.

super cute, and a great way to end our Product of the Month for September. Back to Basics is still available through to June of 2015 (at least, let hope its even longer! I love the font.), grab it now by clicking the links through to my webshop

Check back soon for the reveal of our Product of the Month for October!

x

Hannah Wilks

Stampin’ Up! UK Independent Demonstrator

If you like the project, or any of the products used, would like a catalogue, or to join my team, please contact me, or click on the ‘Shop NOW’ button at the top of the page. You can also find me on Twitter, Facebook, YouTube, Google+, About.me, and Tumblr (Links in the sidebar)

Thank you for stopping by www.www.stampinbyhannah.co.uk today

x


Tag a Bag….. anda box …. and a card …… oh and label something too!

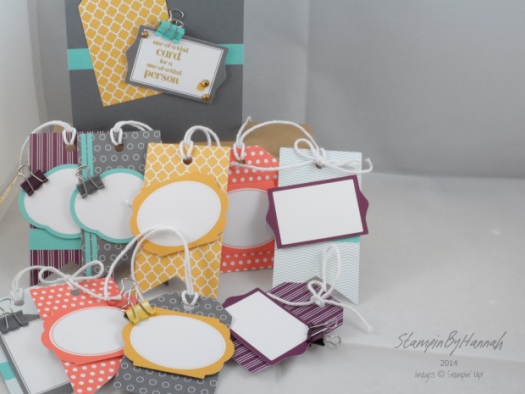
For me one of the hidden gems of the Stampin’ Up! annual catalogue is the Tag a Bag kits! I love making presents look really special, but these kits can be used for so much more than just gift wrap!

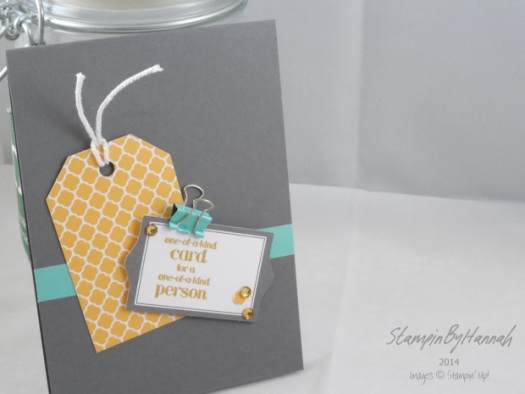
Stampin' Up! UK Tag a Bag cardThis card uses on the tags, from the accessory kit, a couple of Rhinestone Basic Jewels (coloured with a Blendabilities pen) and a stamped sentiment from ‘Something to Say’ and its just so cute!

The Tag a bag accessory kits come with 10 tags, 10 labels, 10 mini binder clips, some self adhesive strip, a whole heap of Whisper White bakers twine, and dimentional! thats way more than you would ever need to make 10 lovely tags, or cards! As usual, the kits are in coordinating colours, the annual catalogue kit uses Basic Gray, Blackberry Bliss, Calypso Coral, Coastal Cabana and Hello Honey. While the seasonal variation (found in the Autumn-Winter catalogue) is in Cherry Cobbler, Crumb Cake, Early Espresso, Garden Green, and Pistachio Pudding. And for only £7.25, they are great value!

Right, thats enough waffle! What can you do with them!

Stampin' Up! UK Tag a bag

Thats loads of really lovely tags, which could be just as many cards! to make those gifts look gorgeous!

but there’s more!

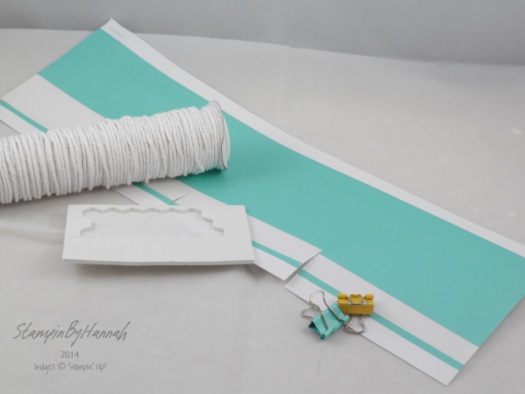
Stampin' Up! UK tag a bag kit

This is what I had left! its loads! half a sheet of those dimentionals (these arent the same as the ones you get if you just buy dimentional, they are fatter, and you get 40 per kit), two of the binder clips, a lot of self adhesive strip! and so much Whisper White bakers twine I might have to use it as gift ribbon!

And if you thought that was all……

Are theses kits awesome! check back soon for some more gift packaging options!


Hannah Wilks

Stampin’ Up! UK Independent Demonstrator

If you like the project, or any of the products used, would like a catalogue, or to join my team, please contact me, or click on the ‘Shop NOW’ button at the top of the page. You can also find me on Twitter, Facebook, YouTube, Google+, About.me, and Tumblr (Links in the sidebar)

Thank you for stopping by www.www.stampinbyhannah.co.uk today

x


Personalised Wedding Cards!

Back in wedding mode again today! These are some cards I made for a friend, as thank you cards for the special ladies involved in her wedding – flower girls, bridesmaids, and the mothers!

I was so exicted when I took the order for these! Her colour scheme was white, pale pink and grey, so I took that and ran with it!

Stampin' Up! UK Wedding Everything Eleanor

I used Whisper White, Smokey Slate and Pink Pirouette, along with Everything Eleanor (isnt it the most gorgeous set for weddings!) and the Back to Basic Alphabet to personalise the cards. The flowers are a mix of Petite Petals and Itty Bitty Accents, and they are finished off with the coordinating stamp and some Pearl Basic Jewels

Stampin' Up! UK Wedding Everything Eleanor

These bridesmaids cards use Smokey Slate as the card base, and the same stamp sets as before. Each card has the bridesmaids name on, handstamped using that Back to Basics Alphabet

Stampin' Up! UK Wedding Everything Eleanor

The last set of cards are the ones I made for the Flower girls. Once again they use Everything Eleanor and Back to Basics, but this time I decided to make them a little more fun, and used the bird stamp to add an extra litte something.

Each of the cards was also stamped with a coordinating stamp inside, and also on the envelope.

I love making cards with purpose like these. Having just finished my own wedding invitations though, I might have to have a little break from weddings…….. ok thats enough of a break! I do love a good wedding, dont you?


Hannah Wilks

Stampin’ Up! UK Independent Demonstrator

If you like the project, or any of the products used, would like a catalogue, or to join my team, please contact me, or click on the ‘Shop NOW’ button at the top of the page. You can also find me on Twitter, Facebook, YouTube, Google+, About.me, and Tumblr (Links in the sidebar)

Thank you for stopping by www.www.stampinbyhannah.co.uk today

x

Mr and Mrs Congratulations Card

So, I’m still focused on weddings at the moment. I’m still planning my own, making invitations, place settings, orders of service, the list goes on and on! But I’ve also been a wedding guest a bit recently too, so here is yet another Congratulations card, Wedding style!

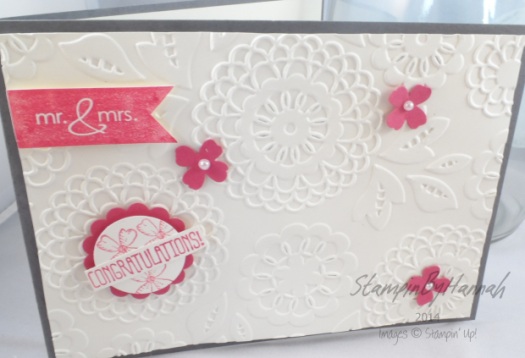
Stampin' Up! UK Wedding Congratulations Lovely Lace

This time I used a piece of Basic Grey as the card base, with a piece of Very Vanilla embossed with that Lovely Lace embossing folder (Love!). The wedding colour theme was grey and dusky pink, so I decided to step it up a little, and use a dark grey and brighter pink. The stamping and flower punches are in Rose Red. Once again I used that Something to Say set for the congratulations (just like this card) and for the little bit of floral stamping on the circle behind congratulations. That lovely Mr. and Mrs. stamp is unfortuneately retired now (and I’m sorry for showing you it, but the rest of the card is just so pretty!). I finished the card by punching three flowers using the flower punch from Itty Bitty Accents, and adding Pearl Basics Jewels 🙂

More Wedding cards to come next week! this time I’ve even managed to use this months Product of the Month!!!!!


Hannah Wilks

Stampin’ Up! UK Independent Demonstrator

If you like the project, or any of the products used, would like a catalogue, or to join my team, please contact me, or click on the ‘Shop NOW’ button at the top of the page. You can also find me on Twitter, Facebook, YouTube, Google+, About.me, and Tumblr (Links in the sidebar)

Thank you for stopping by www.www.stampinbyhannah.co.uk today

x

Memory Monday – 12×12 layout

I love scrapbooking! I found card making through scrapbooking actually. I started making cards because I wanted to find a use for all my scraps of pattern paper, and found that I love making cards as much as I love memory keeping! Recently, what with working as a nurse, card-making, businesses, and wedding planning, scrapbooking has become a bit forgotten, but I’m hoping that this series ‘Memory Mondays’ will help to get me back on track!

Last week I used Project Life to document a trip to Castle Howard, a gorgeous stately home set in  the glorious countryside of North Yorkshire! I love Project Life but sometime I need a little more space to tell my story, and then I return to 12×12 layouts!

Stampin' Up! UK Scrapbook 12x12 Memory Keeping

The weather wasnt the best the day we went to Castle Howard, but in my option Memory Keeping isnt really about the quality of the photograph – its about the memory associated with it!

I used the Flashback Designer Series Paper Pack, in particular the sheets that had Pool Party, Basic Black and Real Red! I love that Stampin’ Up! use the same colours for each product line, it makes coordination just so easy! I picked out the Smokey Slate camera from one of the pieces of Flashback, I often use 3’s both in card making and scrapbooking – I’ll cluster either 3 or 5 embellishments, even numbers just dont look right to me. So, I created 3 patches of embellishments using on of the camera’s on a Dimentional, a piece of Washi Tape and a acetate accent from the Everyday Adventure Project Life by Stampin’ Up! Accessory Pack.

The title uses our Product of the Month – the Back to Basics Alphabet Stamp set, stamped in Pool Party (see, that coordination again!).

The layout looked a little bare at this point, so I added my journalling, argueably the most important aspect of scrapbooking, getting your memories onto the page! This is not always the easiest bit, or the most fun, but ask yourself, why are you making this page if your not saying anything about why! I generally take the who, what, when, where, why approach. Use your journalling to explain who you’re with (or who you are!), what you did, when you did it, where you went, and why you went there.

To finish the layout, as it still looked a little bare, I used a small paint brush with some water, and Pool Party and Smokey Slate ink to create some splatter on the white section of the page.

What do you think? let me know in the comments below….


Hannah Wilks

Stampin’ Up! UK Independent Demonstrator

If you like the project, or any of the products used, would like a catalogue, or to join my team, please contact me, or click on the ‘Shop NOW’ button at the top of the page. You can also find me on Twitter, Facebook, YouTube, Google+, About.me, and Tumblr (Links in the sidebar)

Thank you for stopping by www.www.stampinbyhannah.co.uk today

x

Lets get Merry for …… Super Simple Sunday!

Its that time again! time for a super simple card on a super simple sunday! Yay!

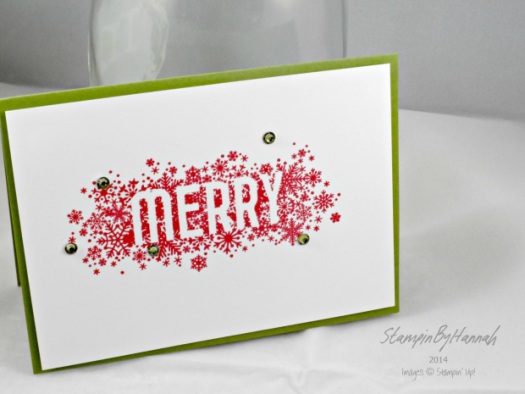
Stampin' Up! UK Seasonally Scattered Merry

I love this card! and its so super simple (hence the super simple sunday! duh!)

I cut a piece of A4 Old Olive cardstock in half across its lenght, and folded it to create our card base. Then layered a piece of Whisper White, cut to slightly smaller than that Old Olive card front. Seasonally Scattered is a lovely stamp set, it contained 3 stamps; Merry, Thanks, and Love, all in this style. I know you’re going to see lots of project ideas using this stamp set from me!

The Merry stamp is stamped in Real Red onto that Whisper White.

I finished the card by colouring 5 Rhinestone Basic Jewels with the darkest Old Olive Blendability, to make them green, and added them t randomly to the card

How simple!


Hannah Wilks

Stampin’ Up! UK Independent Demonstrator

If you like the project, or any of the products used, would like a catalogue, or to join my team, please contact me, or click on the ‘Shop NOW’ button at the top of the page. You can also find me on Twitter, Facebook, YouTube, Google+, About.me, and Tumblr (Links in the sidebar)

Thank you for stopping by www.www.stampinbyhannah.co.uk today

x

Celebrate….. a bit of lovely lace!

Well, hello there!

I’ve got a few posts over the next week or so about a similar topic – weddings!

This card I made as a Congratulations card for a friends wedding, I love it, its cute, and simple, and pink!

Stampin' Up! UK Lovely Lace Big Shot

I used the Lovely Lace embossing folder (its so pretty!), to emboss some Pink Pirouette cardstock. The Congratulations is from Something to Say (have I mentioned my love of that Stamp Set much! its just so versitile). Then I finished the card with some White Organza Ribbon (I managed to tie a bow!!!!!) and some Basic Jewel Pearls!

I think this card would make a lovely Wedding or new baby girl card, but that Lovely Lace Embossing folder – just watch this space!!

Whats your favourite sentiment based stamp set at the moment? let me know in the comments below…


Hannah Wilks

Stampin’ Up! UK Independent Demonstrator

If you like the project, or any of the products used, would like a catalogue, or to join my team, please contact me, or click on the ‘Shop NOW’ button at the top of the page. You can also find me on Twitter, Facebook, YouTube, Google+, About.me, and Tumblr (Links in the sidebar)

Thank you for stopping by www.www.stampinbyhannah.co.uk today

x