12 Tags of Christmas – White Christmas

And so continues the 12 Tags of Christmas!

As usual I have punched  a 6×2″ strip of cardstock with the Scalloped Tag Topper Punch, but this time I have also punched a 5 3/4 x 2″ piece to layer, before rounding the corners of both pieces with the Project Life by Stampin’ Up! corner rounder punch.


Stampin' Up! UK 12 tags of christmas


This week, I have used the White Christmas stamp set, stamped in Early Espresso, on to Very Vanilla cardstock. The To and From stamp is from Festival of Trees. I have then mounted the Very Vanilla piece onto Cherry Cobbler card stock with Dimensionals.

Stampin' Up! UK 12 tags of christmas


The top of this tag is a little different from the others so far. I have threaded Cherry Cobbler 1″ Sheer Linen Ribbon through the tag, and tied it together with some very thin ribbon that I have to admit, I have no idea where it came from!! eek!

I love this simple tag (most of the tags in this series are quite simple really, quick and easy projects are the order of the day around Christmas!)


Hannah Wilks

Stampin’ Up! UK Independent Demonstrator

If you like the project, or any of the products used, would like a catalogue, or to join my team, please contact me, or click on the ‘Shop NOW’ button at the top of the page. You can also find me on Twitter, Facebook, YouTube, Google+, About.me, and Tumblr (Links in the sidebar)

Thank you for stopping by www.www.stampinbyhannah.co.uk today

x

Halloween Cards and Box Project

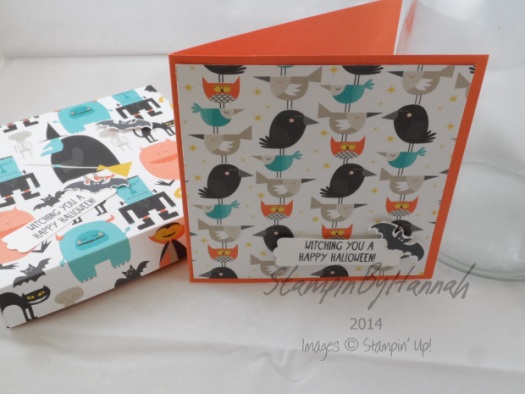
So, its nearly Halloween, as I have previously mentioned, its not really something I celebrate – but these papers and stamps were just so adorable I had to make a project with them!

The Stampin’ Up! Autumn Winter Catalogue for this year has a few Halloween themed stamp sets, including ones with matching framelits as well as really cute monsters, but I’m sucker for a sweet witch (I think its got something to do with my favourite book as a child – the worst witch!) so these cards feature Tee-Hee-Hee. The Motley Monsters DSP features Basic Black, Burmuda Bay, Crushed Curry, Sahara Sand, Tangerine Tango, and Whisper White – for a super bright and fun colour pallet that I am so going to re-visit time and again and again.

Stampin Up UK Motley Monsters Halloween


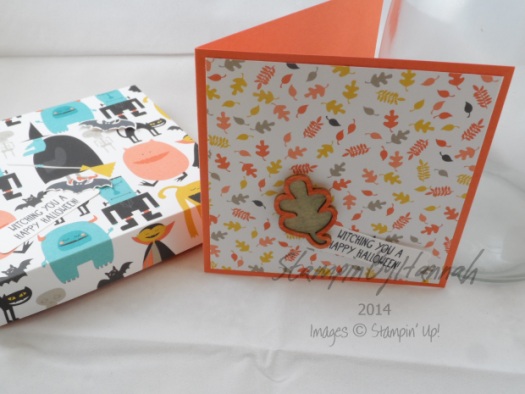
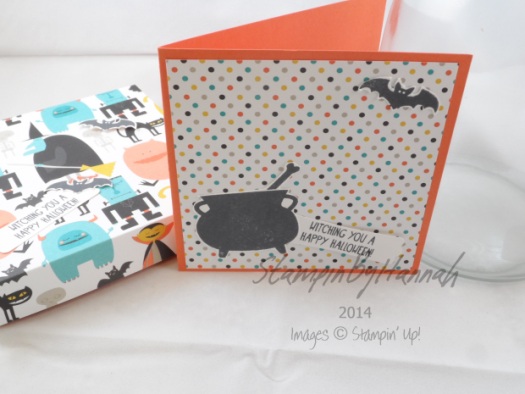
I made 4 cards, all in 4×4 inch size, using Tangerine Tango as the card base, and a 3.75 x 3.75″ piece of Motley Monsters DSP as the card front.

Stampin Up UK Motley Monsters Halloween

Each of the cards is subtly different, using a different piece of the paper, a different stamp, or embellishment.

Stampin Up UK Motley Monsters Halloween

I love wooden elements! These leaves are so super cute! I used two of the Autumn Wooden Elements here, colouring the outline element with my Tangerine Tango Stampin’ Write Marker

Stampin Up UK Motley Monsters Halloween All the cards use the same sentiment from the Tee-Hee-Hee stamp set, and all the stamped images are fussy cut (such a shame there arent any framelits for this stamp set 🙁 )

I also used the same cardstock and DSP to create a box to gift these cards and their envelope together

I loved making this project, you never know, maybe I’ll do some more Halloween crafting next year!


Hannah Wilks

Stampin’ Up! UK Independent Demonstrator

If you like the project, or any of the products used, would like a catalogue, or to join my team, please contact me, or click on the ‘Shop NOW’ button at the top of the page. You can also find me on Twitter, Facebook, YouTube, Google+, About.me, and Tumblr (Links in the sidebar)

Thank you for stopping by www.www.stampinbyhannah.co.uk today

x

PLxSU blog hop October 2014

So, something totally new for me today! taking part in a blog hop!

I do hope you are enjoying the hop, and if this is your first port of call, please check out the other projects on the hop today

Stampin' Up! UK Project life by Stampin Up PLxSU blog hop

On to my project…..

I haven’t looked at project life for a couple of month 🙁 working nights over the late summer and autumn has kind of put pay to most of my life, and so I havent really done very much other than work and sleep! however, a few weeks ago James and I went to one of our favourite places – Beamish museum (If you are ever in the North East of England you MUST check it out, its awesome!), and had a great day!


Before we get into my album, I just want to apologise for the photos, photographing Project Life is still new to me, I hope to improve over the coming months! 


Stampin' Up! UK Project Life

So, I decided to keep things simple this month, concentrating on the photos and a little journalling. As I have already mentioned, I’ve been super busy with the day job recently, working nights is just about killing me, but its due to end soon! Yay! So, more time to craft and create is coming my way :D. I haven’t even included a title! (somewhat of an accident in the fact I forgot!) but we know where we were, and I do mention the place in the journalling.

This spread uses the Everyday Adventure kit (Stampin’ Up! of course!), but I have selected the subtler cards. I love this kit, but it is super bright!, the journalling card on this page originally had a Strawberry Slush coloured heart, which didnt really fit with the rest of the page, but I loved the lined card, so I covered the heart with a sticker from the Everyday Adventure Accessory Pack, and added a punched piece.


Stampin' Up! UK Project Life

I love the look of rounded corners in my albums, I think it probably comes from using Becky Higgins Project Life kits for a while. So the Project Life by Stampin’ Up! corner rounder was a MUST for me!, along with the Design 1 pocket pages pack (its just my favourite layout – I’m using just these for the Wedding album too!)

There are touches of embellishment on some of the photos, but as I have kept all the photos at either 6×4 or 3×4 sizes there wasn’t much room for embellishment; just a couple of stickers or die cuts here and there, washi tape, and staples! (have I ever mentioned my LOVE for staples?!)

Stampin' Up! UK Project Life

I am not an exclusively Project Life based scrapbook-er, I still love 12×12 layouts (I know, I know!), So I have also created a 12×12 to sit opposite this page in my album.

Stampin' Up! UK Project Life

It also uses some cards from the Everyday Adventure Project Life Card Collection! It one of the many things I love about Stampin’ Up! – the fact that I can totally coordinate everything! I’ve added some home-made card candi to this page to add a touch of the ‘Cherry Cobbler’ type colour in the photo, as well as a hint of Old Olive green.

Stampin' Up! UK Project Life


So, I hope you check out some of the other pages on the hop today! (as we are around the world, all the posts go live at midnight where the person is posting from, we will all be there later on!)

Loving Life’s Little Blessings – Katina Martinez

Today Kelsey Is – Kelsey

Scrapping Wonders – Beth

Stampin’ Cita – Carmelita Wasson

TxStampinSharon – Sharon Armstrong

StampinbyHannah – Hannah


Hannah Wilks

Stampin’ Up! UK Independent Demonstrator

If you like the project, or any of the products used, would like a catalogue, or to join my team, please contact me, or click on the ‘Shop NOW’ button at the top of the page. You can also find me on Twitter, Facebook, YouTube, Google+, About.me, and Tumblr (Links in the sidebar)

Thank you for stopping by www.www.stampinbyhannah.co.uk today

x


Fancy Fold Friday – Centre Step Card

Hello! Welcome to another Fancy Fold Friday!

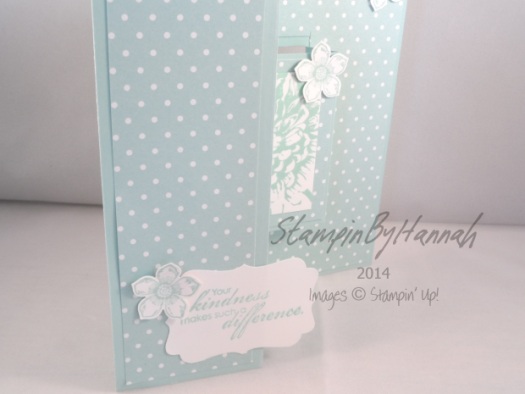
This card was so complicated! I very very nearly gave up with it all together, and I’ve got to say that the DSP dimensions were pure luck! However, i decided I would share the basic structure of the card with you.

Stampin' Up! UK Centre Step Card

This card uses Pool Party Cardstock cut to 8 1/4″ by 5 3/4″. You’re going to need to grab that Stampin’ Trimmer for this one! Cut two lines in the card stock, the first at 1 3/4″ from 1 3/4 to 4 3/4″ and then at 4 1/4″ from 1 3/4 to 4 3/4″. This should give you two slits in your piece of card. Then score along the long edge at 2″, at the start of the two slits (between the two slits ONLY!), at 4 1/8″ either side of the cuts, and between the two slits at 5 3/4″ and at the end of the slits.

Stampin' Up! UK Centre Step Card

This card also features stamps from Blooming with Kindness and Petite Petals (along with the Petite Petal punch) and the Sentiment is punch using the Decorative Label Punch

Let me know in the comments below if you want a video tutorial on some of the fancy folds featured as part of Fancy Fold Friday!

See you again next week

x


Hannah Wilks

Stampin’ Up! UK Independent Demonstrator

If you like the project, or any of the products used, would like a catalogue, or to join my team, please contact me, or click on the ‘Shop NOW’ button at the top of the page. You can also find me on Twitter, Facebook, YouTube, Google+, About.me, and Tumblr (Links in the sidebar)

Thank you for stopping by www.www.stampinbyhannah.co.uk today

x

So thankful for you!

Hello!


I thought I would take a step away from Christmas just for a moment! To say thanks!

Last week I featured the Festival of Trees Stamp Set (still not sick of that set yet! I just LOVE it!), and had such a great response from all of you (both here and on facebook!) and just wanted to say thanks to all of you!

Stampin' Up! UK Calypso Coral Good GreetingsI love bright colours, and rich colours, really I just love colour! but coral isn’t really my colour. So, when I looked through which ink pads I didn’t own a few weeks ago, it wasn’t a surprise to me that Calypso Coral hadn’t worked its way into my basket. But all of the Stampin’ Up! colours are just so beautiful I decided to take a chance on the coral!

How cute is this colour! It’s definitely on the orange spectrum, but its so soft and pretty! and please tell me, what is prettier than butterflies and flowers! So, I grabbed the Papillon Potpourri stamp set, and I Like You (hostess set), along with our Product of the Month – Good Greetings! and stamped this card!

There are actually two butterflies here, I punched one butterfly out of Calypso Coral DSP from the Subtles Designer Series Paper Stack, and then added the stamped and punched butterfly over the top with a single Glue Dot to give some great dimension!

I am so Thankful for you! Thanks so much for all your comments and orders. Check out my Facebook page HERE! and shop HERE!


Hannah Wilks

Stampin’ Up! UK Independent Demonstrator

If you like the project, or any of the products used, would like a catalogue, or to join my team, please contact me, or click on the ‘Shop NOW’ button at the top of the page. You can also find me on Twitter, Facebook, YouTube, Google+, About.me, and Tumblr (Links in the sidebar)

Thank you for stopping by www.www.stampinbyhannah.co.uk today

x

What’s in the box?!

Hello, sorry this post is a little later in the day, have been super busy with several projects at once this afternoon!

Seeing as a few people have ordered recently I thought I would show you what I have ordered this month 🙂


I love seeing what other people are buying at the moment!

See you again soon!


PS: Weekly deals have been updated today as usual, check out the new deals HERE!


Hannah Wilks

Stampin’ Up! UK Independent Demonstrator

If you like the project, or any of the products used, would like a catalogue, or to join my team, please contact me, or click on the ‘Shop NOW’ button at the top of the page. You can also find me on Twitter, Facebook, YouTube, Google+, About.me, and Tumblr (Links in the sidebar)

Thank you for stopping by www.www.stampinbyhannah.co.uk today

x


12 Tags of Christmas – Merry and Bright!

Hello!

Welcome to another instalment of the 12 Tags of Christmas!

This week I used the Good Greetings stamp set (still FREE on any order of £200! until the end of October!) and the Under the Tree Tag a Bag Accessory kit!

Stampin' Up! UK 12 Tags of Christmas

I just love the Tag a Bag Accessory Kits, we have several over the annual and seasonal catalogues. They are just so handy, and include 10 gift tags for just £7.25! Awesome!

So, this tag also uses two pieces of DSP; the green is a piece of Under the Tree Specialty DSP, with the brown being from the Trim the Tree paper stack. I love both these packs of DSP! The specialty paper is really thick (and is awesome for boxes and 3D items) and the little paper stacks are super handy for card fronts and other cute projects (hint hint!)

Stampin' Up! UK Scallop Tag Topper Punch


So, to create this tag. The green piece of 2″ x 6″ and punched using the Scallop tag topper punch. And the brown piece is 2″ x 3″ and punched with the same punch. The sentiment from that Good Greetings set, is stamped on one of the builder tags from the Tag a bag accessory kit, attached with a dimensional. Instead of using twine or ribbon this week, I’ve used one of the pegs from the Tag a bag accessory kit – they are just so cute!


Hannah Wilks

Stampin’ Up! UK Independent Demonstrator

If you like the project, or any of the products used, would like a catalogue, or to join my team, please contact me, or click on the ‘Shop NOW’ button at the top of the page. You can also find me on Twitter, Facebook, YouTube, Google+, About.me, and Tumblr (Links in the sidebar)

Thank you for stopping by www.www.stampinbyhannah.co.uk today

x

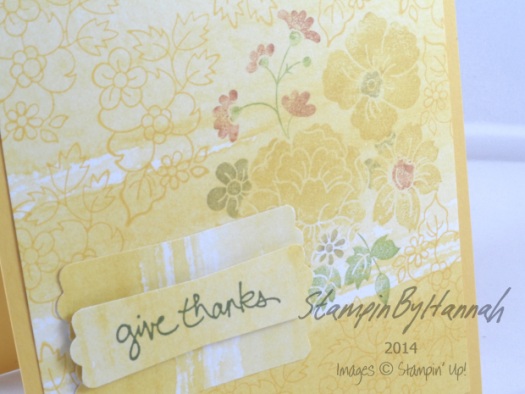
Give Thanks!

Before we get into our card for today I just want to quickly remind you of the Stampin’ Up! offers available at the moment!

Of course there are this weeks Weekly Deals! and that lovely FREE Stamp set! (check HERE for more on that one!)

But its the joining offer I really want to talk to you about!


Stampin' Up! UK Pick a pack of Paper DSP Designer Series PaperJoin Stampin’ Up! before the end of the month to receive a FREE pack of Designer Series paper every month for 6 months! That’s £60 of FREE stock! I love our DSP, its just such a lovely weight, and of course they all coordinate with everything in both the Annual Catalogue AND the seasonal catalogue (and supplement – more on that tomorrow!). As well as the free DSP, Stampin’ Up! also provide demonstrator with other FREE items for meeting various targets! Did I mention that this month I earned 2 FREE stamp sets! Just for meeting my sales goals for the first 3 months of being a demonstrator! and it was really easy! Thanks to everyone who has chosen me to be their Stampin’ Up! demonstrator, I love you all!


Right, Card!

Stampin' Up! UK I like you Stampin Write Markers


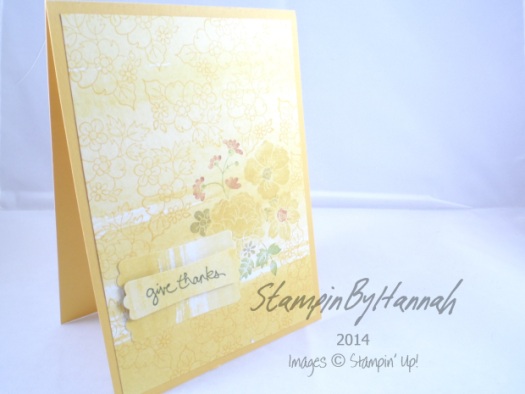
This card uses a Crushed Curry Card base, and a piece of Colour Me Autumn DSP (the colours in this pack of DSP are gorgeous – Blackberry Bliss, Crushed Curry, Mossy Meadow, Cajun Craze, Old Olive! <3). I stamped the DSP with Crushed Curry ink using the Hello Darling Stamp set (one of the ones I chose as my freebies!).

I coloured the Flower stamp with my Stampin’ Write Markers in Crushed Curry, Cajun Craze, and Old Olive, before stamping onto the DSP


Stampin' Up! UK I like you Stampin Write Markers


The sentiment for this card comes from the FREE good greetings stamp set, stamped in Mossy Meadow onto the same DSP, and punched out using the Modern Label Punch, layered with two other punched pieces

I didn’t think Crushed Curry was really going to be my colour! Boy, was I Wrong!


Hannah Wilks

Stampin’ Up! UK Independent Demonstrator

If you like the project, or any of the products used, would like a catalogue, or to join my team, please contact me, or click on the ‘Shop NOW’ button at the top of the page. You can also find me on Twitter, Facebook, YouTube, Google+, About.me, and Tumblr (Links in the sidebar)

Thank you for stopping by www.www.stampinbyhannah.co.uk today

x
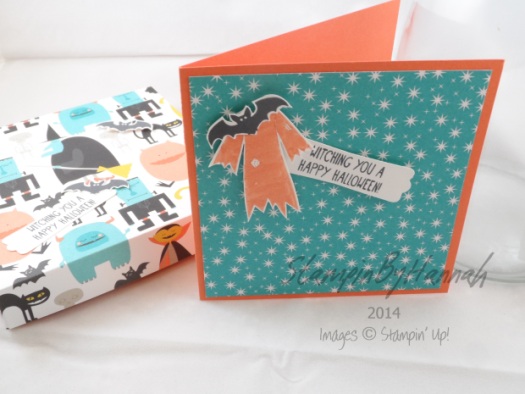


Fancy Fold Friday – Steps of a Festival!

So, this is the last post of our week of Festival of Trees 🙁

I really do love this stamp set (can you tell!) and I’m sure I have plenty of crafting left with it before it leaves us on January 5th 2015

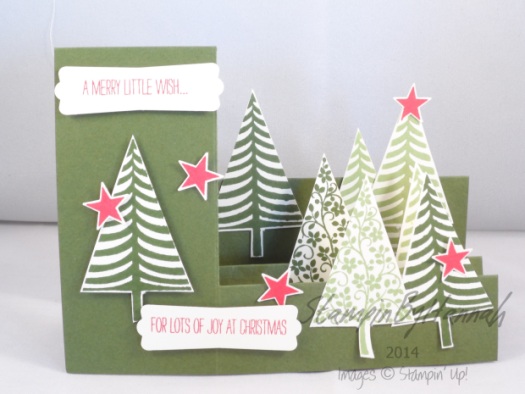
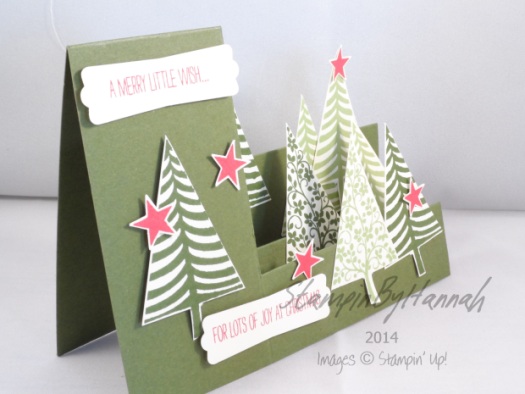
As its Fancy Fold Friday, I couldnt end the week without doing a Fancy Fold Festival of Trees card – this week, Stepper Cards!

FFF - stepper 1

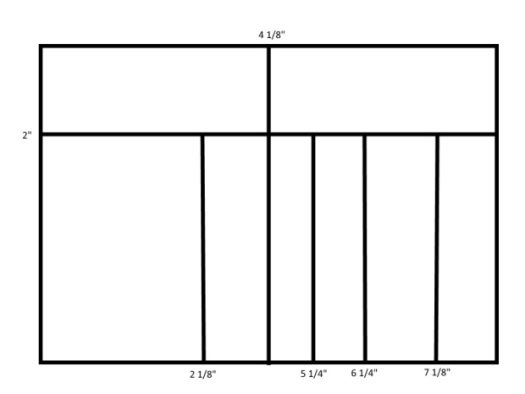
This card is a little complex to cut and score. The cardbase (here in Mossy Meadow) is cut to 8 1/4 by 5 3/4, and is scored on the short side at 2″, and on the long side at 4 1/8″, and 2 1/8, 5 1/4. 6 1/4/ ad 7 1/8 to the 2″ score line.

Side Stepper Card Score Dimentions

Using you Stampin’ Trimmer, cut the 2″ score line between the 2 1/8″ score line and 7 1/8″. The next trick is folding. Fold the 7 1/8″ score line away from you, folding the other lines like a concertina, ensuring that the 4 1/8″ score line on the unscored side is also folded away from you.

This should give you a side stepper card!

As it is Festival of Trees week, I have decorated my Side Stepper as a forest, using two of the tree stamps, the star and both of the sentiments.

FFF - stepper 2

Have I mentioned how much I love how Stampin’ Up! products coordinate – the festival of trees star stamp which works perfectly with the star punch from the Itty Bitty Accents Punch Pack! LOVE IT!

In addition to the Mossy Meadow cardstock, this card features Very Vanilla cardstock, and Mossy Meadow, Pear Pizzazz and Real Red inks!

Can wait for next week!

x


Hannah Wilks

Stampin’ Up! UK Independent Demonstrator

If you like the project, or any of the products used, would like a catalogue, or to join my team, please contact me, or click on the ‘Shop NOW’ button at the top of the page. You can also find me on Twitter, Facebook, YouTube, Google+, About.me, and Tumblr (Links in the sidebar)

Thank you for stopping by www.www.stampinbyhannah.co.uk today

x
 

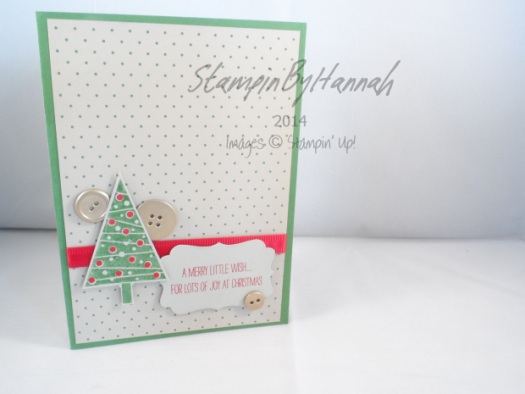
because no Festival is complete without some Gold (buttons)

Well, its Thursday, which means we’re nearly at the end of our Festival of Trees week here at StampinByHannah, I still love this stamp set. I’ve made classic and modern cards, and used both traditional and non-traditional colour schemes.

Today we return to the traditional looking Christmas Card – with Garden Green, Real Red, and …. Gold!!!

Stampin' Up! UK Festival of Trees Gold Buttons

This card uses a card base of Garden Green, with the tree also stamped in the same ink. The DSP is from the Trim The Tree Designer Series Paper Stack (awesome papers, great value for money!), in Sahara Sand. I’ve then added some of the Real Red Woven Ribbon (super pretty) and  a few of the Gold Basic Metal Buttons!

So simple, but super effective!

Check back tomorrow for our last day of our Festival of Trees week!

x


Hannah Wilks

Stampin’ Up! UK Independent Demonstrator

If you like the project, or any of the products used, would like a catalogue, or to join my team, please contact me, or click on the ‘Shop NOW’ button at the top of the page. You can also find me on Twitter, Facebook, YouTube, Google+, About.me, and Tumblr (Links in the sidebar)

Thank you for stopping by www.www.stampinbyhannah.co.uk today

x