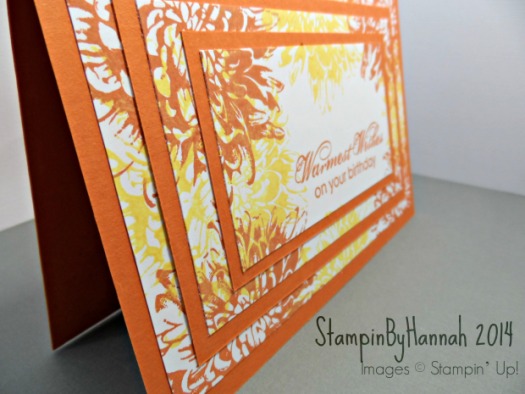
Warmest Wishes …..

As you may have noticed, most of my cards are clean and simple. But, every now and then, I like to push my boundries and try something different. This card is just that, its busy, and bright!

I love the layered effect on this card (its one I’ve made a few times for older relatives and a like),  but I dont usually make it in orange!

The In Colours 2014-2016 include Tangelo Twist –  a knock your eyes out, bright, Orange! It is gorgeous!

Here I’ve paired it with Daffodil Delight (another lovely colour), and the Blooming with Kindness Stamps, creating a bright and cheery, Warmest Wishes on your Birthday, card.

Warmest Wishes Tangelo Twist

The trick with this card is in the measurements!

The card base is half an A4 piece of Tangelo Twist Card stock, and then there are 5 cardstock layers on top, alternating between Whisper White and Tangelo Twist.

Layer 1 – Whisper White – 5 1/2 x 3 3/4″ (14 x 9.5cm)

Layer 2 – Tangelo Twist – 5 x 3 1/8″ (8 x 12.5cm)

Layer 3 – Whisper White – 4 5/8 x 2 3/4″ (11.5 x 7cm)

Layer 4 – Tangelo Twist – 4 / 2 1/4″ (10 x 6cm)

Layer 5 – Whisper White – 3 5/8 x 2″ (9 x 5cm)


Once all your layers are cut, stack the Whisper White pieces on top of each other (each one in the centre of the one underneath), and stamp across all three layers. You could use some temporary adhesive to stop the layers from moving, although I just hold them steady with one hand and stamp with the other. This stamping will leave a white boarder around each layer, but thats OK, thats where the Tangelo Twist layers come into their own! Once the ink is dry, stack the Whisper White pieces with the Tangelo Twist pieces, starting with the largest piece at the bottom and ending with the smallest piece on top.

I have stuck my layers together with SNail adhesive, but for a more dimensional look you could pop your layers up with dimensionals for a truely eye-popping card!


Hannah Wilks

Stampin’ Up! UK Independent Demonstrator

If you like the project, or any of the products used, would like a catalogue, or to join my team, please contact me, or click on the ‘Shop NOW’ button at the top of the page. You can also find me on Twitter, Facebook, YouTube, Google+, About.me, and Tumblr (Links in the sidebar)

Thank you for stopping by www.www.stampinbyhannah.co.uk today

x

Are you up for the Challenge?!

Its an exciting day here at StampinByHannah, as we celebrate the launch of our sister site – www.stampinbychallenge.blogspot.co.uk – a monthly (for now) challenge blog for all cardmakers and papercrafters

Head over to the blog now to find out what this months challenge is, and enter now!

Thought I’d give you a little pick at what I made though (but you’ll have to visit StampinByChallenge to get what the challenge is!)

Stampin By Challenge


This super simple card uses a Whisper White card blank and some punched circles. I used the 1 1/4″ scallop circle punch to cut 3 circles from the new In Colours card stock (in Blackberry Bliss, Lost Lagoon, and Hello Honey), and then layered the 1″ circles of Moonlight DSP on top (with some dimentionals of course!). The sentiment is from the Blooming with Kindness stamp set.

Feeling inspired?

Join the fun now!


Hannah Wilks

Stampin’ Up! UK Independent Demonstrator

If you like the project, or any of the products used, would like a catalogue, or to join my team, please contact me, or click on the ‘Shop NOW’ button at the top of the page. You can also find me on Twitter, Facebook, YouTube, Google+, About.me, and Tumblr (Links in the sidebar)

Thank you for stopping by www.www.stampinbyhannah.co.uk today

x

Sticky Note Holder

Here we are, a lovely little sticky note holder, a quick and easy project for a friday evening!

Sticky note holder stampin up

This project is super simple, using one piece of cardstock and a bit of DSP! I Love the new In Colours, Blackberry Bliss inparticular, and the MoonLight DSP Stack shows it off so well I had to use it too….

The trick is to measure your sticky notes!

I’ve attempted to explain in the video, however, I do like written instructions for fiddly projects like this….

You need to measure your notes, across the width and height (this will give you a square measurement, the front of your holder), and then measure the depth of the pad. Then, you need to take the height of the front and the height of the back (hopefully this is the same number!) and add them together, along with the depth. I’m hoping I’m making sense here ….. maybe time for a diagram.

sticky note measurements

So, to get the lenght of the cardstock you need: 3″ for the font, 3″ for the back, and 5/16″ for the depth. Now, if you can accurately cut to 5/16″ great, I cant, so I’ve cut mine to 3/8″. This gives me a piece of Cardstock 6 3/8″ by 3″.

The DSP is a 1/4″ shorter and narrower than the front of your sticky notes eg: 3×3″ notes, 2 3/4″x2 3/4″ DSP

The rest of the cover is decorated with petite petals cut from that gorgeous Blackberry Bliss, and a sentiment from A Dozen Thoughts, punched with the Modern Label Punch.


Hannah Wilks

Stampin’ Up! UK Independent Demonstrator

If you like the project, or any of the products used, would like a catalogue, or to join my team, please contact me, or click on the ‘Shop NOW’ button at the top of the page. You can also find me on Twitter, Facebook, YouTube, Google+, About.me, and Tumblr (Links in the sidebar)

Thank you for stopping by www.www.stampinbyhannah.co.uk today

x

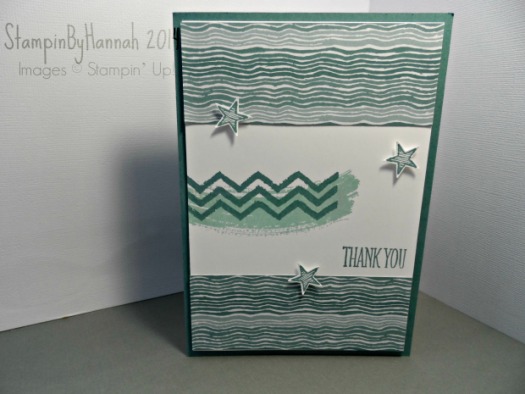
A Moonlight Thank You

Have I mentioned how much I love the new In Colours for 2014-2016! Have I! oh well, your going to hear it again! I love our new In Colours!

This time I thought I’d have a play with the MoonLight Designer Series Paper Stack. These paper stacks are so handy for a quick card. Instead of the usual 12×12″ size, these stacks (and there are two of them in the annual catalogue and another on its way in the seasonal catalogue – I cant wait!), these stacks are 6 1/2″ by 4 1/2″ (thats 11.4×16.5cm), just a little bigger than your standard size card! Awesome! The Moonlight stack features the new In Colours in their full and beautiful glory, using Blackberry Bliss, Hello Honey and Lost Lagoon (the yummest colours!)Stampin Up! Moonlight thank you

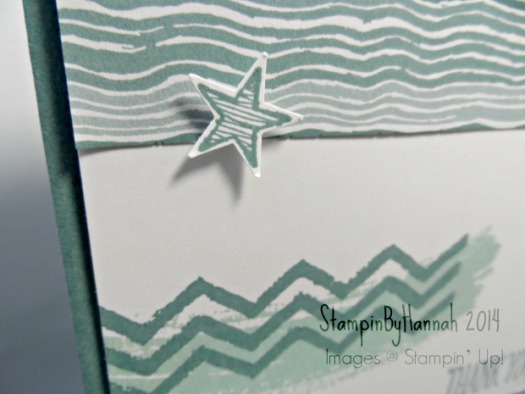
I’ve been playing with Lost Lagoon a bit in the last few weeks, I had a couple of card orders that called for just such a colour, and this card uses my very last piece of Lost Lagoon Cardstock (must order more!), along with a piece of the Moonlight DSP, Work of Art stamp set, and the Something to Say stamp set and coordinating Itty Bitty Accents Punch pack! (LOVE!)

Stampin Up! Moonlight thank you

The Something to Say stamp set features14 sentiment stamps, many of which are designed to be used in pairs, along with 3 accent stamps: a heart, a flower, and a star. Here I’ve used the star, stamped in Lost Lagoon on Whisper White cardstock, and punched them out using the star punch from the Itty Bitty Accents Punch Pack. The Thank You is also from the same stamp set.

A quick and easy card front, attached to a Lost Lagoon Card base with a few dimensionals

Easy!


Hannah Wilks

Stampin’ Up! UK Independent Demonstrator

If you like the project, or any of the products used, would like a catalogue, or to join my team, please contact me, or click on the ‘Shop NOW’ button at the top of the page. You can also find me on Twitter, Facebook, YouTube, Google+, About.me, and Tumblr (Links in the sidebar)

Thank you for stopping by www.www.stampinbyhannah.co.uk today

x

Thank You …….

Mass production of cards can be difficult. I find that producing a small number of the same card makes it easier, doing say 8 of each colour for example.

3x3 Thank you note cards

Recently I have been making Wedding Invitations (150 of them actually) and although I have broken them down into batches, there are a number of other ways of making the ‘batch cardmaking’ process a little easier.

1. do all of each step all at once eg: cut ALL the pieces for ALL the cards, then do ALL the scoring, ALL the stamping etc.

2. do it in smaller batches. I found that once I’d made about 40 invitations I was ready to give up all together, so instead, I did 30-35, and stopped for a while (admittedily, this only works if you have plenty of time!)

3. Change it up. Generally I do 6-8 of the exact same card before I change something, either the colour, or placement of the stamped images, use a different punch, etc.

4. Grab your nearest and dearest to help! not something I have ever tried, but thats more because James is not crafty at all, and I’m not sure if Freda the Cat is much good with a paper trimmer!

So, here’s my offer to you: place an order of £20 or more (there are many ways to order, use the contact me page if you are stuck), and get one of these super cute thank you notes, plus a special little something! (I’m not telling you what – you’ll have to order and find out!)

What could you get for £20? take a little look below (click on the image to go to my shop from where you can purchase!)

Thank you

🙂


Hannah Wilks

Stampin’ Up! UK Independent Demonstrator

If you like the project, or any of the products used, would like a catalogue, or to join my team, please contact me, or click on the ‘Shop NOW’ button at the top of the page. You can also find me on Twitter, Facebook, YouTube, Google+, About.me, and Tumblr (Links in the sidebar)

Thank you for stopping by www.www.stampinbyhannah.co.uk today

x

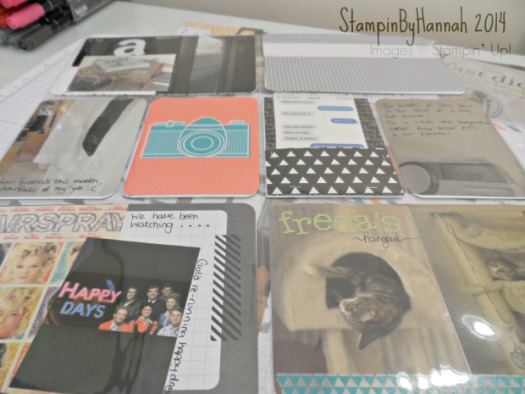
Project Life by Stampin’ Up! July 2014

Another month come and gone, and a heap of photos to get into albums, isnt it great that we have Project Life by Stampin’ Up! to make that process easier.

Project Life by Stampin Up July 2014

I really do love how simple you can make Project Life, and how complex it can become by adding items from the accessory packs, stamping, extra cardstock or DSP, and other memorabilia alongside your photos and journalling.

This month I created 3 pages (or spreads), the first focuses on the first week in the month. Usually I’m not too fussy about which order my photos from the month go in on the page, however, I knew I wanted this week to be seperate and a little different as it is about a very important week in our wedding planning process (12 months to go now! eeeek!), and included the taking of our engagement photos, buying our rings and me finding THE dress! Of course I havent included the photo of the dress (dont want the Mr. seeing it do we!) but I have mentioned it in my journalling.

Project Life by Stampin Up July 2014


The other two pages this month include the other photos and events from the month of July. I have discovered that I seem to take more photos of food than anything else! We’re supposed to be dieting (wedding prep again!) but this month has been horrendous with work, we’ve both had a heap of night shifts and horrible periods of not seeing each other at all, and so we’ve had a bit of a treat with a date night to Pizza Express, payday takeaway, and I might have been very naughty one of the nights James was on nightshift and I couldnt be bothered to find real food! Ooops! oh well, back to the dieting grindstone in August!

Project Life by Stampin Up July 2014

This month, as well as using the Everyday Adventure Project Life Card Collection, and Accessory Pack, I’ve mixed it up a little with the addition of some of the Moonlight Designer Series Paper Stack. I’m planning on working on these pages a little longer (put a nice order recently to add to my ever growing stash!), will do a full video share once they are completely finished, but I didnt want you to think I hadnt been working on it at all, so….

Until next time


Hannah Wilks

Stampin’ Up! UK Independent Demonstrator

If you like the project, or any of the products used, would like a catalogue, or to join my team, please contact me, or click on the ‘Shop NOW’ button at the top of the page. You can also find me on Twitter, Facebook, YouTube, Google+, About.me, and Tumblr (Links in the sidebar)

Thank you for stopping by www.www.stampinbyhannah.co.uk today

x

Take a shot………

Or just take advantage of the latest Stampin’ Up! awesome deal and get your Stampin’ Up! Big Shot in August, and get a free stamp and framelit bundle, as well as getting 15% off other selected bundles!

This offer, only available for one month, lets you into a whole new world (sorry!) of crafting, giving you even more options for cards and projects. The Big Shot is a great die cutting machine, enabling you to emboss, cut and score, using framelits, bigz dies, embossing folders and other wonderful ways to give your cards more dimension and impact.

The Big Shot allows you to cut and emboss a number of different materials, including; card and paper, vellum, coaster board, window sheet, glimmer paper, foil, felt and many others. Use your Big Shot to create 3D projects using the Stampin’ Up! Bigz Die; Hamburger box, Spiral flowers, gift bows, and designer rosettes. Create embossed cards for your Project Life album. Use stamp and framelit bundles to stamp and cut intricate shapes and images, giving your projects that extra special something!

For the month of August get your Big Shot, with a Stamp and Die bundle, for £87.95, AND get 15% off other selected bundles!


Hannah Wilks

Stampin’ Up! UK Independent Demonstrator

If you like the project, or any of the products used, would like a catalogue, or to join my team, please contact me, or click on the ‘Shop NOW’ button at the top of the page. You can also find me on Twitter, Facebook, YouTube, Google+, About.me, and Tumblr (Links in the sidebar)

Thank you for stopping by www.www.stampinbyhannah.co.uk today

x
Wish Big!

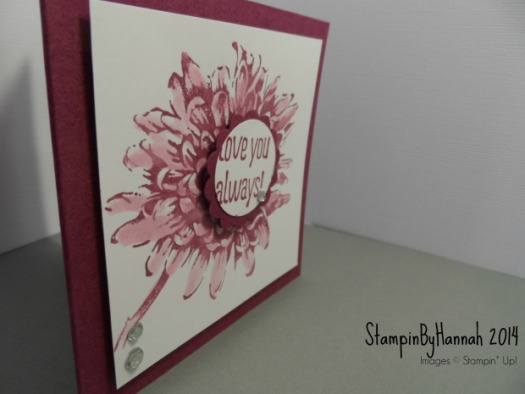
I have a card project for you today, a very simple card project, but with a bit more meaning!

I joined Stampin’ Up! UK as a demonstrator on the 1st June 2014 (thats two months ago!), with the aim of meeting new people, finding some crafty friends and making some nice things with some quality product! I think I’m on my way to accomplishing that!

Believe it or not, I’m quite a shy person, I don’t like being the centre of attention, I hate new situations and crowds of people, and I fight with my anxiety every single day! Crafting / art / creating etc. has always been my escape, my time for me, something I do to get away from everything else, and shut-off for a while. And I love it!

When I found Stampin’ Up! (a number of years ago now) I couldn’t imagine having a blog and posting video’s on the internet! So, I didn’t sign up 🙁 and man, have I missed out over those years! This card represents for me more than just a card, made with Stampin’ Up! product, with a nice sentiment. Its now my mindset, and my goal – Wish Big!

Stampin' Up! UK Card Wish Big

The card is a simple top fold card, cut from A4 (or 8 1/2 x 11″ if your in the states) and folded in half. The Whisper White piece is then cut slightly smaller (1/4″ on the top and side), and onto that I stamped the swirl from Everything Eleanor in Smoking Slate, and the large flower in Rich Razzleberry! The sentiment is from A Dozen Thoughts, ‘Wish Big’, stamped in Rich Razzleberry ink and Punched out using the Modern Label Punch. I inked the edges of the punched label and added 3 rhinestones before putting on the card with Dimentionals.

The card is incredibly simple, but means so much.

Hannah Wilks

Stampin’ Up! UK Independent Demonstrator

If you like the project, or any of the products used, would like a catalogue, or to join my team, please contact me, or click on the ‘Shop NOW’ button at the top of the page. You can also find me on Twitter, Facebook, YouTube, Google+, About.me, and Tumblr (Links in the sidebar)

Thank you for stopping by www.www.stampinbyhannah.co.uk today

x


Stampin’ Write Markers Watercolour Technique!

I recently purchased the Many Marvelous Markers pack from Stampin’ Up! mainly because I wanted access to all the Stampin’ Up! colours.

The Stampin’ Write markers are great, I love the duel tips and the handy storage system (more on that next week!), but I’m always looking to get more out of any product I purchase.

 Watercolour with Stampin Write markers

So, I was playing around with my inks last week, and used them for  similar technique, and suddenly thought ‘will this work with my markers!’

The card , Rich Razzleberry (yum!) is cut to 7″ by 3 1/2″ (17.5 x 9cm) and scored at 3 1/2″ (9cm)

The Whisper White square measures 3 x 3″ (7.5cm)

I use my glass table top but you could just as easily use a plate or paint palate

Hope you like this technique – show me your creations on my facebook page www.facebook.com/stampinbyhannah


Hannah Wilks

Stampin’ Up! UK Independent Demonstrator

If you like the project, or any of the products used, would like a catalogue, or to join my team, please contact me, or click on the ‘Shop NOW’ button at the top of the page. You can also find me on Twitter, Facebook, YouTube, Google+, About.me, and Tumblr (Links in the sidebar)

Thank you for stopping by www.www.stampinbyhannah.co.uk today

x

August Stampin’ Techniques Class – Blooming With Kindness

Stampin' Techniques class August 2014Hello!

I know I usually reserve mondays for tips / techniques / hauls etc. but I thought I would take this monday as an opportunity to tell you about the August Stampin’ Techniques Class here at StampinByHannah!

This class is available either online (check it out here!) for a small fee, or FREE! if you live within 25 miles of me (Stockton-on-Tees), as a party or workshop for you and your friends!

The class comes complete with instructional videos and a handout, as well as all the pieces to make the cards. The stamp set is sold seperately (available below)

Class starts August 1st!

I cant wait for you to join me!


Hannah Wilks

Stampin’ Up! UK Independent Demonstrator

If you like the project, or any of the products used, would like a catalogue, or to join my team, please contact me, or click on the ‘Shop NOW’ button at the top of the page. You can also find me on Twitter, Facebook, YouTube, Google+, About.me, and Tumblr (Links in the sidebar)

Thank you for stopping by www.www.stampinbyhannah.co.uk today

x