A Gift for you….

I have a series of posts for you for the last few Fridays before Christmas; and they are all little boxes perfect for table favours or stocking treats!

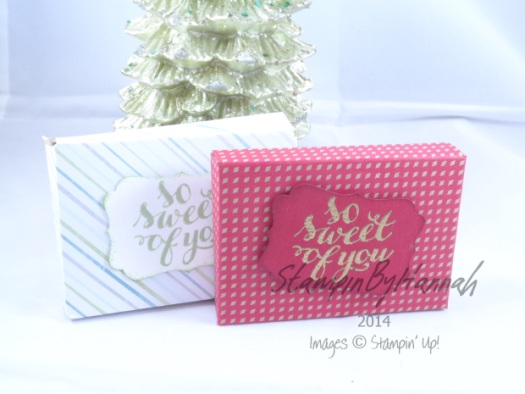
The first of these posts is an Envelope Punch Board project designed to hold a Galaxy Gift for You!

Stampin' Up! UK Galaxy Gift For You Chocolate DSP

The original box uses the All is Calm DSP (its just so pretty), and the stamp is from the Hello There Hostess Stamp Set. The red version uses the Under the Tree Speciality Designer Series Paper and the same stamp set.


Measurements: The Envelope punch board works best in imperial so they are the measurements I will use:

Cardstock measures : 5 1/2 x 5 1/2″

Make the first punch and score at: 2 3/4″ and the second at: 3 1/2″

Use these first score lines as a guide to make the punch and scores on the other 3 sides

Cut away the little squares formed by the Punch board

Fold together around your chocolate and use Glue dots to hold together


Hope you enjoyed this project


Hannah Wilks

Stampin’ Up! UK Independent Demonstrator

If you like the project, or any of the products used, would like a catalogue, or to join my team, please contact me, or click on the ‘Shop NOW’ button at the top of the page. You can also find me on Twitter, Facebook, YouTube, Google+, About.me, and Tumblr (Links in the sidebar)

Sign up to our newsletter here – http://eepurl.com/2if59

Thank you for stopping by www.www.stampinbyhannah.co.uk today

x


12 Tags of Christmas – Dancing Santa!

Oh, yes! only a few more Mondays left until Christmas, and this week I have brought you Crazy Dancing Santa!

Stampin' Up! UK Santa and Co 12 tags of christmas


This tag uses the Santa & Co. Designer Series Paper, more commonly known as ‘that paper with the crazy dancing Santa’s!

Stampin' Up! UK Crazy santa

The tag is DSP cut to 6 x 2″ and punched with the Scalloped Tag Topper Punch (as always!)

The Santa is fussy cut from the paper and mounted on a 1 1/4″ scallop circle punched from Real Red cardstock. I coloured some of rhinestone with the darkest Old Olive Blendability marker, and formed a triangle.

and there we have… Crazy Dancing Santa!


Hannah Wilks

Stampin’ Up! UK Independent Demonstrator

If you like the project, or any of the products used, would like a catalogue, or to join my team, please contact me, or click on the ‘Shop NOW’ button at the top of the page. You can also find me on Twitter, Facebook, YouTube, Google+, About.me, and Tumblr (Links in the sidebar)

Sign up to our newsletter here – http://eepurl.com/2if59

Thank you for stopping by www.www.stampinbyhannah.co.uk today

x

DIY Wreath Card

Wreaths appear to be a BIG trend this year when it comes to Christmas (or actually any holiday / event!), and Stampin’ Up! have an amazing Wreath stamp set (and matching framelits) which is just gorgeous, but I decided that I would make my own!Stampin' Up! UK DIY Wreath Christmas


This card uses a Real Red Card base, with Old Olive and Whisper White Card matts. I used the Itty Bitty Accents Punch Pack Flower punch to make the flowers for the wreath in Old Olive and Real Red, before arranging them in a sort of circle and attaching them using Glue Dots – Super Simple to make but really pretty

Stampin' Up! UK DIY Wreath christmas punch

The sentiment is one from the Holiday Home stamp set (sorry, this stamp set is used a LOT in the coming weeks!)

LOVE!

Hannah Wilks

Stampin’ Up! UK Independent Demonstrator

If you like the project, or any of the products used, would like a catalogue, or to join my team, please contact me, or click on the ‘Shop NOW’ button at the top of the page. You can also find me on Twitter, Facebook, YouTube, Google+, About.me, and Tumblr (Links in the sidebar)

Sign up to our newsletter here – http://eepurl.com/2if59

Thank you for stopping by www.www.stampinbyhannah.co.uk today

x

Fancy Fold Friday – Scallop Tag Topper Card

Hello!

This is a joint post with my other website – www.thehandmadeweddings.co.uk.

I love making wedding stationary, but a standard card can be a little bit dull, and I love making these!

It uses my favourite Scallop Tag Topper punch, yes I really do use it all the time!

Stampin' Up! UK Scallop tag topper punch wedding card


Measurements:

Cardstock = 8 1/4 x 5 3/4″ (21 x 14.5 cm)

Mark your halfway point on the short sides of your cardstock – approximately 2 7/8″ (7.3 cm) and use these as guide marks when using your scallop tag topper punch

Score one of the tags where it joins the card, and fold.

Score the main card at 4 1/4″ (10.8 cm)


Insert measures – 3 7/8 x 5 1/2 ” (10 x 14 cm)

Card matt measures – 2 1/4 x 5 1/2″ (5.5 x 14 cm)


For more information and to see the complete Wedding invitation collection visit – www.thehandmadeweddings.co.uk


Hannah Wilks

Stampin’ Up! UK Independent Demonstrator

If you like the project, or any of the products used, would like a catalogue, or to join my team, please contact me, or click on the ‘Shop NOW’ button at the top of the page. You can also find me on Twitter, Facebook, YouTube, Google+, About.me, and Tumblr (Links in the sidebar)

Sign up to our newsletter here – http://eepurl.com/2if59

Thank you for stopping by www.www.stampinbyhannah.co.uk today

x

An Itty Bitty Bit Shimmery

Have you take a look at the Paper Basics Page of the Annual Catalogue? No?! well, then you have missed out! I LOVE this page! you can find it on page 192, and its where you can find all the cool papers and cardstocks; vellum, Kraft cardstock, watercolour paper, glimmer page and what I am using today – Shimmery White cardstock!

Stampin' Up! UK shimmery white card

This photo does not do this cardstock justice! it is gorgeous!

This is a top folding card, half a piece of A4 folded in half, with a card matt cut slightly smaller and embossed using my Simply Scored! to get long embossed lines like a frame. The off cuts of the Shimmery White cardstock were cut to 1 1/2″ squares, and I used my Itty Bitty Accents punch pack to punch the shapes, before layering them with some scraps of Melon Mambo!

cool huh!


Hannah Wilks

Stampin’ Up! UK Independent Demonstrator

If you like the project, or any of the products used, would like a catalogue, or to join my team, please contact me, or click on the ‘Shop NOW’ button at the top of the page. You can also find me on Twitter, Facebook, YouTube, Google+, About.me, and Tumblr (Links in the sidebar)

Sign up to our newsletter here – http://eepurl.com/2if59

Thank you for stopping by www.www.stampinbyhannah.co.uk today

x

12 Tags of Christmas – Trim the Tree….

Oh yes, We are still working our way though the 12 tags of Christmas!

Stampin' Up! UK Christmas Tag Trim the Tree

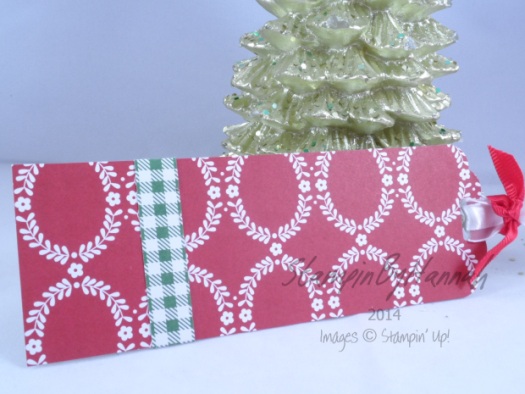
Here I cut a 2 x6″ piece of DSP from the Trim the Tree Designer Series Paper Stack (there are so many cute patterns in there!), and punched the top with the Scalloped Tag Topper Punch.

The band around the tag is just a scrap of the same piece of DSP, wrapped around and attached with some Snail.

The ribbons on the top are the Real Red 3/8″ Satin Woven Ribbon tied around a piece of 5/8″ Organza Ribbon.

This tag is simple but really sweet.


Hannah Wilks

Stampin’ Up! UK Independent Demonstrator

If you like the project, or any of the products used, would like a catalogue, or to join my team, please contact me, or click on the ‘Shop NOW’ button at the top of the page. You can also find me on Twitter, Facebook, YouTube, Google+, About.me, and Tumblr (Links in the sidebar)

Sign up to our newsletter here – http://eepurl.com/2if59

Thank you for stopping by www.www.stampinbyhannah.co.uk today

x

Product of the Month – Project Life by Stampin’ Up! Cards!

Ok, so this month my Product of the Month is the Seasonal Snapshot Project Life by Stampin’ Up! Card Collection and Accessory Pack.

I LOVE this kits, you get heaps of Project Life cards, stickers, Washi tape, and other fun embellishments, and they are great for documenting family holidays, Christmas, Halloween, etc. But I know there is more that you can do with them than just memory keeping (don’t get me wrong, I love memory keeping! but I know its not everyone’s bag!)


So, I grabbed my kits the other day and made some really cool cards using just the cards in the kit (plus some cardstock for the card bases) and the goodies in the Accessory pack.

Stampin' Up! UK Project Life Thankful for you

Some of the cards in this kit are based around Halloween and Thanksgiving, and although Halloween in growing in popularity, Thanksgiving is definitely an All American Holiday! So I knew I needed to find a different purpose for these cards. I always need Thank You cards (each and every customer that shops with me gets a Thank you), and so I took this lovely spotty 6×4 card and cut it down to 4 x 5 3/4″ to fit my card base, added a strip of Washi tape, a punched Decorative Label, and the Thankful sticker from the Accessory kit. The ‘for you’ is part of a stamp from Good Greetings, I coloured with Tangerine Tango Stampin’ Write Marker and added to the label.
Stampin' Up! UK Project Life Seasonal Snaphot

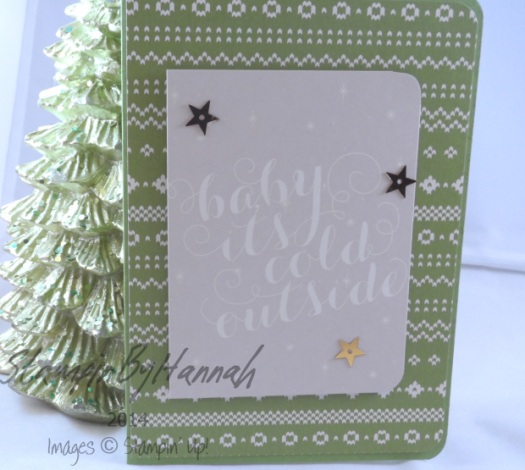
I love this card! Baby It’s Cold Outside, and I thought it paired beautifully with this Old Olive ‘jumper’ print card! I have rounded the corners with the Project Life by Stampin’ Up! Corner punch, and added some stars from the Accessory pack with some multi-purpose liquid glue.

Stampin' Up! UK Project Life by Stampin' Up! Seasonal Snapshot shaker card

This thought is my favourite of the 3 cards! This card took me ages! I love the look of a Shaker card, but I have never made one (until now!) and I have to say, I’ll be grabbing some foam tape before I make one again! I used a Real Red card base, and added the Old Olive Polka dot print 6 x4 card (cut down a little) to the front, before adhering the red snowflake 3 x4 card to the centre.

The accessory pack comes with 3 of these lovely printed acetate 3 x4 cards, one says Merry Christmas, one has a wood grain print, and the other is Halloween themed. And this Merry Christmas just screamed ‘Shaker card’ to me! I have a little confession to make here, the Sahara Sand frame around the acetate piece is cut using Spellbinders Curved Matting Basics A dies, because that is what I had on hand.

Then came the fiddly part! I really need some foam tape next time because to create the ‘shaker’ you have enclose all those sequins in something! Well, I didnt have foam tape (and now I’m thinking about it, this would have been a great time to use those edge pieces from the Dimensionals!), but I do have a whole heap of foam squares from a well know craft superstore (I wasn’t wasting this many dimensionals! sorry!), and used those to enclose my sequins. So, the Sahara sand frame is attached to the acetate piece, then I stuck foam squares around the edge of the acetate, piled the sequins in the centre of the snowflake card, and stuck the acetate, frame, and foam squares, over the top!

I love the look, and it would be super simple if I had some foam tape!


Hannah Wilks

Stampin’ Up! UK Independent Demonstrator

If you like the project, or any of the products used, would like a catalogue, or to join my team, please contact me, or click on the ‘Shop NOW’ button at the top of the page. You can also find me on Twitter, Facebook, YouTube, Google+, About.me, and Tumblr (Links in the sidebar)

Sign up to our newsletter here – http://eepurl.com/2if59

Thank you for stopping by www.www.stampinbyhannah.co.uk today

x
Weekly deals – 5.11.14

Time for some more awesome weekly deals!

Stampin' Up! UK Weekly deals November 2014This weeks offerings include a lovely 8×8″ scrap-booking kit, and the Grateful Heart Thanksgiving Ensemble (MDS digital download) which makes lovely autumn themed party invitations. But also the Lovely Romance stamp set in wood mount, which coordinates with the Chalk Talk framelits. AND some great This and That goodies, Coaster Board, and the Triangle punch which could be a great addition to your crafty stash!


But wait, thats not all!


Stampin' Up! UK Blendabilities club


Also, I have an offer for you this week! Check out my new Blendabilities club!

Get all the Stampin’ Up! Blendabilities, along with momento ink (and refill), stamps, colour lifter pen, and Whisper White cardstock, for just £42.50 per month for 6 months. Each month you will receive at least 2 sets of Blendabilities, as well as a project and instructional video from me! How exciting, and a great way to get started with our Blendabilities – colour your projects happy!


Hannah Wilks

Stampin’ Up! UK Independent Demonstrator

If you like the project, or any of the products used, would like a catalogue, or to join my team, please contact me, or click on the ‘Shop NOW’ button at the top of the page. You can also find me on Twitter, Facebook, YouTube, Google+, About.me, and Tumblr (Links in the sidebar)

Sign up to our newsletter here – http://eepurl.com/2if59

Thank you for stopping by www.www.stampinbyhannah.co.uk today

x

12 Tags of Christmas – Under the Tree

Welcome to another 12 Tags of Christmas!

This week I used the Under the Tree Specialty Designer Series Paper – a wonderful heavy cardstock weight paper that is amazing for boxes and packaging, but has a hidden feature!
Stampin' Up! UK 12 Tags of Christmas Under the TreeOk, so, this tag is 6″ x 2″, and punched with the Scallop Tag Topper Punch.

The Under the Tree paper is coloured on one side, and kraft with a white pattern on the other. For this tag I used the Kraft side, and inked the tag with Old Olive Ink and a sponge. The white printed pattern acts as a resist, meaning that the Kraft cardstock takes the colour of the ink, but the pattern doesn’t! (this sort of thing always reminds me of some Tim Holtz products, and just screams to ink and spritz and alter). I then stamped the snowflake stamp from Trendy Trims in Early Espresso ink.

The tag was then finished with the Natural and Old Olive Two-Tone Trim (extra chunky bakers twine! LOVE!)


So, check back next time for another installment of our 12 Tags of Christmas!

and sign up for the StampinByHannah newsletter by hitting the Subscribe to Newsletter button —->

Hannah Wilks

Stampin’ Up! UK Independent Demonstrator

If you like the project, or any of the products used, would like a catalogue, or to join my team, please contact me, or click on the ‘Shop NOW’ button at the top of the page. You can also find me on Twitter, Facebook, YouTube, Google+, About.me, and Tumblr (Links in the sidebar)

Thank you for stopping by www.www.stampinbyhannah.co.uk today

x


12 Tags of Christmas – White Christmas

And so continues the 12 Tags of Christmas!

As usual I have punched  a 6×2″ strip of cardstock with the Scalloped Tag Topper Punch, but this time I have also punched a 5 3/4 x 2″ piece to layer, before rounding the corners of both pieces with the Project Life by Stampin’ Up! corner rounder punch.


Stampin' Up! UK 12 tags of christmas


This week, I have used the White Christmas stamp set, stamped in Early Espresso, on to Very Vanilla cardstock. The To and From stamp is from Festival of Trees. I have then mounted the Very Vanilla piece onto Cherry Cobbler card stock with Dimensionals.

Stampin' Up! UK 12 tags of christmas


The top of this tag is a little different from the others so far. I have threaded Cherry Cobbler 1″ Sheer Linen Ribbon through the tag, and tied it together with some very thin ribbon that I have to admit, I have no idea where it came from!! eek!

I love this simple tag (most of the tags in this series are quite simple really, quick and easy projects are the order of the day around Christmas!)


Hannah Wilks

Stampin’ Up! UK Independent Demonstrator

If you like the project, or any of the products used, would like a catalogue, or to join my team, please contact me, or click on the ‘Shop NOW’ button at the top of the page. You can also find me on Twitter, Facebook, YouTube, Google+, About.me, and Tumblr (Links in the sidebar)

Thank you for stopping by www.www.stampinbyhannah.co.uk today

x