Make It Monday | Pleated Designer Series Paper Card

Make It Monday Pleated Designer Series Paper card using Presents and Pine Cones and Merriest Wishes from Stampin' Up! UK

make-it-monday-banner

Hello! Wow, hasn’t Monday come around awfully quickly! I am off on Annual Leave this week (read, more time for Stamping!) as I am attending Stampin’ Up! On Stage Local on Saturday – I am so excited!!! I’m actually heading down to Telford on Thursday for a night away with James before meeting up with some Stampin’ friends on Friday.]

Make It Monday Pleated Designer Series Paper card using Presents and Pine Cones and Merriest Wishes from Stampin' Up! UK

I am starting to get ready for my November Stamp a Stack event – This time we are making a stack of Christmas cards, and I have to admit that we may well be making a version of this card then too! But I love it.

The Designer Series Paper sale ends today, so don’t forget to grab your packs of Designer Series Paper while it’s on offer before its too late.

Measurements:

Card Base: 29.6 x 10.5 cm scored on the long side at 14.8

Whisper White Layer: 14.3 x 10 cm

Designer Series Paper: 26.5 cm x 6.5 cm

Score your piece of Designer Series Paper on the long side at 6.5, 8, 12, 13.5, 17, 18.5, 21, and 22.5 cm

Make It Monday Video Tutorial Pleated Designer Series Paper card using Presents and Pine Cones and Merriest Wishes from Stampin' Up! UK

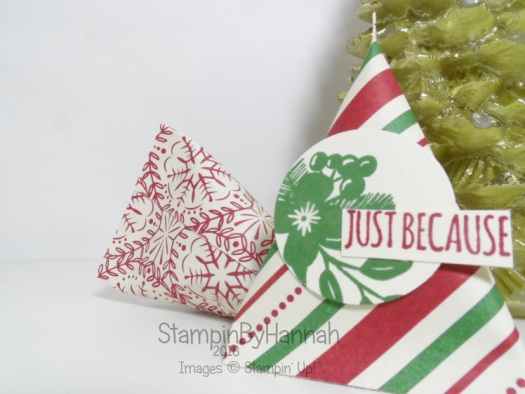
How pretty is that Bauble? These stamps and dies are from the gorgeous Merriest Wishes bundle, I’m sure I will be sharing heaps of projects with this bundle in the next few weeks

This card is finished with a bow using the Emerald Envy Silky ribbon.

Thanks so much for checking out my blog today, don’t forget to subscribe to my newsletter and to my YouTube channel while you here, and I will see you again tomorrow for 2 awesome blog posts!


Stampin' Up! Sale UK


Product List


Shop Now button-001Join my team button-001

To purchase any of the items featured in my projects please use the links above. To join my team of Stampin’ Friends select ‘Join My Team’ or send me a message!

Please support StampinByHannah, and join my Code Club, by using the Hostess code featured in the top right hand of my blog. For orders of over £150 please do not use this code, as you are entitled to your own Hostess benefits!

Sign up to my newsletter here – http://eepurl.com/2if59

Hannah McCurley

Stampin’ Up! UK Independent Demonstrator

How To… Create Quick and Easy Birthday Cards

How to make a quick and easy birthday card video tutorial using products from Stampin' Up! UK

how-to-banner

Welcome to a brand new series of Blog Posts here at StampinByHannah! I’m not promising a How To… every week, but I will try (I have a few prepped and filmed already so I am hopeful!)

I recently spent the day stamping, making cards and generally having a great time crafting; I was prepping for an event and really needed some simple projects for someone who had never stamped before, and I came up with this great card:

Easy Birthday card using Tin of Cards and Playful Backgrounds from Stampin' Up! UK

In the interest of keeping things simple, check out the video:

Measurements:

Card base – half A4 (14.8 x 21 cm) scored at 10.5 cm

Card stock – 14.8 x 5.5 cm

Card stock for stamping – 14.8 x 5 cm

Plus scraps for die cutting

How to make a quick and easy birthday card video tutorial using products from Stampin' Up! UK


Product List


Shop Now button-001Join my team button-001

To purchase any of the items featured in my projects please use the links above. To join my team of Stampin’ Friends select ‘Join My Team’ or send me a message!

Please support StampinByHannah, and join my Code Club, by using the Hostess code featured in the top right hand of my blog. For orders of over £150 please do not use this code, as you are entitled to your own Hostess benefits!

Sign up to my newsletter here – http://eepurl.com/2if59

Hannah McCurley

Stampin’ Up! UK Independent Demonstrator

Christmas Countdown | Mini Chocolate Sour Cream Packets

Christmas Countdown Chocolate Video Tutorial using This Christmas from Stampin' Up!

Christmas Countdown using Stampin' Up! UK products

Yay! Christmas is coming! and I have a whole series of quick and easy Christmas Papercraft projects for you to make this Festive season.

This week I have these cute mini sour cream packets to hold individual chocolates. I made 24 of these a few years ago as part of an Advent calendar, and James had great fun tearing each one open each morning to get at his chocolate!

Christmas Countdown Chocolate Video Tutorial using This Christmas from Stampin' Up!

These use the This Christmas Designer Series Paper (which I am a bit obsessed with!). This speciality DSP is thinner than standard Designer Series Paper, and you get more in a pack, for the same price as normal.

Measurements:

Designer Series Paper – 3 x 4″ (7.5 x 10 cm)

I hope you love this series of Christmas projects, and I will see you for another video tomorrow…..


Stampin' Up! UK Designer Series Paper Sale


Product List


Shop Now button-001Join my team button-001

To purchase any of the items featured in my projects please use the links above. To join my team of Stampin’ Friends select ‘Join My Team’ or send me a message!

Please support StampinByHannah, and join my Code Club, by using the Hostess code featured in the top right hand of my blog. For orders of over £150 please do not use this code, as you are entitled to your own Hostess benefits!

Sign up to my newsletter here – http://eepurl.com/2if59

Hannah McCurley

Stampin’ Up! UK Independent Demonstrator

Love you Lots Birthday Card

Childrens birthday card using love you lots from Stampin' Up! UK

I am still sharing my heap of family birthday cards, I had so many birthday’s this month and actually had a couple of custom card orders to make too. I shared the birthday card I made for my mum to send for the same gorgeous little girl last week, but just had to share the card that I sent as well.

Childrens birthday card using love you lots from Stampin' Up! UK

How cute is that elephant?! I have been told that the recipient of this card LOVED the elephant, and I have to agree, just something about the sketchy look!

This elephant is from the Love you Lots stamp set, which is one of a collection of sets that you can choose from when you spend over £150, or host a party that spends more that £150. £150 is like Stampin’ Up!’s magic number, at this number you start to earn Stampin’ Rewards, aka FREE ££££ to spend on anything you like in the catalogue, including the Reward Exclusives.

3rd Birthday card using Love you lots from Stampin' Up! UK

The 3 is stamped and die cut using the wonderful Large Numbers dies and Number of Years stamp set, actually the Happy Birthday is taken from the same set.

Hope you love this simple birthday card as much as a cute little 3 year old!


Don’t forget to shop using the Code Club Code to receive some great FREE product! 

E2NTDHUA

I will be closing this order on the 30th October 2016


Product List


Shop Now button-001Join my team button-001

To purchase any of the items featured in my projects please use the links above. To join my team of Stampin’ Friends select ‘Join My Team’ or send me a message!

Please support StampinByHannah, and join my Code Club, by using the Hostess code featured in the top right hand of my blog. For orders of over £150 please do not use this code, as you are entitled to your own Hostess benefits!

Sign up to my newsletter here – http://eepurl.com/2if59

Hannah McCurley

Stampin’ Up! UK Independent Demonstrator

Bunch of Blossoms Faux Watercolour Card

Watercolour Celebration card using Faux Watercolour and Bunch of Blossoms from Stampin' Up! UK

I have had this style of card in my head for weeks, but somehow getting the card out of my head and into the card stock was a bit of a struggle! I love following other Stampin’ Up! demonstrators, and find them so inspiring. This card was inspired by a couple of different demo’s, but mostly the lovely Dena from The Creativity Cave and the fabulous Faux Watercolour technique!Watercolour Celebration card using Faux Watercolour and Bunch of Blossoms from Stampin' Up! UK
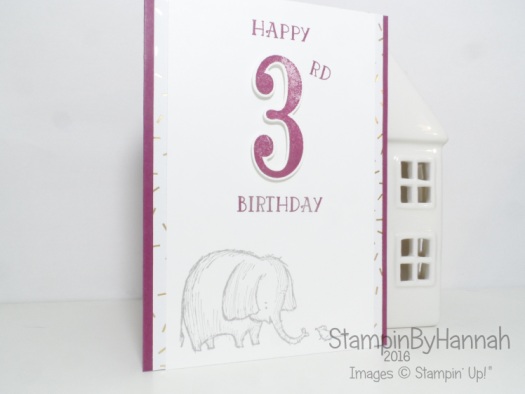
For all this card looks totally different from my usual card bases, it actually comes from the same size of card stock – just scored on the short edge rather than the long one.
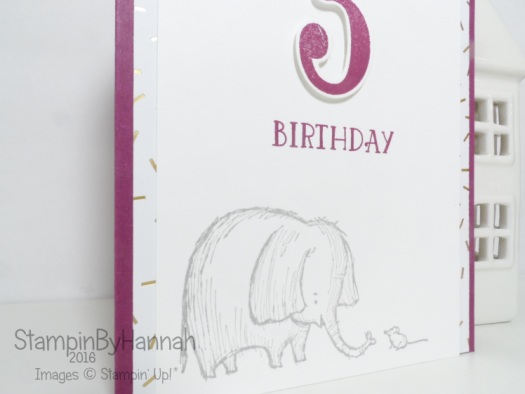
The key to this card really is Watercolour Paper. The Pink Pirouette layer of watercolour is put down first using an aqua-painter. I added several layers of colour, building up the intensity of the colour to the point where I was happy, and to create those pretty ‘hard edges’ I love when watercolouring.

Watercolour Bunch of Blossoms congratulations card using Stampin' Up! UK products

The leaves from the Bunch of Blossoms stamp set includes a couple of different sizes of leaves, this card uses the smaller leaf. Each leave is stamped into the Watercolour paper in Old Olive (making sure the Pink Pirouette layer is completely dry!). Before the Old Olive dries I ran an Aqua-Painter over the stamped image, this creates a Faux Watercolour, and a softer look than the original hard stamping.

I tried a couple of different ways of adding the sentiment, but settled on stamping and heat embossing with White Stampin’ Emboss Powder.

The card is finished with one of my favourite go-to finishing technique, droplets of Fine-Tip glue, so pretty!

Measurements:

Card base: 21 x 14.8 cm, scored on the short edge at 7.4 cm

Old Olive layer: 19.5 x 6 cm

Watercolour Paper: 19 x 5.5 cm


Buy 3 Get one FREE Stampin' Up! Designer Series Paper


Product List


Shop Now button-001Join my team button-001

To purchase any of the items featured in my projects please use the links above. To join my team of Stampin’ Friends select ‘Join My Team’ or send me a message!

Please support StampinByHannah, and join my Code Club, by using the Hostess code featured in the top right hand of my blog. For orders of over £150 please do not use this code, as you are entitled to your own Hostess benefits!

Sign up to my newsletter here – http://eepurl.com/2if59

Hannah McCurley

Stampin’ Up! UK Independent Demonstrator

Make It Monday | Cute Shaker card using Jar of Love

Make It Monday Cute Floral Shaker Card using Jar of Love from Stampin' Up! UK

make-it-monday-banner

Hello! Welcome to a brand new week of projects and inspiration here at StampinByHannah! I am loving filming these Make It Monday videos, actually I’m just loving filming at the moment, and have a whole heap of videos planned for you in the coming weeks (there are at least 3 this week alone!), so sit back and enjoy….. Make It Monday!

Make It Monday Cute Floral Shaker Card using Jar of Love from Stampin' Up! UK

I’m just loving this cute shaker card, how adorable are those fireflies?! This card would be fab for birthdays or a congratulations card for one of your girlfriends (I’m thinking, new job, new grand-child, or even a just because!)

Shaker Cards are so much fun! I’m loving adding small die cuts, as well as sequins, glitter, mica flakes, beads and other fun elements. I have to say though my absolute Top Tip with shaker cards is to run your Embossing Buddy around your shaker frame before you remove the adhesive backing – check the video to see why!

Make It Monday video Tutorial Shaker Card using Jar of Love from Stampin' Up! UK

I have a heap of videos coming for you starting this week, including the start of my Christmas Countdown series! Don’t forget to subscribe to my YouTube channel to catch all my latest video tutorials!


Stamp of the Month Club UK


Product List


Shop Now button-001Join my team button-001

To purchase any of the items featured in my projects please use the links above. To join my team of Stampin’ Friends select ‘Join My Team’ or send me a message!

Please support StampinByHannah, and join my Code Club, by using the Hostess code featured in the top right hand of my blog. For orders of over £150 please do not use this code, as you are entitled to your own Hostess benefits!

Sign up to my newsletter here – http://eepurl.com/2if59

Hannah McCurley

Stampin’ Up! UK Independent Demonstrator

Watercolour with Jar of Love

Pinkies Team Design Challenge Colouring Watercolour with Jar of Love from Stampin' Up! UK

Hello folks! I’ve been challenged (again!) to share a card using colouring today. One of my team leaders, the gorgeous Michelle Last, sets us a challenge every other month, and you know what I’m like, I cannot pass on either an opportunity to colour or to take part in a challenge!

Pinkies Team Design Challenge Colouring Watercolour with Jar of Love from Stampin' Up! UK

So, we were challenge to create a card using a colouring, and I ALMOST selected an image I could colour… but then I had a think and decided that I would ‘colour’ a background.

The card base is Bermuda Bay, with a layer of Basic Grey, and finally a layer of Shimmery White Card stock. Now, I LOVE to watercolour on my cards, but watercolour paper is kinda pricey, well Shimmery White is a great alternative, it watercolours great, it’s smooth, and it’s a bit cheaper too! So, I grabbed my Aqua Painters and some Bermuda Bay ink and watercoloured a background to ground my Vellum jar.

Watercolour card using Jar of Love from Stampin' Up! UK

The flowers are also stamped on Shimmery White, in Rose Red, and once I had die cut them (loving the coordinating dies that are bundled with Jar of Love!) I spritzed them with a whole heap of water and left them to sit a while – this caused the ink to bleed and run, creating a variation in colour when I dabbed the water off with a piece of kitchen towel.

I haven’t added a sentiment yet, I know, I really should, but I’m saving that part until I have a suitable recipient!


Stampin' Up! UK Designer Series Paper Sale


Product List


Shop Now button-001Join my team button-001

To purchase any of the items featured in my projects please use the links above. To join my team of Stampin’ Friends select ‘Join My Team’ or send me a message!

Please support StampinByHannah, and join my Code Club, by using the Hostess code featured in the top right hand of my blog. For orders of over £150 please do not use this code, as you are entitled to your own Hostess benefits!

Sign up to my newsletter here – http://eepurl.com/2if59

Hannah McCurley

Stampin’ Up! UK Independent Demonstrator

Simply Sketched Saturday Challenge | October 2016

Simply Sketched Saturday Challenge October 2016 Designer Tin of Cards Floral Boutique Card using Stampin' Up! UK products

Stampin' Up! Sketch Challenge

Oh yes, It’s that time again! Time for the Simply Sketched Saturday Challenge! I LOVE taking part in this challenge every month, we have a great time working with a sketch set by one of our members, and this month it is the gorgeous Sally Shaw.

Simply Sketched Saturday Challenge October 2016

Now, this sketch scared the pants off me! I would consider myself quite well versed in working with a sketch by now, but really I had NO idea what I was going to do with this one. When Sally sent it over to me to create the graphic I sat for a few minutes trying to see a stamp set or some Designer Series Paper, or anything I could work with as a jumping off point. My brain chose this moment to loose all creativity…. I had nothing!

But, it’s Ok, because the other thing that my brain does to me on a regular basis is remind me of stuff, this image kept coming to me – always when I was driving, or a work…. never anywhere I could be creative to get this sketch onto paper! Typical! But the one thing that kept coming back was those two long thin boxes and the idea of replacing them with ribbon or twine.

Simply Sketched Saturday Challenge October 2016 Designer Tin of Cards Floral Boutique Card using Stampin' Up! UK products

And so the thought of Twine became my jumping off point! I have made a few cards with a similar design recently, there is just something about those Layering Circles that just makes me want to use them all the time!

Seeing as I had a brand new spool of Night of Navy Bakers Twine it seemed sensible to use it on this card, one I had a colour I found this lovely Designer Series Paper in my paper storage, and that then linked me to the coordinating stamp set; Floral Phrases. The band across the card (yes I know, its not on the sketch, I’m using some artistic licence here) is heat embossed in white onto Night of Navy – love that border stamp.

Sending Love card using Floral Boutique and Designer Tin of Cards from Stampin' Up! UK

The Sentiment is taken from the Designer Tin of Cards stamp set. It has a heart on it, and it just felt completely right to cover it with an Enamel Shape, I nearly kept to the monotone theme and used a Night of Navy heart too, but then remembered another challenge I took part in ages ago with was about monotone with a pop of colour, and so added a Real Red heart instead.

So, seeing as I couldn’t get my head around the sketch at all when it first landed on my desk, I am really rather pleased with the card I have created this week!

I cannot wait to see what the others have made this month, why not join me and hop along to the next person in our Challenge by using the Next button below.

Simply Sketched Next

Simply Sketched Previous


Buy 3 Get one FREE Stampin' Up! Designer Series Paper


Product List


Shop Now button-001Join my team button-001

To purchase any of the items featured in my projects please use the links above. To join my team of Stampin’ Friends select ‘Join My Team’ or send me a message!

Please support StampinByHannah, and join my Code Club, by using the Hostess code featured in the top right hand of my blog. For orders of over £150 please do not use this code, as you are entitled to your own Hostess benefits!

Sign up to my newsletter here – http://eepurl.com/2if59

Hannah McCurley

Stampin’ Up! UK Independent Demonstrator

Cute Birthday Shaker Card

Simple Shaker Birthday Card using Guy Greetings and Lots of Love from Stampin' Up! UK

I mentioned a few weeks ago that this time of the year is CRAZY with birthdays in my family, and I really needed a quick, fun card for my cousin…. and this is what he ended up with!

Simple Shaker Birthday Card using Guy Greetings and Lots of Love from Stampin' Up! UK

This shaker was super simple to put together I took me less than 15 minutes (including fussy cutting that frog!). The secret here is Foam Adhesive Strips. The card is a 4 x 4″ card with a layer cut to 3 3/4 x 3 3/4″, with a circle die cut from the centre (with a piece of Window sheet attached behind it). I then run my Embossing Buddy across the Window sheet to remove some of the static and stop those gorgeous sequins from sticking too much!

Cute Shaker Card using Lots of Love from Stampin' Up! UK

The Piece of Whisper White behind was embossed with the Lucky Stars Embossing Folder, for some extra texture. The Foam Adhesive Strips are then attached to the back of the circle piece, bending these around the circle is super easy (as I will demonstrate in Monday’s Make It Monday video!!!). I would suggest using the Foam to attach the edges of the card to the card base as well as around the shaker window – just because they are thicker than Dimensionals and you want your card front to be the same height all the way across right?!


Stamp of the Month Club UK


Product List


Shop Now button-001Join my team button-001

To purchase any of the items featured in my projects please use the links above. To join my team of Stampin’ Friends select ‘Join My Team’ or send me a message!

Please support StampinByHannah, and join my Code Club, by using the Hostess code featured in the top right hand of my blog. For orders of over £150 please do not use this code, as you are entitled to your own Hostess benefits!

Sign up to my newsletter here – http://eepurl.com/2if59

Hannah McCurley

Stampin’ Up! UK Independent Demonstrator

Project Kit | Stitched With Cheer

Stitched with Cheer Project kit from Stampin' Up! UK

I was recently gifted this great project kit, and just had to have a go at making the cards as intended before I find alternative uses for everything in this jam packed kit of 18 stunning Christmas Cards!

Stitched with Cheer Project kit from Stampin' Up! UK

Now, I haven’t got round to buying the stamp set that coordinates with this kit (although it is really cute!) and so grabbed for a equally fabulous Christmas stamp set instead; Christmas Pines

Super Easy Christmas Card using the Stitched with Cheer Project Kit from Stampin' Up! UKThese cards are so easy to put together, they all have a little bit of stitching on (so on trend!) and the kit includes not only the twine and a needle, but also a needle threader to help you out!

Christmas Pines and Stitched with Cheer Christmas Card from Stampin' Up! UK

I think this card is my favourite, loving those trees and the gold doily! This kit comes with all the components for 18 cards; 6 of each of the 3 Designs plus 18 envelopes and coordinating liners too

Quick and Easy Christmas Card using the Stitched with Cheer project kit from Stampin' Up! UK

And Stampin’ Up! have made a great video of how to put the cards together too!

I love our project kits and I would LOVE to put this one together with you and your friends! I am currently looking for Hostesses for parties in November and December and this kit would be a great excuse to get the girls together and get a head start on your Christmas crafting! Just ask me how!


Don’t forget to shop using the Code Club Code to receive some great FREE product! 

E2NTDHUA

I will be closing this order on the 30th October 2016


Product List


Shop Now button-001Join my team button-001

To purchase any of the items featured in my projects please use the links above. To join my team of Stampin’ Friends select ‘Join My Team’ or send me a message!

Please support StampinByHannah, and join my Code Club, by using the Hostess code featured in the top right hand of my blog. For orders of over £150 please do not use this code, as you are entitled to your own Hostess benefits!

Sign up to my newsletter here – http://eepurl.com/2if59

Hannah McCurley

Stampin’ Up! UK Independent Demonstrator