Make It Monday | Floral Phrases

congratulations cards using Floral Phrases bundle from Stampin' Up! UK

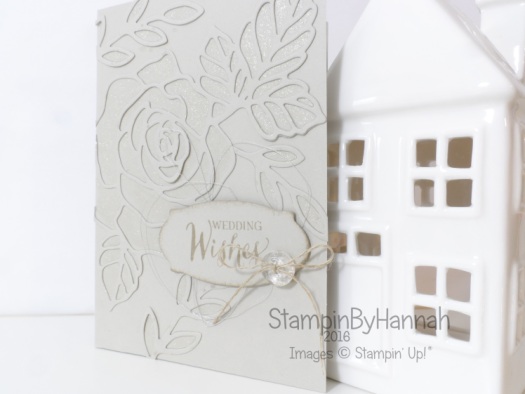
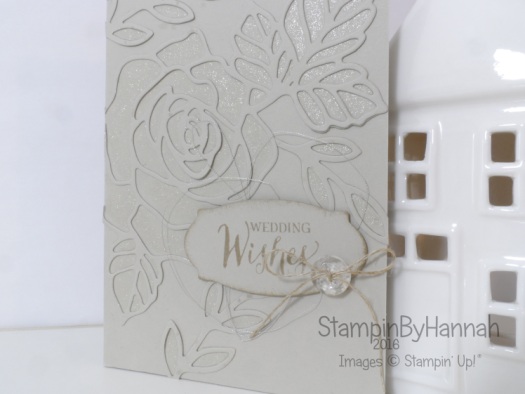
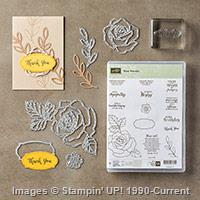
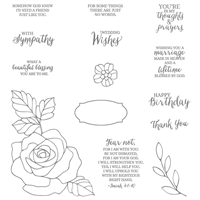
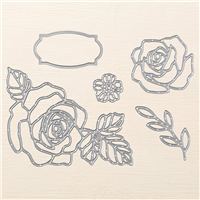
I think this suite would be my number one choice for wedding stationary this year. I am totally in love with the large, intricate dies (although I have to say that these dies are the reason that the Big Shot Die Brush is an awesome purchase!) and the coordinating stamp set is just beautiful

Make It Monday floral phrases congratulations card video tutorial using Stampin' Up! UK products

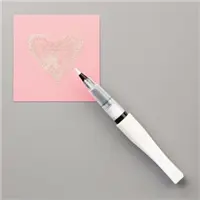
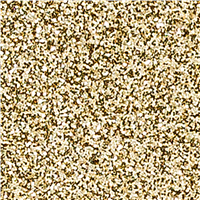
I really struggled to make anything with this awesome suite when they first arrived on my desk. I think because they are shown in Night of Navy in the catalogue (which I just adore) I found stamping or die cutting in any other colour really tricky. So, I decided to stamp a heap of different colours – as you can see in the video – and I am rather pleased to report that I feel much freer about this bundle now. Although I think I will have to make something with this and Night of Navy eventually!

I’m trying some different things with my photography over the next few weeks, as well as changing my video set up! I would love to hear what you think, please feel free to leave comments in the comments section at the bottom of this post.

congratulations cards using Floral Phrases bundle from Stampin' Up! UK

These would be a lovely cards to receive as a Wedding Congratulations card, or even to send as Save the Dates or Wedding Invitations. I cannot wait to get to play with these dies again, they are just so pretty.


Don’t forget to shop using the Code Club Code to receive some great FREE product! 

B7TH9MY6

I will be closing this order on the 30th June 2016


Product List


Shop Now button-001Join my team button-001

To purchase any of the items featured in my projects please use the links above. To join my team of Stampin’ Friends select ‘Join My Team’ or send me a message!

Please support StampinByHannah, and join my Code Club, by using the Hostess code featured in the top right hand of my blog. For orders of over £150 please do not use this code, as you are entitled to your own Hostess benefits!

Sign up to my newsletter here – http://eepurl.com/2if59

Hannah McCurley

Stampin’ Up! UK Independent Demonstrator

Simply Sketched Saturday Challenge – Forever Begins Today

Stampin' Up! UK Birthday Blooms Suite Sayings Wedding Card

Stampin' Up! Sketch Challenge
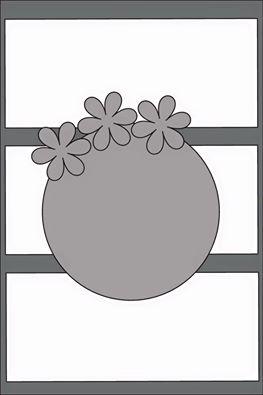
Hello Everyone! So glad you could join us for another week of the Simply Sketched Saturday Challenge! This weeks sketch comes from the lovely Justyna.

Simply Sketched Stampin' Up! Challenge Blog Hop

I love this sketch, it totally pushed me outside of my norm, and allowed me to create something very different for me. I have to admit that I also took inspiration from the ever so talented Teneale Williams for this one, particularly stamping on coloured card stock – definitely something I shall be doing more of!

Stampin' Up! UK Birthday Blooms Suite Sayings Wedding Card

I of course had to turn the sketch this time. I haven’t rotated a sketch for a while – I love taking a sketch and editing it to suit me. So this time I turn it sideways.

I really don’t use a lot of coloured card stock, I buy heaps of Whisper White but a pack of a colour can last me years! This particular colour I didn’t think was one of my favourites, but now I’ve used it in such a big way it is starting to grow on me. Actually I use so little of this colour (Soft Suede) that when I came to stamp I realised I don’t even have the coordinating Ink! Shocking! So to get the tone on tone effect I jumped to another brown, Crumb Cake instead.

I’ve also used Crumb Cake to stamp and watercolour the Bloom in the circle. Can you believe that that is one ink colour?! its super pretty in real life, my camera work just has not done this one justice. The flowers from the Itty Bitty Accents Punch Pack are also sponged in Crumb Cake.

Stampin' Up! UK Sketch Challenge Wedding Card Birthday Blooms Suite Sayings

The only other ink colour I have used here is Early Espresso for the sentiment, taken from Suite Sayings, and perfect to send as a wedding congratulations.

Have you spotted the gold glitter? Its actually a tape! and its currently FREE during Sale-a-bration! Awesome. Remember Sale-a-bration ends on the 31st of March, so don’t wait too long or this beautiful tape may have just already left us. To get this lovely tape for free you just have to spend £45, and the choose the tape as your free gift!

Thanks for stopping by today, and don’t forget to hop along to see what the girls have made with this sketch

Til next time

Simply Sketched NextSimply Sketched Previous


Stampin' Up! Sale-a-bration


Product List


Shop Now button-001Join my team button-001

To purchase any of the items featured in my projects please use the links above. To join my team of Stampin’ Friends select ‘Join My Team’ or send me a message!

Please support StampinByHannah, and join my Code Club, by using the Hostess code featured in the top right hand of my blog. For orders of over £150 please do not use this code, as you are entitled to your own Hostess benefits!

Sign up to my newsletter here – http://eepurl.com/2if59

Hannah McCurley

Stampin’ Up! UK Independent Demonstrator

Wedding Wishes ….

Stampin' Up! UK Rose Wonder Wedding Card

I’m LOVING playing with the new Wink of Stella Glitter Brushes in the Spring / Summer catalogue, and just HAD to combine the clear pen with the Rose Wonder stamps and die bundle!

Stampin' Up! UK Rose Wonder Wedding Card

This whole card is in Sahara sand. The rose and leaves are both die cut using the Rose Garden thinlits dies, and attached to the card front using my trusty 2-way glue pen. I’m still trying to decide how I prefer to attach these intricate dies, some days I use Tombow and others I seem to prefer the 2-way glue pen – so gutted that the adhesive sheets were retired last year, they would have been perfect!

The Wedding Wishes sentiment is taken from Rose Wonder, and is stamped in Crumb Cake – I wanted a colour of a similar tone but a little darker – and then the edges of the die cut are sponged in the same. I did originally just add the die cut straight onto the card, but it looked a little too plain, so I went back and added some loops of Silver Metallic thread, and a Vintage button tied with a bow of Linen thread.

Stampin' Up! UK Rose Wonder Wink of Stella

I’m hoping that this photo does some of the sparkle of the Wink of Stella Glitter Brush some justice. Each of the petals and leaves of this gorgeous die cut have been ‘coloured’ with super fine glitter, and it real life this card just sparkles – perfect for a wedding congratulations! – James bought me a new photography bulb for my birthday so I’m trying out new ways of taking my photos. I’m hoping that my photography skills are improving, but trying to capture the sparkle of this glitter is tough!


Shop Now button-001Join my team button-001

To purchase any of the items featured in my projects please use the links above. To join my team of Stampin’ Friends select ‘Join My Team’ or send me a message!

Please support StampinByHannah, and join my Code Club, by using the Hostess code featured in the top right hand of my blog. For orders of over £150 please do not use this code, as you are entitled to your own Hostess benefits!

Sign up to my newsletter here – http://eepurl.com/2if59

Hannah McCurley

Stampin’ Up! UK Independent Demonstrator

Perpetual Birthday Card!

Stampin' Up! UK Perpetual Birthday Calendar Pootles

I’m currently preparing for my Perpetual Birthday Calendar Kit Class at the weekend. (I’m sure to repeat this one, just let me know if you’d be interested!) and so the stamps have been out on my table, and I just had to use them on a card! My wonderful Upline Pootles regularly uses this stamp sets on cards, so I think I was channelling my inner Pootler with this one! I’ve even used Glimmer paper!

As you probably know by now I’m in the final few weeks before my Wedding! (almost sorted!) and so am also making heaps of cards as Thank you’s for various people. I will share some of these while I’m on my honeymoon, but I though I would share this one a little earlier (I know James doesn’t read the blog so I know he’s not going to see this!)

Stampin' Up! UK Perpetual Birthday Calendar Pootles

I bought I’m a special gift to open on the day, and needed a card to go with it. This is perfect!

I don’t usually do loads of layers, but like I said, channelling my inner Pootler here – the card base is a piece of Real Red card stock cut to 4 x 8″ and scored at 4″ to make a 4×4 card base. The layers are then Very Vanilla (3 3/4 x 3 3/4″), Gold Glimmer Paper (3 x 3″), Real Red (2 3/4 x 2 3/4″), and Very Vanilla (2 1/2 x 2 1/2″).

The stamping is also in Real Red using that cute scattered heart stamp from the Perpetual Birthday Calender stamp set.

What do you think?


Shop Now button-001Join my team button-001

To purchase any of the items featured in my projects please use the links above. To join my team of Stampin’ Friends select ‘Join My Team’ or send me a message!

Please support StampinByHannah by using the Hostess code featured in the top right hand of my blog. For orders of over £150 please do not use this code, as you are entitled to your own Hostess benefits!

Sign up to my newsletter here – http://eepurl.com/2if59

Hannah Wilks

Stampin’ Up! UK Independent Demonstrator

A Perfect Day …..

A couple of weekends ago we attended the wedding of a close friend, and you know what weddings mean, wedding cards!

Stampin' Up! UK Wedding Card Your Perfect DayWe had the most fabulous day at a castle in County Durham, not too far from where we live, and partied into the night. I have to say I was  little worse for wear the next day exhibiting at a craft fair! Things are really crazy busy around here at the moment, with planning and preparing for our own wedding, making wedding invitations for other people, my full time day job, and running my Stampin’ Up! business! James started at university last week, so I have plenty of time when he’s working or studying.

Anyway, that’s enough of my ramble; The card uses the Your Perfect Day stamp set. and Brushed Gold Card stock.

The sentiment is embossed onto vellum. I applied a little Tombow glue to the embossed area to attach it to the card, it worked well actually and even after a couple of days I still couldn’t see it. Behind the vellum the image is stamped in Sahara Sand (stamped off once) with So Saffron Flowers.

I also stamped the inside! something I don’t do nearly often enough!


Hannah Wilks

Stampin’ Up! UK Independent Demonstrator

If you like the project, or any of the products used, would like a catalogue, or to join my team, please contact me, or click on the ‘Shop NOW’ button at the top of the page. You can also find me on Twitter, Facebook, YouTube, Google+, About.me, and Tumblr (Links in the sidebar)

Sign up to our newsletter here – http://eepurl.com/2if59

Thank you for stopping by www.www.stampinbyhannah.co.uk today

x


Ambassador’s Chocolate box! using Stampin’ Up! UK products – video Tutorial

I love taking packaging as inspiration for handmade projects, a few weeks ago I was shopping with a friend and spotted a long thin box of chocolates, and just knew I had to buy it and re-create it. Now, that box wasn’t all that exciting, but using an existing box makes it much easier to re-engineer a box to fit the same items! So, the original box held 5 chocolates, my version holds 3, but I think 3 of these indulgent chocolates is enough!

Stampin' Up! UK Ferrero Rocher box chocolate video tutorial

I have made this box a few times now, with punched out sections, and designer series paper, but may favourite has to be this Brushed Gold version. The photo doesn’t do the colour of this cardstock justice, but I think I managed to capture the shine in the video.

I also grabbed one of the new wedding themed stamp sets from the Spring/Summer catalogue for the stamped sentiment – Your Perfect Day, punched out perfectly (pun intended) with the 1 1/4″ circle punch. I just love the look of these two punched layered on top of each other, the bottom layer is a 1 3/8″ circle punched from Blackberry Bliss cardstock (love that colour!)

Measurements:

Cardstock = 8 1/4 x 6 1/2″ (21 x 17 cm)

Score on the long side first at – 1/2, 2, 6 1/4 and 7 3/4″ (1 , 5, 16, and 20 cm)

Score on the short side at 1/2, 2, 3 1/2 and 5″ (1, 5, 9, 13 cm)

Measurements for Designer Series Paper:

4 pieces cut to 1 1/4 x 4″ (3 x 10 cm)

2 pieces cut to 1 1/4 x 1 1/4″ (3 x 3 cm)


Hannah Wilks

Stampin’ Up! UK Independent Demonstrator

If you like the project, or any of the products used, would like a catalogue, or to join my team, please contact me, or click on the ‘Shop NOW’ button at the top of the page. You can also find me on Twitter, Facebook, YouTube, Google+, About.me, and Tumblr (Links in the sidebar)

Sign up to our newsletter here – http://eepurl.com/2if59

Thank you for stopping by www.www.stampinbyhannah.co.uk today

x

Fancy Fold Friday – Scallop Tag Topper Card

Hello!

This is a joint post with my other website – www.thehandmadeweddings.co.uk.

I love making wedding stationary, but a standard card can be a little bit dull, and I love making these!

It uses my favourite Scallop Tag Topper punch, yes I really do use it all the time!

Stampin' Up! UK Scallop tag topper punch wedding card


Measurements:

Cardstock = 8 1/4 x 5 3/4″ (21 x 14.5 cm)

Mark your halfway point on the short sides of your cardstock – approximately 2 7/8″ (7.3 cm) and use these as guide marks when using your scallop tag topper punch

Score one of the tags where it joins the card, and fold.

Score the main card at 4 1/4″ (10.8 cm)


Insert measures – 3 7/8 x 5 1/2 ” (10 x 14 cm)

Card matt measures – 2 1/4 x 5 1/2″ (5.5 x 14 cm)


For more information and to see the complete Wedding invitation collection visit – www.thehandmadeweddings.co.uk


Hannah Wilks

Stampin’ Up! UK Independent Demonstrator

If you like the project, or any of the products used, would like a catalogue, or to join my team, please contact me, or click on the ‘Shop NOW’ button at the top of the page. You can also find me on Twitter, Facebook, YouTube, Google+, About.me, and Tumblr (Links in the sidebar)

Sign up to our newsletter here – http://eepurl.com/2if59

Thank you for stopping by www.www.stampinbyhannah.co.uk today

x

Save the Date

Ok, so we’re getting to that point in the year when all those Brides start looking for Wedding Stationary (If you are one of those Brides BTW check out this page!), and so as crafters we are often called upon to make invitations, save the dates, thank you cards etc. etc.

Stampin' Up! UK Save the Date Cheers to Love Butterflies

This lovely Save the Date card uses a sentiment from Cheers to Love (lovely for wedding cards!), and some of the butterflies from Papillon Potpourri.

The card base here is the Brushed Gold cardstock (Yum!) with a Whisper White piece. I first stamped the solid butterflies in Blushing Bride, before overstamping the detailed butterflies in Gold! The Sentiment is also stamped using the Gold Metallic Encore Ink.

The larger butterfly I stamped on a scrap piece of Whisper White, in VersaMark, before embossing in Gold, and punching it out with the Elegant Butterfly Punch. Both the Whisper White stamped piece, and the large butterfly are added to the card base with dimensionals for that layered look.

For more information on Wedding Stationary, Contact me HERE


Hannah Wilks

Stampin’ Up! UK Independent Demonstrator

If you like the project, or any of the products used, would like a catalogue, or to join my team, please contact me, or click on the ‘Shop NOW’ button at the top of the page. You can also find me on Twitter, Facebook, YouTube, Google+, About.me, and Tumblr (Links in the sidebar)

Sign up to our newsletter here – http://eepurl.com/2if59

Thank you for stopping by www.www.stampinbyhannah.co.uk today

x

Wedding Wednesday

SAM_0333With my wedding coming up in 2015, I am in full wedding stationary production; Save the dates, Invitations, Orders of Service, Place cards, Menus, Seating Plans, Favour boxes, and anything else I can possibly think of to make out of paper and card.

My Stationary is simple, double stamped punched heart, attached to a card with a peg (and a foam square and liquid glue) with a simple stamped title, and a printed insert.

SAM_0331The key to successful homemade wedding stationary is just that, keeping it simple. Depending on the number of guests you could have hundreds of each item to produce, and although in theory it is cheaper to make your own costs can quickly spiral when adding sparkly bits, ribbons, and fancy card stock.

The design also needs to be easy to mass produce, its a great activity to involve your bridesmaids in, but are they as crafty as you? No? then make sure its something they cant get wrong, or you could find yourself making everything again and the time leading up to the wedding is stressful enough without having to make hundreds of wedding favours.

x