So, like I promised I’ve managed to make a few things with my Product of the Month this month – The Back to Basics Alphabet!
I did film makingthis, but something happened to my camera and it failed to capture the whole event! So, I decided to do away with it altogether!
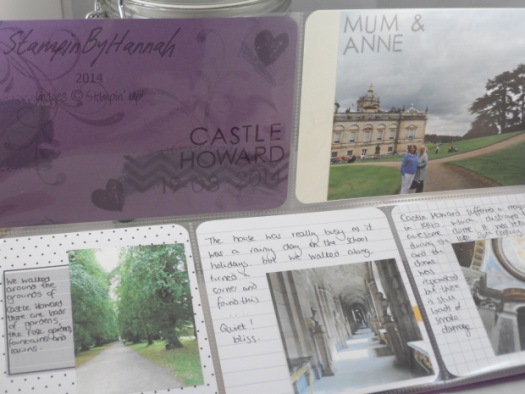
This is a simple project. You could easily step it up and create something amazing, but I wanted to keep it simple to showcase the Alphabet. I cut a piece of Perfect Plum Cardstock to 6″ x 4″, and rounded the corners (to match the rest of the cards in my album!). I know some people arent a fan of the rounded corner look, but I LOVE it, the cards just dont feel finished to me without rounded corners, I expect it comes from using the Becky Higgins Project Life Core Kits for so long! but, back to the project!
I used Work of Art to create a background on the PL card stamping in: Wisteria Wonder, Perfect Plum and Blackberry Bliss, before stamping the page title and date using the Back to Basics Alphabet Stamp set – isnt it great that it includes numbers too!
I added some more stamping to some of the other cards in this layout too, adding details of people and locations around the grounds. This alphabet is so easy to use because its such a clear clean font, and its just so versitile – check back soon for more alphabet ideas!
If you like the project, or any of the products used, would like a catalogue, or to join my team, please contact me, or click on the ‘Shop NOW’ button at the top of the page. You can also find me on Twitter, Facebook, YouTube, Google+, About.me, and Tumblr (Links in the sidebar)
Another month come and gone, and a heap of photos to get into albums, isnt it great that we have Project Life by Stampin’ Up! to make that process easier.
I really do love how simple you can make Project Life, and how complex it can become by adding items from the accessory packs, stamping, extra cardstock or DSP, and other memorabilia alongside your photos and journalling.
This month I created 3 pages (or spreads), the first focuses on the first week in the month. Usually I’m not too fussy about which order my photos from the month go in on the page, however, I knew I wanted this week to be seperate and a little different as it is about a very important week in our wedding planning process (12 months to go now! eeeek!), and included the taking of our engagement photos, buying our rings and me finding THE dress! Of course I havent included the photo of the dress (dont want the Mr. seeing it do we!) but I have mentioned it in my journalling.
The other two pages this month include the other photos and events from the month of July. I have discovered that I seem to take more photos of food than anything else! We’re supposed to be dieting (wedding prep again!) but this month has been horrendous with work, we’ve both had a heap of night shifts and horrible periods of not seeing each other at all, and so we’ve had a bit of a treat with a date night to Pizza Express, payday takeaway, and I might have been very naughty one of the nights James was on nightshift and I couldnt be bothered to find real food! Ooops! oh well, back to the dieting grindstone in August!
This month, as well as using the Everyday Adventure Project Life Card Collection, and Accessory Pack, I’ve mixed it up a little with the addition of some of the Moonlight Designer Series Paper Stack. I’m planning on working on these pages a little longer (put a nice order recently to add to my ever growing stash!), will do a full video share once they are completely finished, but I didnt want you to think I hadnt been working on it at all, so….
If you like the project, or any of the products used, would like a catalogue, or to join my team, please contact me, or click on the ‘Shop NOW’ button at the top of the page. You can also find me on Twitter, Facebook, YouTube, Google+, About.me, and Tumblr (Links in the sidebar)
Or just take advantage of the latest Stampin’ Up! awesome deal and get your Stampin’ Up! Big Shot in August, and get a free stamp and framelit bundle, as well as getting 15% off other selected bundles!
This offer, only available for one month, lets you into a whole new world (sorry!) of crafting, giving you even more options for cards and projects. The Big Shot is a great die cutting machine, enabling you to emboss, cut and score, using framelits, bigz dies, embossing folders and other wonderful ways to give your cards more dimension and impact.
The Big Shot allows you to cut and emboss a number of different materials, including; card and paper, vellum, coaster board, window sheet, glimmer paper, foil, felt and many others. Use your Big Shot to create 3D projects using the Stampin’ Up! Bigz Die; Hamburger box, Spiral flowers, gift bows, and designer rosettes. Create embossed cards for your Project Life album. Use stamp and framelit bundles to stamp and cut intricate shapes and images, giving your projects that extra special something!
For the month of August get your Big Shot, with a Stamp and Die bundle, for £87.95, AND get 15% off other selected bundles!
If you like the project, or any of the products used, would like a catalogue, or to join my team, please contact me, or click on the ‘Shop NOW’ button at the top of the page. You can also find me on Twitter, Facebook, YouTube, Google+, About.me, and Tumblr (Links in the sidebar)
You know, sometimes, when your working on a longer project (mass producing wedding invitations, Project Life by Stampin Up!, making items for craft fairs or fundraising events) you need somewhere to put all your items together, to stop them taking over!
Well, here is your solution! The Project Tray!
I use these all the time to hold various items and projects in the works, they hold items ready for making / photographing / selling / sending etc. I love them! and I thought I’d share the design with you.
It is super simple (as always, I cant do complicated!)
If you like the project, or any of the products used, would like a catalogue, or to join my team, please contact me, or click on the ‘Shop NOW’ button at the top of the page. You can also find me on Twitter, Facebook, YouTube, Google+, About.me, and Tumblr (Links in the sidebar)
Each month, hopefully the first Saturday / Sunday of each month, I will be posting a look at my Project Life.
If you havent checked out the latest Project Life by Stampin’ Up! products you really should (links at the end of this post). Stampin’ Up have now released a number of Project Life kits, Everyday Adventure and Happiness Is (both great for everyday events and regular Project Life-ing), Little Moments (for baby), and Playground (awesome for all those photos of the kids! Then, later this month; Love Story, which is definitely on my wish list, designed for love, engagements, weddings and related events! Each kit has an associated accessory pack, and there are blank grid cards, pens, pocket pages, binders, framelits dies, stamps and a corner rounder punch available.
As I have previously mentioned (HERE), I love this method of ‘quick’ scrapbooking. So much so that I already have one of the larger Becky Higgins Project Life Kits, and the Wedding mini-kit (see a theme here!) and I will be using this system for my wedding album, more on that in next months Project Life by Stampin Up! post!
So, on with June. June was a little busy round here; I work 3 or 4 days a week, becoming a Stampin’ Up! demonstrator, Blogging and YouTube, meeting friends, wedding planning, and trying to have 30 seconds to myself; I only filled 2 page protector. But thats ok, one of the great things about this system for scrapbooking is the versatility; what do you want to document? Is it the daily events in your life, a big event (such as a wedding, or the birth of a child), a family holiday, or getting all those family photos into an album other people can look at. For me, I’m planning on documenting our daily lives; as well as the planning and countdown to our wedding next year. I’m hoping to have at least one page per month, any more than that is a bonus! I have a couple of tools to help me: a good diary, and two iPhone apps remindingme to take some pictures!
Last month I only used one, Collect (From Free), an app which describes itself as a everyday photo diary. This month I’m continuing to use Collect, but I am also using the Little Moments app by Fat Mum Slim (£1.49), this app not only gives you a great range of photo embellishment and editing tools, but also links to the #FMSphotoaday prompts.
The pages themselves came together very quickly. I print my photos at home, one my regular printer, so trimming my photos takes a little while, buts worth it in the end. Once you have your photos, and have a page protector selected, its a simple task of laying out your photos and matching them to a card. Then is the fun bit, adding journalling and embellishments. Stampin’ Up! make this even easier by giving you the option of purchasing the co-coordinating accessory pack, as well as using Stampin’ Up Colours – so you can customise embellishments with your Inks, Stampin-Write markers, Blendabilities, and cardstock!
Like I said, this months pages are quite simple; I know I could have embellished a lot more, but really I just needed to get my memories out of my head and onto the page, and that took enough time this month!
If you like the project, or any of the products used, would like a catalogue, or to join my team, please contact me, or click on the ‘Shop NOW’ button at the top of the page. You can also find me on Twitter, Facebook, YouTube, Google+, About.me, and Tumblr (Links in the sidebar)
I recently wrote a post about the Stampin’ Up! Color Coach (See it HERE!) I love it, I think its an awesome tool (and Yes! you definitely need one!), but there was something missing! I’ve customised mine to meet my needs, and I thought I’d give you a peak!
I like the screw fastener the Color Coach comes with, but I like a bit more flexibility (I move the swatches around a lot and I like to be able to have one on its own, which I found a little awkward with the screw), So, I swapped it out for a O ring (most likely found at my local craft-type store, maybe in a mini-album kit, but believe me its been floating around my craft room for a good while!).
I also like to be able to see at a glance which inks I currently own (no, I don’t have them all yet! one day soon hopefully!), and what a tone on tone looks like. So, I stamped the same colour of ink on the card (Eg: Melon Mambo Swatch, stamped on with Melon Mambo ink) using the Everything Eleanor Swirlly stamp.
Now I can move the swatches around much more easily and see which colours I have (and which ones I need to get next!)
If you like the project, or any of the products used, would like a catalogue, or to join my team, please contact me, or click on the ‘Shop NOW’ button at the top of the page. You can also find me on Twitter, Facebook, YouTube, Google+, About.me, and Tumblr (Links in the sidebar)
A couple of weeks ago I wrote a post about Project Life by Stampin’ Up! about Project Life along with some tools to help you complete your Project Life!
I have just received my Project Life by Stampin’ Up! kit; card collection, accessory kit, page protectors and the new corner rounder punch to coordinate, see it all HERE!
I love this system! Stay tuned for more Project Life here on my blog and dont forget to subscribe to my YouTube to get the newest video first!
If you like the project, or any of the products used, would like a catalogue, or to join my team, please contact me, or click on the ‘Shop NOW’ button at the top of the page. You can also find me on Twitter, Facebook, YouTube, Google+, About.me, and Tumblr (Links in the sidebar)
Today Stampin’ Up! UK introduces Project LIfe by Becky Higgins into the catalogue. I have previously dabbled in this method of memory keeping. I am a traditional 12×12 scrapbooker, I love working with my photos, bringing out something in the picture, telling a story, drawing the eye into a particular part of a page. The great thing about Project Life is the ability to tell a lot of stories in a very small space, generally 3×4 or 4×6 inches.
——> what does the Kit contain
Each kit costs £13.50 and contains 100 double sided cards in 6×4, 4×4 and 3×4 sizes with no repeated designs (unlike the Becky Higgins packs which have multiples of each card). The cards coordinate with Stampin’ Up! colours and have coordinating accessory packs (£8.95) with lazer cut cards, stickers, washi tape, and wood accents, along with some other accessories. Stampin’ Up! have also produced a new corner punch, journalling pens, 3 stamp sets, framelits dies, as well as a selection of exclusive photo pocket pages to put all your cards and photos in!
——> Doing Project Life
So, to be successful at completing a Project Life project comes down to planning. Decide what you what to document; is it one trip? the first 12 months of your child’s life? a year in the life of your family? There are plenty of project life planners available for free to assist you in this planning stage, I have previously created my own, but It generally involves writing down key memories or events, and of course, remembering to take the pictures (This is generally where I fall down). I have recently discovered a totally awesome app to help, collectphotoapp.com. The app is basically a calender which you fill with photos, it also reminds you to take a photo a day. The issue then is printing, I recommend finding a method that works for you and how you plan on completing your Project Life. Personally I prefer the Print at Home method, allowing me to change my photo size/shape, and reprint if I need to. I just use photo paper and my regular print (it a pretty decent, HP OfficeJet 4500), but I would definitely consider getting a dedicated photo printer, such as the Canon Selphy.
—–> The Fun bit!
Now you have your collected memories and your photos you ready to put some pages together. I layout all my photos, seeing which ones tell the same story, and deciding if any photos need to be re-printed in a different size. Then I allocate cards, and write my journalling. The comes the fun bit, the embellishments, adding the bling, stamping and making it all pretty!
Get your Project Life by Stampin Up! kit today by clicking here!
Hannah Wilks
Stampin’ Up! UK Independent Demonstrator
If you like the project, or any of the products used, would like a catalogue, or to join my team, please contact me, or click on the ‘Shop NOW’ button at the top of the page. You can also find me on Twitter, Facebook, YouTube, Google+, About.me, and Tumblr (Links in the sidebar)