Butterfly Basics

Hello and Welcome to a new week at StampinbyHannah!

This card uses the Butterfly Thinlits dies, from the Spring/Summer Stampin’ Up! catalogue. Isn’t it pretty.
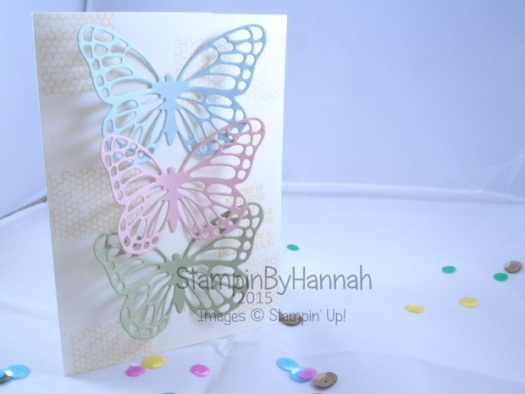
Stampin' Up! UK Butterfly Thinlits dies Butterfly BasicsWhen I first received these dies I had a good old play with them, trying to find the best way to get them to cut, which colours did I prefer, that kind of thing, and this is the card that resulted.

I adore the subtles collection cardstocks for spring, the colours are all just so pretty. Here I have used Soft Sky, Blushing Bride and Pear Pizzazz.

There are now loads of videos on YouTube showing you some of the best ways to get these dies to cut. I am absolutely no expert on this one! I run them through my slightly tired Big Shot several times, rotating them and moving them across the cutting plates. Once they are cut I stand and poke all the pieces through with my pokey tool (or Stampin’ Up! Paper Piercing Tool), into a Sandwich bag to catch all the little bits. But these Butterflies are worth the effort, they are stunning on a card!


Hannah Wilks

Stampin’ Up! UK Independent Demonstrator

If you like the project, or any of the products used, would like a catalogue, or to join my team, please contact me, or click on the ‘Shop NOW’ button at the top of the page. You can also find me on Twitter, Facebook, YouTube, Google+, About.me, and Tumblr (Links in the sidebar)

Sign up to our newsletter here – http://eepurl.com/2if59

Thank you for stopping by www.www.stampinbyhannah.co.uk today

x


Fancy Fold Friday – Extended Thinlit Circle Card

I have previously used this Thinlit Circle Card die for a Fancy Fold Friday, but this time I’ve made a small alteration – creating an extended flap on one end.

Stampin' Up! UK Thinlit Circle Card extended Painted Petals

I love the Painted Petals Stamp set and Painted Blooms Designer Series Paper. I just think its great that you can look like a watercolour expert, just using a couple of stamps!

The Painted Blooms DSP features some lovely colours, but the colour that stood out on this piece was Blackberry Bliss and so I selected Blackberry Bliss cardstock as my card base.

The secret to making this card successfully is cutting your cardstock, the die creates a card that is 5 1/2″ tall, so your cardstock should be cut a hair shorter to ensure that it passes through the die allowing you to cut part of the die, leaving the trailing edge to create the extended portion.

Measurements:

Cardstock = 8 1/4 x 5 3/8

Insert your cardstock through the die, leaving one edge of the cardstock above the die when laid on your acrylic plate. Fold the extended side into the card, lining the edge up with the circle cut out in the centre.

Cut a 6×6″ piece of DSP with the die. Trim around all  4 edges, and cut along the score lines left by the die. Trim the larger piece to 2″ wide.

Whisper White piece for the insert measures 2 x 5″, cut a scallop circle from Whisper White using the Scallop Circle die from the die set.


Hannah Wilks

Stampin’ Up! UK Independent Demonstrator

If you like the project, or any of the products used, would like a catalogue, or to join my team, please contact me, or click on the ‘Shop NOW’ button at the top of the page. You can also find me on Twitter, Facebook, YouTube, Google+, About.me, and Tumblr (Links in the sidebar)

Sign up to our newsletter here – http://eepurl.com/2if59

Thank you for stopping by www.www.stampinbyhannah.co.uk today

x
Fancy Fold Friday – Twisted Easel Card

Have you got that Friday feeling?! I do! and if its Friday, it can only mean one thing around here! Time for another Fancy Fold!

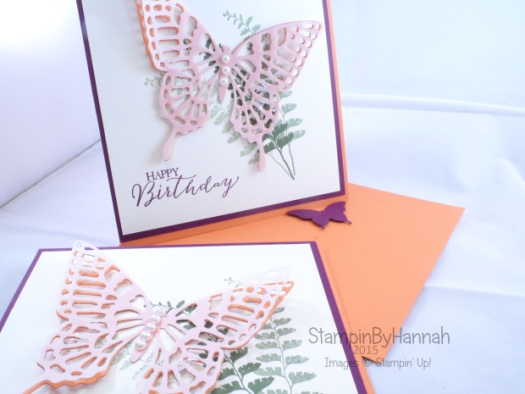
This week I have kept it simple and made a Twisted Easel card, using that lovely Butterfly Basics stamp set and the coordinating Butterflies Framelits dies.

Stampin' Up! UK Twisted Easel Card Butterfly Basics In Collours

I absolutely LOVE the latest selection of In Colours; Blackberry Bliss, Lost Lagoon, Hello Honey, Mossy Meadow, and Tangelo Twist, and so have selected 3 of them to use on my Fancy Fold card this week.

No one wants to watch my pick all the pieces out of these butterflies so I pre-cut them for filming purposes, but I wanted to share with you how pretty they are and how well they cut using the Big Shot! There are loads of YouTube tutorials out there already showing you how to get the best from these dies, so for now I’ll stick to having them pre-cut and ready to show you.

Measurements:

Cardstock – 12 x 6″ (30 x 15 cm)

Score on the long side at 6″ (15 cm)

Score a diagonal line from the top corner of one side of your cardstock to the bottom of the central score line. Fold and Burnish all the score lines well (this is the trick to this card)

Mat = 5 3/4 x 5 3/4″ (14.5 x 14.5 cm)

Layer – 5 1/2 x 5 1/2″ (14 x 14 cm)


Hannah Wilks

Stampin’ Up! UK Independent Demonstrator

If you like the project, or any of the products used, would like a catalogue, or to join my team, please contact me, or click on the ‘Shop NOW’ button at the top of the page. You can also find me on Twitter, Facebook, YouTube, Google+, About.me, and Tumblr (Links in the sidebar)

Sign up to our newsletter here – http://eepurl.com/2if59

Thank you for stopping by www.www.stampinbyhannah.co.uk today

x
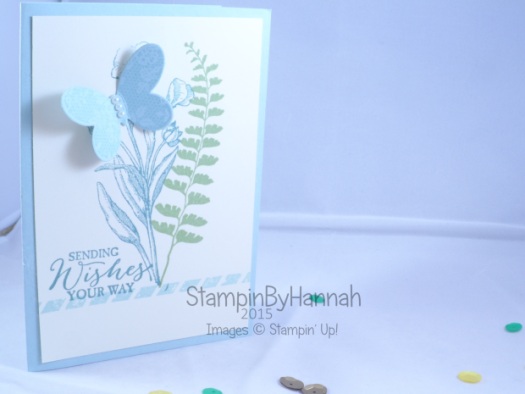
 

Sending Wishes Your Way….

I know that most of the time we make cards for happy occasions, but there are always times we need a ‘Thinking of you’ type card.

Stampin' Up! UK Butterfly Basics Thinking of you sympathy card

Stampin’ Up! stamp sets are always versatile, and although I didn’t originally set out to make such a card, I think this set is perfect for such an occasion.

Using the Butterfly Basics Stamp Set from the Spring/Summer catalogue, and a Soft Sky Card base. The Fern has been stamped in Pear Pizzazz onto a piece of Very Vanilla. I love all the Blue colours from Stampin’ Up! and my current favourite has to be Lost Lagoon, so I’ve used that to stamp the flower and sentiment, before stamping the boarding in Soft Sky.

The butterfly is stamped in Soft Sky ink onto to the same colour of cardstock, I do love tone on tone stamping. Before being die cut using the Butterflies thinlits die


Hannah Wilks

Stampin’ Up! UK Independent Demonstrator

If you like the project, or any of the products used, would like a catalogue, or to join my team, please contact me, or click on the ‘Shop NOW’ button at the top of the page. You can also find me on Twitter, Facebook, YouTube, Google+, About.me, and Tumblr (Links in the sidebar)

Sign up to our newsletter here – http://eepurl.com/2if59

Thank you for stopping by www.www.stampinbyhannah.co.uk today

x
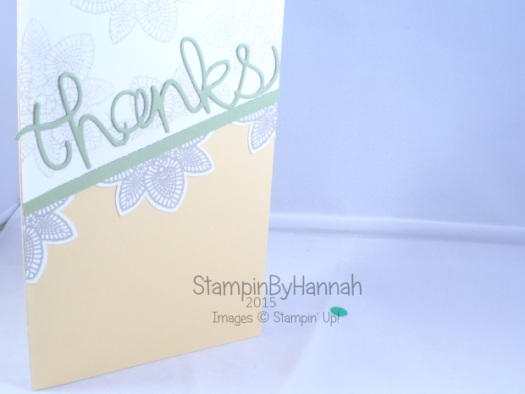
Thanks….. I’m Crazy About you!

Welcome to another week here at StampinByHannah! There are some great projects coming this week.

To set the week off I decided to say Thanks! using the Hello You Thinlits Dies (that come bundled with the Crazy About You stamp set)

Stampin' Up! UK Petal Potpourri Hello You

This card is a CASE (copy and share everything) from the Stampin’ Up! Spring/Summer catalogue page 23. Using the Petal Potpourri stamp set, and that lovely doily print flower (LOVE it!).

The card base is So Saffron, with a piece of Whisper White added at an angle.

I stamped the flower twice on a piece of Whisper White, using Crumb Cake ink, and punched them out with the Flower Medallion Punch before cutting them in half.

The ‘Thanks’ is die cut using those lovely framelits in Pear Pizzazz cardstock, using the Big Shot. Stampin’ Up! Transfer Adhesive Sheets are definitely the best things to stick these die cut words on with.

The Big Shot! I don’t think I’ve talked about the Big Shot before have I? I might have mentioned it briefly I suppose. The Big Shot is one of the greatest tools as a card-maker, I use mine all the time! The Big Shot is a manual Die Cutting machine, meaning that it uses Dies to cut shapes from cardstock (or fabric, fun foam, paper, felt, and a host of other materials). Stampin’ Up! sell the Big Shot and a whole heap of accessories, including the Magnetic Platform (which hold onto your metal dies, allowing you to line up stamped images and your dies without using bits of tape!), spare cutting mats, Dies and Embossing Folders. The Spring/Summer catalogue features a lot of new dies and embossing folders for use with your Big Shot, and makes a Big Shot a worthwhile investment.

At this point I felt that the card was a little too plain, and so added some more of the Petal Potpourri Doilies in Crumb Cake stamped off once to finish.


Hannah Wilks

Stampin’ Up! UK Independent Demonstrator

If you like the project, or any of the products used, would like a catalogue, or to join my team, please contact me, or click on the ‘Shop NOW’ button at the top of the page. You can also find me on Twitter, Facebook, YouTube, Google+, About.me, and Tumblr (Links in the sidebar)

Sign up to our newsletter here – http://eepurl.com/2if59

Thank you for stopping by www.www.stampinbyhannah.co.uk today

x


Fancy Fold Friday – Twist Turn Card Video Tutorial!

Welcome to another Fancy Fold Friday! This week I am re-visiting a previous project as a reader had asked for a video tutorial, and so here it is. This is originally a CASE from My Chic and Scratch, but I have altered the measurements to fit A4 cardstock.

Stampin' Up! UK Twist Turn card Butterfly BasicsThis card uses the new Butterfly Basics stamp set, from the Spring/Summer catalogue from Stampin’ Up! This stamp set comes bundled with a set of thinlits, Butterflies Thinlit Dies. This set of dies is a little different that our usual Stampin’ Up! thinlits as not all the dies match a stamp, instead the sets compliment each other. Saying that the butterfly featured on this card is the only stamp/die combination in the set!

Measurements:

Cardstock – 8 1/4 x 5 1/4″ (20.9 x 13.3 cm)

Score on the long side at 2 5/8 and 3 1/2″ (6.6 and 8.9 cm)

Score on the short side at 2 5/8″ (6.6 cm)

Between the two score lines draw two further score lines on a diagonal. Lay your card with the long side at the top and the square created by the previous score lines on the left. Draw a score line from the top of the left hand score line to the point with the right hand score and horizontal score line meet. Then draw a further score line from the point with the right hand score line and the horizontal score line meet to the bottom of the left hand score line.

With the card still laid in the same orientation fold along the horizontal score line, before folding all the score lines both forwards and backwards. Fold the left hand score line backwards, and fold the card along the horizontal score. Holding the card under the square that you have just formed, take hold of the top two corners of that square and tilt. Make sure you burnish all the score lines well at this point.

Then attach your decorative cardstock or DSP.

Measurements:

2 1/4 x 2 1/4″ ( 5.7 x 5.7 cm)
2 1/4 x 4 1/4″ (5.7 x 10.8 cm)


Hannah Wilks

Stampin’ Up! UK Independent Demonstrator

If you like the project, or any of the products used, would like a catalogue, or to join my team, please contact me, or click on the ‘Shop NOW’ button at the top of the page. You can also find me on Twitter, Facebook, YouTube, Google+, About.me, and Tumblr (Links in the sidebar)

Sign up to our newsletter here – http://eepurl.com/2if59

Thank you for stopping by www.www.stampinbyhannah.co.uk today

x

Happy Birthday…. thinlits edition!

Well, its still my Birthday week, so I’m still celebrating! My birthday and a catalogue launch in one week, busy times for me! but I love it!

Stampin' Up! UK Birthday card Crazy about you Hello you

This card uses a brand new stamp set from the Spring/Summer catalogue, Crazy about you. Before I get into the card I just want to mention this set, not only is a great set for sentiments and phrases, as well as three lovely floral images, but it comes bundledwith 3 thinlits dies – Hello You! I love it when Stampin’ Up! bundle stamps and dies (or stamps and DSP!) as it you save 15%! AND there is something even better about this stamp set! It comes in Wood Mount, Clear Mount AND Photopolymer! Awesome!

Onto the card….

I used a Melon Mambo card base today, with a Whisper White matt.

The leaves are from that lovely Crazy About You stamp set and are stamped in Pear Pizzazz (I think this is my favourite green!). I stamped the Birthday stamp in Pear Pizzazz on a scrap of Whisper White and cut it into a banner shape. Before layering it with a similarly cut scrap of Pink Pirouette and a piece of the Subtles Collection DSP stack in Wild Wasabi!

Then comes the greatest thing about this stamp/die bundle – the word thinlit dies! You get 4 in the pack: Happy, You, Thanks, and Hello! and the font its just so pretty! I used my Big Shot to die cut the word Happy from some more Melon Mambo, and used the Transfer Adhesive Sheets to adhere it to the card. Have I mentioned about Transfer Adhesive Sheets yet? they are perhaps the coolest adhesive I have ever used! You peel off the backing and apply your diecut to the glue, put the backing back over and rub to ensure the glue transfers, before peeling your die cut back off (carefully its now super sticky!) and putting it on your card! No longer do you have to spread wet glue as thinly as humanly possible over the back of a diecut, or attempt to stick them on with tape runner! Awesome!

Right, I think that is probably enough waffle for today!

have a great day and see you again tomorrow for Fancy Fold Friday!!!


Hannah Wilks

Stampin’ Up! UK Independent Demonstrator

If you like the project, or any of the products used, would like a catalogue, or to join my team, please contact me, or click on the ‘Shop NOW’ button at the top of the page. You can also find me on Twitter, Facebook, YouTube, Google+, About.me, and Tumblr (Links in the sidebar)

Sign up to our newsletter here – http://eepurl.com/2if59

Thank you for stopping by www.www.stampinbyhannah.co.uk today

x

Fancy Fold Friday – Thinlit edition…..

Ok, So I thought I had finished Fancy Fold Friday (I’m planning on bringing it back soon, I just haven’t got round to making any Fancy Fold cards recently!), and then I found this on my desk.

I know that this really is cheating, but people are always so impressed with these cards, and they just look so complicated to make, but really they are so easy, and its all down to a die!

Stampin' Up! UK Circle Thinlit Festival of Trees

This card is created using the Circle  Card Thinlit die. Stampin’ Up! have 3 of these ‘flip card’ creating dies at the moment, this circle one, a label one, and a great snowflake one! Each die comes with a number of other dies to create a great card. These dies are wonderful! Trying to made a ‘flip card’ by hand is a right pain! This die, not only cuts the card to the right size, but cuts the flip shape AND creates the score lines! and all I had to do was run it through my Big Shot!

To create this card I cut a piece of Real Red cardstock to the slightly bigger than the Circle Card Thinlit die, and ran it though my Big Shot. I also grabbed the scallop circle die from the same die set and a piece of Old Olive cardstock, and ran that through the Big Shot too!

I couldnt make one of these cards without using my favourite Festival of Trees stamp set, this time stamped in Pear Pizzazz, Old Olive, and Real Red. The sentiment is also from the same stamp set, stamped in Real Red, and cut into a cute little banner.

The tricky bit of this card is cutting that DSP! The paper I have used here is from Santa and Co. (that one with the crazy dancing Santas!). To ensure that the DSP fits the card, I used the Circle Card Thinlit die again, but this time cut the DSP rather than cardstock. Then cut along the score lines to give me two pieces; one for the front and the other for the inside! Then its just a case of adding Snail adhesive and sticking it all together!

Over the next few weeks I will be revisiting some of my previous Fancy Fold cards, and adding videos! Like my Facebook page or Subscribe to my YouTube to stay up to date and get my latest projects straight away.


Hannah Wilks

Stampin’ Up! UK Independent Demonstrator

If you like the project, or any of the products used, would like a catalogue, or to join my team, please contact me, or click on the ‘Shop NOW’ button at the top of the page. You can also find me on Twitter, Facebook, YouTube, Google+, About.me, and Tumblr (Links in the sidebar)

Sign up to our newsletter here – http://eepurl.com/2if59

Thank you for stopping by www.www.stampinbyhannah.co.uk today

x

Weekly Deals!

Oh yes, Its Wednesday!

Our Festival of Trees journey will continue a little later today! but first, it is of course Weekly Deals Time!!!!

Stampin' Up! UK Weekly deals

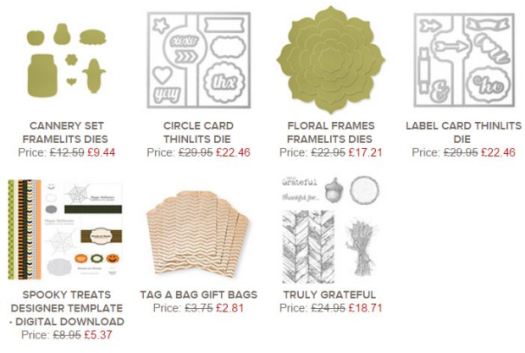
How awesome are these deals!!!! I adore the two thinlit dies on offer this week! I have been eye-ing up the circle card thinlit for AGES! this may be the perfect opportunity to grab it! (seeing as I have an order in the waiting already!) These two thinlit dies create flip cards, and come complete with a selection of other dies to embellish your card with!  The framelits this week are also great! The Cannery set, coordinates with Perfectly Preserved – an older stamp set you may have in your collection, but is now only available in digital stamp form. The floral frame though coordinate with Daydream Medallions, which is gorgeous!

You guys already know how much I love all of the Tag a Bag gift items in our catalogue, and these bags are a super cute way to dress up sweeties and other small gifts (just in time for halloween!). Speaking of halloween, our digital download this week is Spooky Treats  – a MDS template pack allowing you to create sweet wrappers and other spooky treat labels!

I love the weekly deals! they always offer something you hadn’t really thought of, or had completely missed in the catalogue!

Stampin' Up! UK Pick a pack of Paper DSP Designer Series Paper

Dont forget as well as Weekly deals there are two other offers currently available!

First, Good Greetings is still available completely FREE when you spend more than £200!

And, Pick a Pack of Paper runs until the end of October!


Hannah Wilks

Stampin’ Up! UK Independent Demonstrator

If you like the project, or any of the products used, would like a catalogue, or to join my team, please contact me, or click on the ‘Shop NOW’ button at the top of the page. You can also find me on Twitter, Facebook, YouTube, Google+, About.me, and Tumblr (Links in the sidebar)

Thank you for stopping by www.www.stampinbyhannah.co.uk today

x

Weekly deals and more!

You got it folks! its wednesday, that only means one thing! Brand new Weekly Deals from Stampin’ Up!

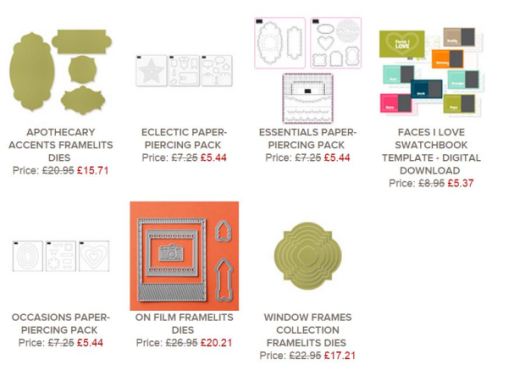
This weeks offering is top notch as always, with framelets and Paper Piercing packs!

stampin up uk weekly deals


How awesome! Thats Framelit collections, and Paper Piercing Packs, along with a lovely swatchbook idea for MDS (I have been having a go with the Stampin’ Up! digital crafting software, it is awesome! I’m hoping to share a project or two with you soon, I promise!)

As well as brand new Weekly Deals this week, the Clearance Rack has also been updated with some great Designer Series Paper, card making kits, and some great ideas for Halloween and Christmas crafting!

go and check out the offers now!


Hannah Wilks

Stampin’ Up! UK Independent Demonstrator

If you like the project, or any of the products used, would like a catalogue, or to join my team, please contact me, or click on the ‘Shop NOW’ button at the top of the page. You can also find me on Twitter, Facebook, YouTube, Google+, About.me, and Tumblr (Links in the sidebar)

Thank you for stopping by www.www.stampinbyhannah.co.uk today

x