Halloween Cards and Box Project

So, its nearly Halloween, as I have previously mentioned, its not really something I celebrate – but these papers and stamps were just so adorable I had to make a project with them!

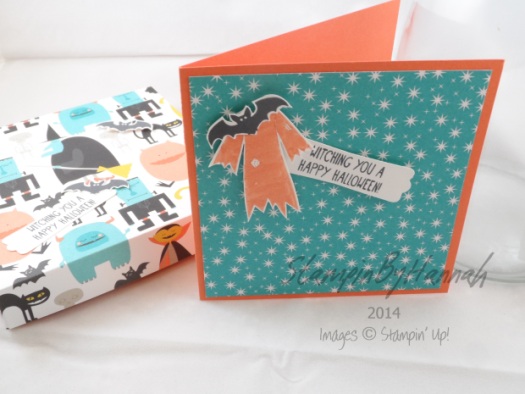
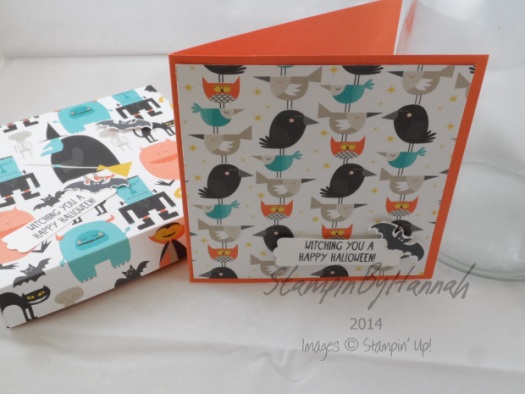
The Stampin’ Up! Autumn Winter Catalogue for this year has a few Halloween themed stamp sets, including ones with matching framelits as well as really cute monsters, but I’m sucker for a sweet witch (I think its got something to do with my favourite book as a child – the worst witch!) so these cards feature Tee-Hee-Hee. The Motley Monsters DSP features Basic Black, Burmuda Bay, Crushed Curry, Sahara Sand, Tangerine Tango, and Whisper White – for a super bright and fun colour pallet that I am so going to re-visit time and again and again.

Stampin Up UK Motley Monsters Halloween


I made 4 cards, all in 4×4 inch size, using Tangerine Tango as the card base, and a 3.75 x 3.75″ piece of Motley Monsters DSP as the card front.

Stampin Up UK Motley Monsters Halloween

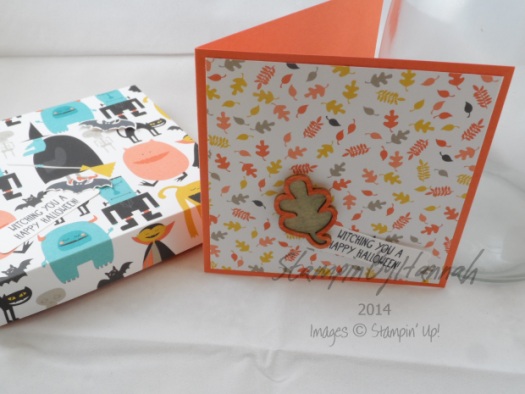
Each of the cards is subtly different, using a different piece of the paper, a different stamp, or embellishment.

Stampin Up UK Motley Monsters Halloween

I love wooden elements! These leaves are so super cute! I used two of the Autumn Wooden Elements here, colouring the outline element with my Tangerine Tango Stampin’ Write Marker
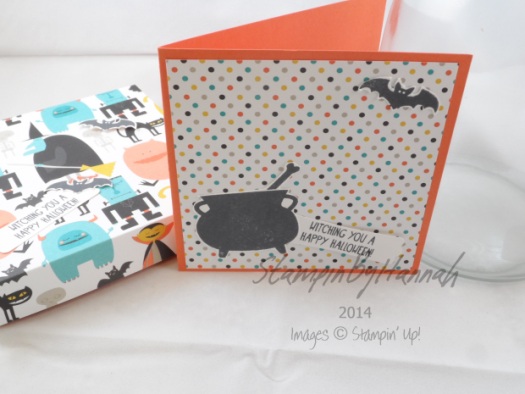
Stampin Up UK Motley Monsters Halloween All the cards use the same sentiment from the Tee-Hee-Hee stamp set, and all the stamped images are fussy cut (such a shame there arent any framelits for this stamp set 🙁 )

I also used the same cardstock and DSP to create a box to gift these cards and their envelope together

I loved making this project, you never know, maybe I’ll do some more Halloween crafting next year!


Hannah Wilks

Stampin’ Up! UK Independent Demonstrator

If you like the project, or any of the products used, would like a catalogue, or to join my team, please contact me, or click on the ‘Shop NOW’ button at the top of the page. You can also find me on Twitter, Facebook, YouTube, Google+, About.me, and Tumblr (Links in the sidebar)

Thank you for stopping by www.www.stampinbyhannah.co.uk today

x
August Stampin’ Techniques Class – Blooming With Kindness

Stampin' Techniques class August 2014Hello!

I know I usually reserve mondays for tips / techniques / hauls etc. but I thought I would take this monday as an opportunity to tell you about the August Stampin’ Techniques Class here at StampinByHannah!

This class is available either online (check it out here!) for a small fee, or FREE! if you live within 25 miles of me (Stockton-on-Tees), as a party or workshop for you and your friends!

The class comes complete with instructional videos and a handout, as well as all the pieces to make the cards. The stamp set is sold seperately (available below)

Class starts August 1st!

I cant wait for you to join me!


Hannah Wilks

Stampin’ Up! UK Independent Demonstrator

If you like the project, or any of the products used, would like a catalogue, or to join my team, please contact me, or click on the ‘Shop NOW’ button at the top of the page. You can also find me on Twitter, Facebook, YouTube, Google+, About.me, and Tumblr (Links in the sidebar)

Thank you for stopping by www.www.stampinbyhannah.co.uk today

x
The Stampin’ Up! Colour Coach …… and why you need one!

So I had a parcel last week from my upline, a lovely welcome to my team card, one of her fabulous notebooks and a colour coach. Now, I’d seen the Colour Coach in the Stampin’ Up! catalogue, I’d looked at it, and thought “don’t need one of those, I understand colour, I know which colour work and which don’t!” I have always made my own colour swatches in the past, I have a tag for each Ink pad I own (including my Stampin’ Up! ones) so if I want to a can compare different colours, and I have used them previously to match inks to patterned papers or to choose an ink  colour for a particular stamp or image, so I really wasn’t planning on getting the Stampin’ Up! colour coach.


I was so very wrong! The colour coach is awesome! Each colour gets its own card; the front it a solid colour with it name and colour family along the side and bottom, while the back shows you 2 three colour combinations including the colour of the card, along with its ‘sister’ colour for creating a monochromatic look, two step stamping or choosing coordinating ink and cardstock.

The front of the guide explains how the coach works, while the back card gives you space to create your own colour combinations. The coach also include two cards giving the colours in each colour collection: subtles, brights, regals, neutrals. The current In Colours are available as two separate packs, one for the newest colours and one for the returning colours.


Stampin’ Up! also provide a great PDF (available here) which give you further tips and colour principles to get you started in your colour journey.


Check out the Colour Coach in my shop


Hannah Wilks

Stampin’ Up! UK Independent Demonstrator

If you like the project, or any of the products used, would like a catalogue, or to join my team, please contact me, or click on the ‘Shop NOW’ button at the top of the page. You can also find me on Twitter, Facebook, YouTube, Google+, About.me, and Tumblr (Links in the sidebar) Thank you for stopping by www.www.stampinbyhannah.co.uk today

x
Card Making Basics – Tools

So I thought while we wait for my Stampin’ Up! starter kit to arrive and my online shop to go live I would start a series of posts around Card making basics, and where is the best place to start? tools? well it is now!

  1. paper trimmer – the Stampin Up! paper trimmer is my personal favourite because of its large cutting and measuring area and the fact that it can be changed from a basic trimmer into a rotatory cutter
  2. bone folder – I always though, a bone folder was a bone folder, I was wrong! there is just something about the Stampin Up! bone folder, either size or weight that makes a massive difference with burnishing score lines
  3. Simply Scored – I LOVE  THIS Tool! hands down my favourite tool from any craft company! I have yet to come across a project where I don’t use it; cards, boxes, bags, envelopes,
  4. stamps – don’t think I need to say much more about stamps really, love them, cant get enough!
  5. Punches – see stamps!
  6. Paper piercer – use it for everything, in particular getting the backing off that pesky sticky strip!
  7. Tweezers – use a basic pair (designed for eyebrows I do believe) to remove backing from tape, sticky strip, place jewels and pearls, hold items while embossing, I use my tweezers all the time
  8. Grid paper – very useful for lining up papers, measuring, ensuring stamps are straight etc. and stopping your desk from getting messy!
  9. Big shot! – so useful, admittedly can be done without, but fantastic for die-cutting and embossing. I would suggest that an embossing machine (the texture boutique is awesome) adds a special extra something to your cards and projects. Along the same vein, dies and embossing folders, I would suggest dies that match stamps, and simple embossing patterns such as dots and strips
  10. Stampin Scrub – hands down the best way to clean those intricate and detailed stamps. I will openly admit, for years I have used the cheapest baby wipes I could possibly find, but no longer. My stamps are finally clean!


While I’m here, don’t forget to check out my site at StampinUp.net :  http://www.stampinup.net/esuite/home/stampinbyhannah


Hannah Wilks

Stampin’ Up! UK Independent Demonstrator

If you like the project, or any of the products used, would like a catalogue, or to join my team, please contact me, or click on the ‘Shop NOW’ button at the top of the page. You can also find me on Twitter, Facebook, YouTube, Google+, About.me, and Tumblr (Links in the sidebar)

Thank you for stopping by www.www.stampinbyhannah.co.uk today

x