Technique Tuesday | Blender Pens on Vellum

Stampin' Up! UK Blender Pens on vellum

Hello and welcome to another Technique Tuesday, I have recently been playing with my Blender Pens, and thought I would share the easiest way to use them!

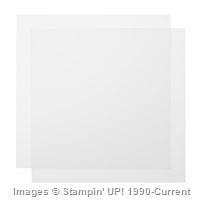
I love the Blender Pens, they make colouring images so super quick and easy, but they take a little bit of practice particularly on Whisper White card stock. However, they are really easy to use on vellum.

So, what is a Blender Pen?

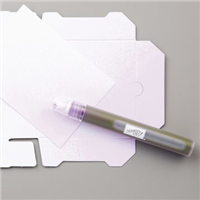
A Blender Pen is a pen that contains a special clear solution, that helps inks to move on paper. They create a similar effect to watercolouring, but without the mess of water everywhere. These pens work best on smooth surfaces; Whisper White card stock, Shimmery White card stock, or Vellum. This is because the ink still needs to be a little wet for the solution to move the ink. I find that they work best on vellum, this is because the ink takes longest to dry, giving you plenty of time to get a smooth colour blend

Stampin' Up! UK Blender Pens on vellum

I had some issues during the filming of this one! So, as usual you get a couple of ‘live bloopers!’ My camera ran out of battery (I’d filmed about 8 videos in one day!), but I hope it doesn’t effect your enjoyment of the tutorial

Top Tips for using Blender Pens on Vellum;

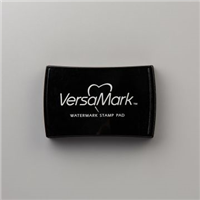
– I prefer to use Stazon Black on Vellum, as it is designed for smooth surfaces and dries to a nice crisp Black

– Use on colour at a time, here I coloured all the leaves first, then the flower centres and then the petals

– Scribble off your Blender Pen onto some scrap paper between each colour. The tip of your Blender Pen may stain, but this won’t effect the colour once you have scribbled off the excess

– Play and have fun!

Stampin' Up! UK Birthday Blossoms Vellum

Once the vellum is coloured I turn the vellum over, and use Fast Fuse Adhesive to stick the vellum to the card. I love Fast Fuse for this, because it is a clear tape you can’t see it, but I also apply the tape to the coloured areas. This way you can’t see when it is attached, I like the look of the vellum loose at the edges, but you could use glue dots in each corner and cover them with Candy Dots or Pearls.

What’s your favourite way of attaching Vellum to your cards?


Dont forget to shop using the Code Club Code to receive some great FREE product!

XEQGUA4P

I will be closing this order on the 30th July 2015


Shop Now button-001Join my team button-001

To purchase any of the items featured in my projects please use the links above. To join my team of Stampin’ Friends select ‘Join My Team’ or send me a message!

Please support StampinByHannah, and join my Code Club, by using the Hostess code featured in the top right hand of my blog. For orders of over £150 please do not use this code, as you are entitled to your own Hostess benefits!

Sign up to my newsletter here – http://eepurl.com/2if59

Hannah Wilks

Stampin’ Up! UK Independent Demonstrator

Birthday Blossoms

Stampin' Up! UK birthday blossoms

I am in love with this stamp set! I know there are a few videos and posts coming with this one – but that’s because I love it, and I only use what I love!

Stampin' Up! UK birthday blossoms

This card uses that lovely Ink Smooshing technique that I used a few weeks ago  (on this card!) I am planning a technique video on this one because I just love it! Its so super simple.

First stamp the sentiment in Versamark onto Watercolour Paper, and heat emboss with clear or white Stampin’ Emboss Powder. Grab your largest clear block (or tile, glass counter top etc.) and press your ink pad onto it! Spritz with water. Using a piece of Window Sheet, or the acetate panels that come with your photopolymer stamps, pick up the ink and water mixture and apply to your Watercolour Paper. Repeat until you have the effect desired. Here I picked up the ink and water mixture several times to get this dark colour.

stampin' Up! Uk delightful Dijon birthday blossoms

When you mix your ink and water, you are diluting the colour, so the final result will be lighter, so the more you add, the darker the final result.

You can see the difference in colour tone between the ink smooshing and the stamped flowers – its all the same ink pad!


Shop Now button-001Join my team button-001

To purchase any of the items featured in my projects please use the links above. To join my team of Stampin’ Friends select ‘Join My Team’ or send me a message!

Please support StampinByHannah, and join my Code Club, by using the Hostess code featured in the top right hand of my blog. For orders of over £150 please do not use this code, as you are entitled to your own Hostess benefits!

Sign up to my newsletter here – http://eepurl.com/2if59

Hannah Wilks

Stampin’ Up! UK Independent Demonstrator

Freshly Made Sketches #191 – It’s Your Birthday

Stampin' Up! UK Freshly Made Sketches Endless Birthday Wishes

Oh yes, It’s that time again! Playing along with Freshly Made Sketches again this week with #191!

Freshly Made Sketches 191

This sketch scared the pants off me! So much white space! I love white space, I really do, and most of my cards feature expanses of white space, but to see a sketch with so much white was just frightening!

Stampin' Up! UK Freshly Made Sketches Endless Birthday Wishes

I’ve had a stack of card stock sat out on my shelf this week, and the Real Red piece shouted at me for this card. As soon as I saw the two little strips on the sketch I knew I wanted to use some Designer Series Paper, so I pulled Typeset – I love this paper, its so pretty but I hadn’t used it on a card before! I know, its shocking, but putting DSP on cards is something I struggle with – I am a total stamper at heart.

Initially I grabbed Guy Greetings for my sentiment, but I quickly changed my mind to the lovely new Endless Birthday Wishes. I uses a ruler and pencil to draw a line across the piece of Very Vanilla card stock, and I stamped the sentiment in Real Red on the line. Sometimes I find this way to get a straight line quicker than pulling out my Stamp-a-ma-jig!

I almost thought the card was finished, but it just felt a little too clean! I’ve been playing with the Birthday Blossoms preparing for my Stamp-a-Stack for July, so pulled it again for these awesome flowers punched with the Pansy Punch.

Thanks for stopping by today, see you again soon

x


Shop Now button-001Join my team button-001

To purchase any of the items featured in my projects please use the links above. To join my team of Stampin’ Friends select ‘Join My Team’ or send me a message!

Please support StampinByHannah by using the Hostess code featured in the top right hand of my blog. For orders of over £150 please do not use this code, as you are entitled to your own Hostess benefits!

Sign up to my newsletter here – http://eepurl.com/2if59

Hannah Wilks

Stampin’ Up! UK Independent Demonstrator