Weekly Deals – 19.11.14

Are you ready? Are you sure?

Its time for Weekly Deals!

Stampin' Up! UK Weekly Deals 19th November 2014

What a great selection again this week! As usual we have a great Digital Download, Autumn Spice coordinates perfectly with the Autumn Spice DSP from 201o. The kit includes; 13 stamp brushes and some great DSP, as well as some 8×8 scrapbook templates.

The Celebration Basics Invitations are great for quick and easy invitations, and come complete with the envelopes. The Celebration add-ons (which come complete with 6×6 DSP, sprintzer, die cuts and 12 feet of garland) work with the Celebration Basics Kit – grab all these items together for a great coordinated party!

We also get some Wisteria Wonder 3/4″ Chevron Ribbon, and the Sweet Threats Simply Sent kit.

The last deal this week, and I think the greatest of the bunch, is the Starburst Framelit Dies, which coordinates with the Starburst Sayings Stamp set, but is also great for adding that little something to embellishment clusters on scrapbook pages!


Hannah Wilks

Stampin’ Up! UK Independent Demonstrator

If you like the project, or any of the products used, would like a catalogue, or to join my team, please contact me, or click on the ‘Shop NOW’ button at the top of the page. You can also find me on Twitter, Facebook, YouTube, Google+, About.me, and Tumblr (Links in the sidebar)

Sign up to our newsletter here – http://eepurl.com/2if59

Thank you for stopping by www.www.stampinbyhannah.co.uk today

x

Save the Date

Ok, so we’re getting to that point in the year when all those Brides start looking for Wedding Stationary (If you are one of those Brides BTW check out this page!), and so as crafters we are often called upon to make invitations, save the dates, thank you cards etc. etc.

Stampin' Up! UK Save the Date Cheers to Love Butterflies

This lovely Save the Date card uses a sentiment from Cheers to Love (lovely for wedding cards!), and some of the butterflies from Papillon Potpourri.

The card base here is the Brushed Gold cardstock (Yum!) with a Whisper White piece. I first stamped the solid butterflies in Blushing Bride, before overstamping the detailed butterflies in Gold! The Sentiment is also stamped using the Gold Metallic Encore Ink.

The larger butterfly I stamped on a scrap piece of Whisper White, in VersaMark, before embossing in Gold, and punching it out with the Elegant Butterfly Punch. Both the Whisper White stamped piece, and the large butterfly are added to the card base with dimensionals for that layered look.

For more information on Wedding Stationary, Contact me HERE


Hannah Wilks

Stampin’ Up! UK Independent Demonstrator

If you like the project, or any of the products used, would like a catalogue, or to join my team, please contact me, or click on the ‘Shop NOW’ button at the top of the page. You can also find me on Twitter, Facebook, YouTube, Google+, About.me, and Tumblr (Links in the sidebar)

Sign up to our newsletter here – http://eepurl.com/2if59

Thank you for stopping by www.www.stampinbyhannah.co.uk today

x

12 Tags of Christmas – Trim the Tree….

Oh yes, We are still working our way though the 12 tags of Christmas!

Stampin' Up! UK Christmas Tag Trim the Tree

Here I cut a 2 x6″ piece of DSP from the Trim the Tree Designer Series Paper Stack (there are so many cute patterns in there!), and punched the top with the Scalloped Tag Topper Punch.

The band around the tag is just a scrap of the same piece of DSP, wrapped around and attached with some Snail.

The ribbons on the top are the Real Red 3/8″ Satin Woven Ribbon tied around a piece of 5/8″ Organza Ribbon.

This tag is simple but really sweet.


Hannah Wilks

Stampin’ Up! UK Independent Demonstrator

If you like the project, or any of the products used, would like a catalogue, or to join my team, please contact me, or click on the ‘Shop NOW’ button at the top of the page. You can also find me on Twitter, Facebook, YouTube, Google+, About.me, and Tumblr (Links in the sidebar)

Sign up to our newsletter here – http://eepurl.com/2if59

Thank you for stopping by www.www.stampinbyhannah.co.uk today

x

Cafe bags and Gift boxes, and an offer from me to you!

I hope you read my post last week about Gift Packaging (its HERE if you want it!), I love our selection of boxes and bags, including the selection of dies and boards so you can design and make your own.

Our pre-made boxes and bags are all in Kraft card (or paper) and can be a little dull – so, I’ve dressed them up!

Stampin' Up! UK Tiny Treat Box

This is our Tiny Treat box, that I have dressed up with some DSP (All is Calm), and some punches. I have also added a box made with the Lost Lagoon Silky Taffeta Ribbon (LOVE!).


Stampin' Up! UK Petite Cafe Bag

This is the Petite Cafe Bag, with some added extras. Once again I’ve just All is Calm DSP (isn’t it just beautiful!) and I’ve simply attached it with some staples!

So, I have an offer for you: If you join my team before Christmas, I will send you both of these project (complete with some goodies), as well as all the usual things that you would expect from me (and Stampin’ Up! UK). For more information about Joining me CLICK HERE!

Hope to speak to you soon


Hannah Wilks

Stampin’ Up! UK Independent Demonstrator

If you like the project, or any of the products used, would like a catalogue, or to join my team, please contact me, or click on the ‘Shop NOW’ button at the top of the page. You can also find me on Twitter, Facebook, YouTube, Google+, About.me, and Tumblr (Links in the sidebar)

Sign up to our newsletter here – http://eepurl.com/2if59

Thank you for stopping by www.www.stampinbyhannah.co.uk today

x


Product of the Month – Project Life by Stampin’ Up! Cards!

Ok, so this month my Product of the Month is the Seasonal Snapshot Project Life by Stampin’ Up! Card Collection and Accessory Pack.

I LOVE this kits, you get heaps of Project Life cards, stickers, Washi tape, and other fun embellishments, and they are great for documenting family holidays, Christmas, Halloween, etc. But I know there is more that you can do with them than just memory keeping (don’t get me wrong, I love memory keeping! but I know its not everyone’s bag!)


So, I grabbed my kits the other day and made some really cool cards using just the cards in the kit (plus some cardstock for the card bases) and the goodies in the Accessory pack.

Stampin' Up! UK Project Life Thankful for you

Some of the cards in this kit are based around Halloween and Thanksgiving, and although Halloween in growing in popularity, Thanksgiving is definitely an All American Holiday! So I knew I needed to find a different purpose for these cards. I always need Thank You cards (each and every customer that shops with me gets a Thank you), and so I took this lovely spotty 6×4 card and cut it down to 4 x 5 3/4″ to fit my card base, added a strip of Washi tape, a punched Decorative Label, and the Thankful sticker from the Accessory kit. The ‘for you’ is part of a stamp from Good Greetings, I coloured with Tangerine Tango Stampin’ Write Marker and added to the label.

Stampin' Up! UK Project Life Seasonal Snaphot

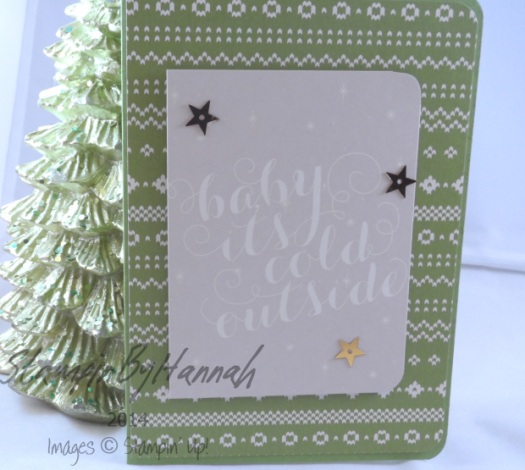
I love this card! Baby It’s Cold Outside, and I thought it paired beautifully with this Old Olive ‘jumper’ print card! I have rounded the corners with the Project Life by Stampin’ Up! Corner punch, and added some stars from the Accessory pack with some multi-purpose liquid glue.

Stampin' Up! UK Project Life by Stampin' Up! Seasonal Snapshot shaker card

This thought is my favourite of the 3 cards! This card took me ages! I love the look of a Shaker card, but I have never made one (until now!) and I have to say, I’ll be grabbing some foam tape before I make one again! I used a Real Red card base, and added the Old Olive Polka dot print 6 x4 card (cut down a little) to the front, before adhering the red snowflake 3 x4 card to the centre.

The accessory pack comes with 3 of these lovely printed acetate 3 x4 cards, one says Merry Christmas, one has a wood grain print, and the other is Halloween themed. And this Merry Christmas just screamed ‘Shaker card’ to me! I have a little confession to make here, the Sahara Sand frame around the acetate piece is cut using Spellbinders Curved Matting Basics A dies, because that is what I had on hand.

Then came the fiddly part! I really need some foam tape next time because to create the ‘shaker’ you have enclose all those sequins in something! Well, I didnt have foam tape (and now I’m thinking about it, this would have been a great time to use those edge pieces from the Dimensionals!), but I do have a whole heap of foam squares from a well know craft superstore (I wasn’t wasting this many dimensionals! sorry!), and used those to enclose my sequins. So, the Sahara sand frame is attached to the acetate piece, then I stuck foam squares around the edge of the acetate, piled the sequins in the centre of the snowflake card, and stuck the acetate, frame, and foam squares, over the top!

I love the look, and it would be super simple if I had some foam tape!


Hannah Wilks

Stampin’ Up! UK Independent Demonstrator

If you like the project, or any of the products used, would like a catalogue, or to join my team, please contact me, or click on the ‘Shop NOW’ button at the top of the page. You can also find me on Twitter, Facebook, YouTube, Google+, About.me, and Tumblr (Links in the sidebar)

Sign up to our newsletter here – http://eepurl.com/2if59

Thank you for stopping by www.www.stampinbyhannah.co.uk today

x

Fancy Fold Friday – Thinlit edition…..

Ok, So I thought I had finished Fancy Fold Friday (I’m planning on bringing it back soon, I just haven’t got round to making any Fancy Fold cards recently!), and then I found this on my desk.

I know that this really is cheating, but people are always so impressed with these cards, and they just look so complicated to make, but really they are so easy, and its all down to a die!

Stampin' Up! UK Circle Thinlit Festival of Trees

This card is created using the Circle  Card Thinlit die. Stampin’ Up! have 3 of these ‘flip card’ creating dies at the moment, this circle one, a label one, and a great snowflake one! Each die comes with a number of other dies to create a great card. These dies are wonderful! Trying to made a ‘flip card’ by hand is a right pain! This die, not only cuts the card to the right size, but cuts the flip shape AND creates the score lines! and all I had to do was run it through my Big Shot!

To create this card I cut a piece of Real Red cardstock to the slightly bigger than the Circle Card Thinlit die, and ran it though my Big Shot. I also grabbed the scallop circle die from the same die set and a piece of Old Olive cardstock, and ran that through the Big Shot too!

I couldnt make one of these cards without using my favourite Festival of Trees stamp set, this time stamped in Pear Pizzazz, Old Olive, and Real Red. The sentiment is also from the same stamp set, stamped in Real Red, and cut into a cute little banner.

The tricky bit of this card is cutting that DSP! The paper I have used here is from Santa and Co. (that one with the crazy dancing Santas!). To ensure that the DSP fits the card, I used the Circle Card Thinlit die again, but this time cut the DSP rather than cardstock. Then cut along the score lines to give me two pieces; one for the front and the other for the inside! Then its just a case of adding Snail adhesive and sticking it all together!

Over the next few weeks I will be revisiting some of my previous Fancy Fold cards, and adding videos! Like my Facebook page or Subscribe to my YouTube to stay up to date and get my latest projects straight away.


Hannah Wilks

Stampin’ Up! UK Independent Demonstrator

If you like the project, or any of the products used, would like a catalogue, or to join my team, please contact me, or click on the ‘Shop NOW’ button at the top of the page. You can also find me on Twitter, Facebook, YouTube, Google+, About.me, and Tumblr (Links in the sidebar)

Sign up to our newsletter here – http://eepurl.com/2if59

Thank you for stopping by www.www.stampinbyhannah.co.uk today

x

Christmas Wishes Pocket Project

I do love a cute Christmas make – and this would be great to make for you children and grandchildren to remember why they love Christmas, why Christmas is so special, or to teach them a little bit about the Christmas story.

Before you watch the video, I recorded this a couple of weeks ago (and I forgot all about it!) and so I’m sorry for a waffle at the beginning about the Good Greetings offer which has sadly now ended.


I found a similar looking item in my local Craft Superstore, however, I thought I could totally make something similar at home.

Stampin' Up! UK Christmas Wishes Pocket

The measurements:

Cardstock = 8 x 4 1/2″ (20.4 x 11.5 cm)

A piece of cardstock that measures 3 1/4″ x 3 1/4″ (9.5 x 9.5 cm)

and 10 stripes that measure 3/4″ x 5″ (2 x 12.7 cm)

Score the short side at – 1/2″ and 4″ ( 0.6 and 10.2cm)

Score the short side at – 4 1/2″ (11.5cm)

Now, I think this would be a really cute idea to add to your Project Life or December Daily! but the pocket is too big!

So, to make a pocket which fits your project life: You need a piece of cardstock that measure = 6 1/2 x 4″ (16.5 x 10.2 cm), score the short side at 1/2″ and 3 1/2″ (1.2cm and 9cm), and the long side at 4″ (10.2 cm)


Hannah Wilks

Stampin’ Up! UK Independent Demonstrator

If you like the project, or any of the products used, would like a catalogue, or to join my team, please contact me, or click on the ‘Shop NOW’ button at the top of the page. You can also find me on Twitter, Facebook, YouTube, Google+, About.me, and Tumblr (Links in the sidebar)

Sign up to our newsletter here – http://eepurl.com/2if59

Thank you for stopping by www.www.stampinbyhannah.co.uk today

x

A Polar Pool Party…..

I love making Christmas cards, I take a heap of time over them every year. Most years I have made 50+ of the same card, this year, my first Christmas as a Stampin’ Up! UK demonstrator, I have made so many Christmas cards as samples, I don’t have to stand at my desk for hours over a weekend making all my cards! This is super exciting! I know it’s a small thing, but it just reminds me of the many reasons why being a Stampin’ Up! UK demonstrator is just the most awesome thing I have ever done!

Stampin' Up! UK White Christmas Pool PartySo, this is another one of my many Christmas cards!

I cut a piece of Pool Party cardstock in half, and folded it in half to create this side folding, but wide card. I stamped the trees from White Christmas in Pool party ink, on Very Vanilla cardstock, before adding the ‘Merry Christmas’ banner and polar bear in Smokey Slate. I added the Very Vanilla stamped piece onto the card base, but there was something missing.

I cut a lot of my cardstock down a little when making card bases (I just find it easier when doing ‘layer maths’) and so have a stack of strips of cardstock left over, which of course I keep! I added one of these cardstock strips in Smokey Slate to the top of the card, and added some of the ‘snow’ stamps from White Christmas.

Thats another Christmas card made, all ready for my family, friends or customers!


Hannah Wilks

Stampin’ Up! UK Independent Demonstrator

If you like the project, or any of the products used, would like a catalogue, or to join my team, please contact me, or click on the ‘Shop NOW’ button at the top of the page. You can also find me on Twitter, Facebook, YouTube, Google+, About.me, and Tumblr (Links in the sidebar)

Sign up to our newsletter here – http://eepurl.com/2if59

Thank you for stopping by www.www.stampinbyhannah.co.uk today

x

12 Tags of Christmas – Merry….

Its Monday! And in the lead up to Christmas, that only means one thing…… its time for another 12 tags of Christmas!

Stampin' Up! UK 12 tags of Christmas Seasonally Scattered

This tag is super duper simple!

The tag base is a 2″ x 6″ piece of Whisper White cardstock, punched with the Scalloped Tag topper punch.

I just adore the Seasonally Scattered stamp set, I will be so sad when it leaves us in January, but for now I’m planning on using it for as long as possible! So I used the Merry Stamp, in Real Red Ink, its just so beautiful!

I added some sparkle (I’m sorry, the picture does NOT do this one justice at all!) by dotting my 2-way glue pen around the image, and added some lovely glitter. I don’t use glitter all that often, I love sparkle but I generally opt for jewels and rhinestones over glitter, but every time I bust out the glitter I remember how much I love it, and wonder why it doesn’t get used more!

The string on this tag is the white bakers twine from the Tag a Bag accessory kit from the annual catalogue.


Hannah Wilks

Stampin’ Up! UK Independent Demonstrator

If you like the project, or any of the products used, would like a catalogue, or to join my team, please contact me, or click on the ‘Shop NOW’ button at the top of the page. You can also find me on Twitter, Facebook, YouTube, Google+, About.me, and Tumblr (Links in the sidebar)

Sign up to our newsletter here – http://eepurl.com/2if59

Thank you for stopping by www.www.stampinbyhannah.co.uk today

x

All Around the World Stampin’ Challenge – AW 28 entry

I’m really trying to push myself at the moment, no only in my creativity, but also my business, my fitness (and so weight loss) and my job! I have a LOT going on! and I LOVE it!

But, sometimes a get stuck in a rut with cardmaking. This is when I turn to Pinterest, or YouTube, or a Challenge for inspiration.

This week, I took another look at the All Around the World Stampin’ Challenge Blog, a group of Stampin’ Up! demos from around the world, who complete 2 challenges a month, and have some amazing ideas. I am going to try and complete some of these challenges (not promising I’m going to take part every fortnight, but I will try!)

Stampin' Up! UK AW28 Festival of Trees Baked Brown Sugar Cherry Cobbler Mossy Meadow

The challenge this time was to use Baked Brown Sugar, Cherry Cobbler, and Mossy Meadow. This is why these challenges push me so much; I don’t own all the Stampin’ Up! Ink pads, I don’t have cardstock in every colour, and I definitely don’t have all the stamps! But, I do own the Many Marvellous Markers (and luckily for this challenge, the In-Colour 2013-2015 Stampin’ Write Markers).

So, I grabbed my Mossy Meadow and Cherry Cobbler cardstock, along with a piece of Whisper White, my favourite stamp set from the seasonal catalogue, and my pens, and got to creating.

I used Mossy Meadow as my cardbase, with a layer of Cherry Cobbler (complete with pierced boarder!) and a layer of Whisper White. I stamped the Tree from Festival of Trees in Mossy Meadow (stamped off first) and added the tinsel in Versamark and Gold embossing powder.The tree pot I stamped in Cherry Cobbler (using my pens) and the star is Baked Brown Sugar and punched out using one of the Itty Bitty Accents punches.

I added the scribble backdrop of Baked Brown Sugar before popping the tree up with some dimensionals. The sentiment is stamped in Mossy Meadow, and the Basic Jewel Rhinestones coloured with Old Olive Blendabilities (have I told you how much I love those?! check out my latest Club for more!)

And that is my Challenge entry!

Thats for reading, don’t forget to subscribe to my newsletter (link in the babble below) to keep up to date with news around here!


Hannah Wilks

Stampin’ Up! UK Independent Demonstrator

If you like the project, or any of the products used, would like a catalogue, or to join my team, please contact me, or click on the ‘Shop NOW’ button at the top of the page. You can also find me on Twitter, Facebook, YouTube, Google+, About.me, and Tumblr (Links in the sidebar)

Sign up to our newsletter here – http://eepurl.com/2if59

Thank you for stopping by www.www.stampinbyhannah.co.uk today

x