Popping in again to let you know something really cool!
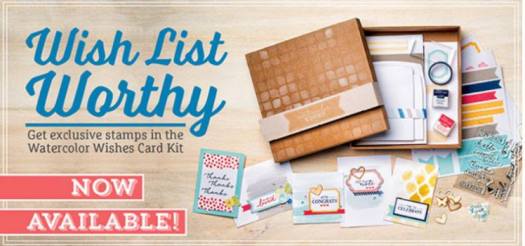
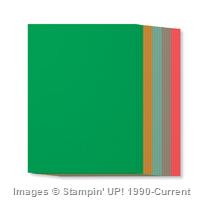
The Watercolour Wishes Card Kit is now available in my Online Store!
This awesome card kit contains a delightful exclusive stamp set, as well as the components to make 20 unique cards (with envelopes!) – die cut pieces, pre-watercoloured card bases, stickers, Stampin’ Spots in Night of Navy and Watermelon Wonder, Washi tape, sequins, wooden elements, and so much more!
grab yours today!
To purchase any of the items featured in my projects please use the links above. To join my team of Stampin’ Friends select ‘Join My Team’ or send me a message!
Please support StampinByHannah, and join my Code Club, by using the Hostess code featured in the top right hand of my blog. For orders of over £150 please do not use this code, as you are entitled to your own Hostess benefits!
There are so many accessories for stamping, I thought I would give you my top picks to get you started.
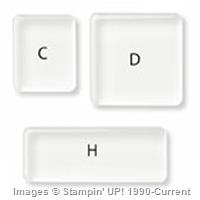
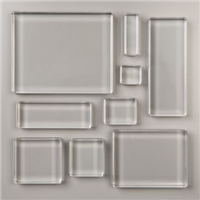
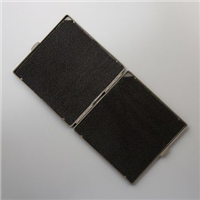
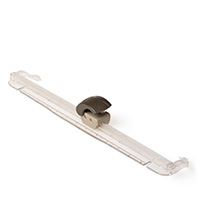
Stampin’ Blocks!
There are so many different blocks on the market and I will admit to having quite a collection, however, I only use a few. Last year before I became a demonstrator for Stampin’ Up! I thought that a clear block was a clear block, that they are much of a muchness, and didn’t really matter. I was wrong! I now only use my Stampin’ Up! blocks, and not because I’m a demonstrator, but because they are the best!
There are several things I look for a in block, is it easy to hold? what about the weight? size? and durability. The blocks I use are available in a range of sizes, are a nice weight and are really durable, but the best thing about them is the hold. I’m sure you have a few blocks, and they are probably those nasty thin ones from the cheap section in the craft store?! I have some too, and why don’t I use them? because my fingers go over the edges and into the ink! I make enough of a messy without my blocks helping me out! Stampin’ Up! blocks feature a wonderful groove for your fingers to sit, keeping them out of the ink and helping prevent inky finger prints on your nice piece of Whisper White!
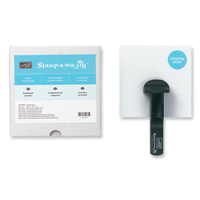
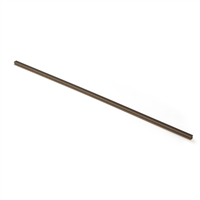
Stamp-a-ma-jig
I know there is lots of buzz around the crafty world at the moment about stamp positioners, in particular a very expensive one from the States, and while I’m sure its great, as a beginner its is an unnecessary expense. I have a whole video on the stamp-a-ma-jig, and I love it! Its a great way of getting nicely straight sentiments and centred images, and its only £11!
Swatch Book
I posted a video on this recently too, my custom made swatch book. I have the PDF’s available on the coordinating blog post too. I use this all the time to match colours and choose colour combinations, and its a great tool for documenting your growing ink colour collection!
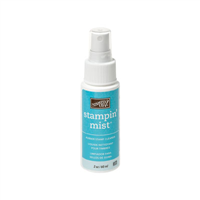
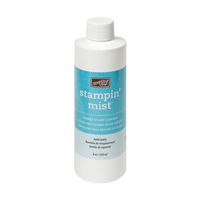
Stampin’ Scrub
This is probably the one tool I get asked about most at classes and events; my Stampin’ Scrub! I love this thing! It features two sides of of washable black fibre scrub pads that are the greatest things for cleaning those inky stamps! Use in combination with Stampin’ Mist to clean and condition your stamps after each use, less waste and hassle that baby wipes with no of the nasty residue. I wouldn’t be without mine!
To purchase any of the items featured in my projects please use the links above. To join my team of Stampin’ Friends select ‘Join My Team’ or send me a message!
Please support StampinByHannah by using the Hostess code featured in the top right hand of my blog. For orders of over £150 please do not use this code, as you are entitled to your own Hostess benefits!
I can’t believe we are already at week 3 of my Cardmaking 101 series; saying that, I have a heap of posts in the planning for you! I can see this series lasting a while, please feel free to drop me a message or leave a comment if you have any card making questions, and I will do my best in answer them in a future Cardmaking 101!
This week I thought it might be helpful to discuss the different types of stamps. Now, before we getting into the post proper, I just want to remind you that I am a Stampin’ Up! demonstrator, and so I will be discussing there products!
Wood Mount Stamps
Ok, so Wood Mount – this refers to Red Rubber stamps mounted onto wooden blocks. There are some real advantages to these stamps; the main one being that the blocks are pre-mounted, no scrabbling around searching for the perfectly sized block each time – they are already there! Stampin’ Up!’s Wood Mounted stamps arrive as a sheet of red rubber stamps, a series of wooden blocks, and a sheet of stickers. Before you can stamp you must pop the stamps out of the sheet and work out which stamp matches which block (I’ve made this sound complicated, its really not – its usually pretty obvious which stamp goes with which block). The stamps are pre-glued, and you peel the backing paper off the stamps and stick them onto the blocks. The stickers are then stuck onto the other side of the wooden block for identification.
I love my wood mount stamps, however, they are more expensive, and they take much more space to store – although they do sit next to your clear mount stamps on your shelf.
Clear Mount Stamps
Like Wood Mount stamps, Clear mount are our classic red rubber. I am totally a red rubber girl – I just love the quality and feel of red rubber stamps. Clear mount stamps require Clear blocks to allow you to stamp, you mount and un-mount them at each use. Stampin’ Up! clear mount stamps also come with a sheet of stickers, however, I find that they affect the cling if not perfectly applied to the stamp meaning that the fall off the blocks half way through stamping! So I tend to just put the sheet of stickers inside the slip cover on my stamp cases and leave them there! Saying this, I am a Clear mount person – I love the red rubber, and the value of the clear mount wins every single time!
Photopolymer
Stampin’ Up! Photopolyer stamps are fantastic! They are the same quality as the classic red rubber, but allow you to see through the stamps for perfect alignment every time! I recommend Photopolymer for layering stamps and sentiments. Some sets are available only in Photopolymer, however, more and more sets are available in all three options. Photopolymer stamps are generally packaged in our DVD sized clear mount stamp cases, although if there are lots of stamps they sometimes come in the bigger Wood Mount cases, but they still sit nicely with your other stamps on the shelf. Photopolyer stamps are a great price, and come between two sheets of Window Sheet. Be warned though, Photopolymer stamps have a habit of ‘wondering off’ your desk and into the bin as they get stuck to things and can be difficult to see! Photopolymer also tends to stain over time, particularly if you use red/pink ink, this doesn’t affect the stamp and will not transfer to your next project.
To purchase any of the items featured in my projects please use the links above. To join my team of Stampin’ Friends select ‘Join My Team’ or send me a message!
Please support StampinByHannah by using the Hostess code featured in the top right hand of my blog. For orders of over £150 please do not use this code, as you are entitled to your own Hostess benefits!
Welcome to the second in my series of Card making 101 – this week I thought we would look at some of the tools I most regularly use in my card making.
Tools are so important, they say you judge a craftsman by his tools – and card making is a craft! I have used a heap of trimmers over the years, but the Stampin’ Trimmer is by far the best! I just love the wide foot-bed, this means that to cut a card base (which is what I use my trimmer for by far the most!) I don’t need to swing out the extension arm. Saying that I love that this trimmer extends to 14″ – way more that I will ever need. The blades are so easy to replace, and you get to choose between the standard trimmer blades or the rotary attachment!
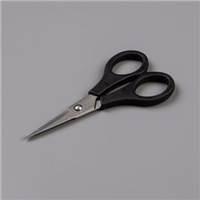
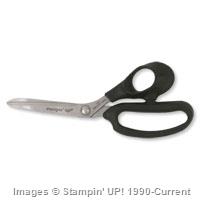
A good pair of scissors is so important, and I would suggest two pair – a good pair of long scissors for cutting along the score lines of boxes and bags, and a pair of paper snips for fussy cutting, and detailed bits. A separate pair of scissors for cutting ribbon is also a good idea as paper will dull the blades and make ribbon cutting difficult. The Stampin’ Paper Snips are excellent, blades sharp right to the tip and comfortable hold.
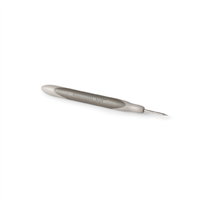
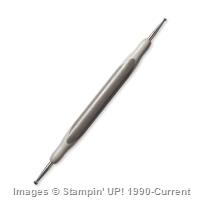
I also use my scissors for picking up jewels and pearls, candy dots and other little sticky things. But I mostly grab for my paper piercing tool for these sorts of jobs, I’m sure if you have seen some of my YouTube tutorials you will have seen me do this. A paper piercing tool is also great for adding pierced details to your cards and projects, as well as getting all those fiddly bits out of your dies when die cutting.
I think one of the most important card making tools is a good bone folder. For years I had a cheap plastic bone folder, and it wasn’t until I started with Stampin’ Up! that I changed to a ‘proper’ one, what a difference! A clean, crisp edge to all folded projects, cards and boxes. My plastic bone folder has now be relegated to re-inking ink pads!
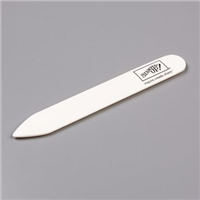
The most random tool in my kit though must be my emery board! I use this so much, and it has several uses! Mostly it gets used when my trimmer blade needs changing, when card stock starts to cut a little fluffy, an emery board is great for sanding away the rough edges. Or for when you want that distressed look. Or when you catch a finger nail with your paper snips!
I hope you are finding these posts helpful, and if you have any questions about card making, stamping or Stampin’ Up! either drop me a message via my contact me page, or leave me a comment below
To purchase any of the items featured in my projects please use the links above. To join my team of Stampin’ Friends select ‘Join My Team’ or send me a message!
Please support StampinByHannah by using the Hostess code featured in the top right hand of my blog. For orders of over £150 please do not use this code, as you are entitled to your own Hostess benefits!
Today marks the start of my completely free weekly card-making class here at StampinByHannah. This class has been in the planning for ages and I am so pleased I am finally ready to share it with you.
Each week, on a Sunday, a new tutorial will be released focusing on card making basics; hints and tips, tools, techniques and useful information to help you to make amazing projects. I am so excited! shall we begin?
This week I thought we would start at the beginning; how to cut yourself a card base. I know that not everyone will cut there own card bases, but I think its a useful thing to know, particularly as then your not stuck with white or cream cards all the time – lets get some colour in here!
How to:
I use A4 card stock, I know that these measurements will not be useful for everyone, particularly those who use 8.5×11″ however, I live in the UK and A4 is all we have
There are two ways to cut a card base, depending on the style of card you wish to create. I frequently use tent fold cards and so cut my A4 length ways at 10.5 cm to create two long skinny pieces of card stock, I don’t tend to score in the middle for these and find that folding them in half and burnishing with my bone folder is enough
The other common card base is a ‘book style’ card, and for these I cut my A4 width-ways at 14.8 cm, scoring them in half at 10.5 cm and folding to create my card
These two methods create the same size card; 14.8 x 10.5 cm
To create a layer for the front of your card, take an A4 piece of Whisper White and cut at 10 cm, and 14.2 cm to create a slightly smaller piece that will fit beautifully on the front of the card base you have already created.
To create further layers reduce the size of your card stock by 0.5 cm each time, the next layer would therefore be 9.5 x 13.8 cm, the next 9 x 13.2 cm, and the next 8.5 x 12.8
I hope this has been useful, if you have any card making questions or queries please let me know and I will endeavour to answer your questions in later editions of Cardmaking 101
To purchase any of the items featured in my projects please use the links above. To join my team of Stampin’ Friends select ‘Join My Team’ or send me a message!
Please support StampinByHannah by using the Hostess code featured in the top right hand of my blog. For orders of over £150 please do not use this code, as you are entitled to your own Hostess benefits!
I am so sorry I missed my challenge Saturday last week, but I was at Stampin’ Up! Regional Training (having heaps of fun!) and in my excitement I completely forgot! Shocking I know, But I am back this week playing along with Freshly Made Sketches #187, and this fabulous sketch:
I love this sketch, it really pushed me. I’ve been stuck in a bit of a craft rut recently, or, as my darling mother said the other day “your cards are always muted!” (thanks mother!), and so I grabbed for a set of super bright colours; the new In Colours Watermelon Wonder and Cucumber Crush!
I will admit to being a little scared of the brightness of these two; Watermelon Wonder is an almost Neon Corally Orange, while Cucumber Crush is a vivid green, definitely not colours I would have chosen of my own accord, but absolutely one of the reasons I love Stampin’ Up! and playing along with challenges, so….
The Card!
I decided seeing as I was using new colours, I might as well go the whole hog and use new stamps and Designer Series Paper too!
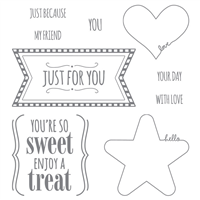
The Designer Series Paper is Cherry on Top; and is a fabulous mix of bright colours and birthday prints, paired with the coordinating Washi Tape. While the stamp set is called You’re So Sweet – I love this set, its great for adding a special something to a present, or using as a card accent, and it coordinates (and is available bundled with….) the Mini Treat Bag Thinlits dies! Awesome!
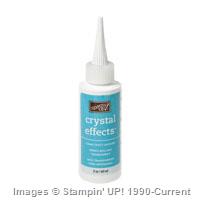
The heart is punched from Watermelon Wonder card stock and adhered with half a dimensional before I covered it in Crystal Effects for a super shiny look.
All these products will be available to purchase from the 2nd June (or now if you choose to become a demonstrator!). I will be sending catalogues this coming week, to get your FREE copy (UK only – sorry) fill in this form!
To purchase any of the items featured in my projects please use the links above. To join my team of Stampin’ Friends select ‘Join My Team’ or send me a message!
Please support StampinByHannah by using the Hostess code featured in the top right hand of my blog. For orders of over £150 please do not use this code, as you are entitled to your own Hostess benefits!
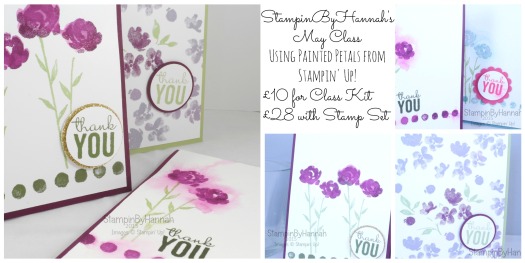
If you follow me on Social Media you will already know about my May Technique Class.
This month we are going to have heaps of fun with ink and water! along with Painted Petals to create 3 beautiful Thank You cards.
As always there are several different options, including my special Party Workshop – where I come to your house and create the cards with you and your friends!
Class costs £10 per person for either the live class on 12th May or the virtual class, OR £28 with the stamps included.
Payment accepted in cash, cheque or Paypal to stampinbyhannah (at) outlook.com BEFORE 27th April 2015. Message me for booking and payment.
To purchase any of the items featured in my projects please use the links above. To join my team of Stampin’ Friends select ‘Join My Team’ or send me a message!
Please support StampinByHannah by using the Hostess code featured in the top right hand of my blog. For orders of over £150 please do not use this code, as you are entitled to your own Hostess benefits!
I love making Christmas cards, I take a heap of time over them every year. Most years I have made 50+ of the same card, this year, my first Christmas as a Stampin’ Up! UK demonstrator, I have made so many Christmas cards as samples, I don’t have to stand at my desk for hours over a weekend making all my cards! This is super exciting! I know it’s a small thing, but it just reminds me of the many reasons why being a Stampin’ Up! UK demonstrator is just the most awesome thing I have ever done!
So, this is another one of my many Christmas cards!
I cut a piece of Pool Party cardstock in half, and folded it in half to create this side folding, but wide card. I stamped the trees from White Christmas in Pool party ink, on Very Vanilla cardstock, before adding the ‘Merry Christmas’ banner and polar bear in Smokey Slate. I added the Very Vanilla stamped piece onto the card base, but there was something missing.
I cut a lot of my cardstock down a little when making card bases (I just find it easier when doing ‘layer maths’) and so have a stack of strips of cardstock left over, which of course I keep! I added one of these cardstock strips in Smokey Slate to the top of the card, and added some of the ‘snow’ stamps from White Christmas.
Thats another Christmas card made, all ready for my family, friends or customers!
If you like the project, or any of the products used, would like a catalogue, or to join my team, please contact me, or click on the ‘Shop NOW’ button at the top of the page. You can also find me on Twitter, Facebook, YouTube, Google+, About.me, and Tumblr (Links in the sidebar)
This week I thought I would knock things up a gear and give you a card in a box!
I love these cards! When I’ve made them for people, everyone is always stunned by them!
Isnt it fab!
Ok, So the measurements for this fab project:
Cardstock = 9 x 5 inches (23 x 13 cm) and two pieces measuring 3 x 2″ (8 x 5cm)
DSP = 4 3/4 x 1 7/8″ (12 x 4 1/2cm), 4 pieces that measure 2 x 2 1/8″ (5 x 5.2cm) and 3 pieces that measure 2 x 2 5/8″ (5 x 6.5cm)
Score the Cardstock on the short edge at 2 3/4″ (7cm) and on the long side at 2 1/8″, 4 1/4″, 6 3/8″ and 8 1/2″ (thats every 5.2cm!)
I’ve used Tangelo Twist (I LOVE that orange!) and Flashback DSP for this box, and have fussy cut the images from the Tee-Hee-Hee stamp set for the embellishments! (how cute are those bats!) All the stamping is done using Staz-on Ink
Check the video for full instructions!
DISCLAIMER – I work in Inches, all metric measurements are approximate!
The sentiment used on this card is from Good Greetings – which is still available for FREE with an qualifying order placed before the end of October!
If you like the project, or any of the products used, would like a catalogue, or to join my team, please contact me, or click on the ‘Shop NOW’ button at the top of the page. You can also find me on Twitter, Facebook, YouTube, Google+, About.me, and Tumblr (Links in the sidebar)
So, its nearly Halloween, as I have previously mentioned, its not really something I celebrate – but these papers and stamps were just so adorable I had to make a project with them!
The Stampin’ Up! Autumn Winter Catalogue for this year has a few Halloween themed stamp sets, including ones with matching framelits as well as really cute monsters, but I’m sucker for a sweet witch (I think its got something to do with my favourite book as a child – the worst witch!) so these cards feature Tee-Hee-Hee. The Motley Monsters DSP features Basic Black, Burmuda Bay, Crushed Curry, Sahara Sand, Tangerine Tango, and Whisper White – for a super bright and fun colour pallet that I am so going to re-visit time and again and again.
I made 4 cards, all in 4×4 inch size, using Tangerine Tango as the card base, and a 3.75 x 3.75″ piece of Motley Monsters DSP as the card front.
Each of the cards is subtly different, using a different piece of the paper, a different stamp, or embellishment.
I love wooden elements! These leaves are so super cute! I used two of the Autumn Wooden Elements here, colouring the outline element with my Tangerine Tango Stampin’ Write Marker
All the cards use the same sentiment from the Tee-Hee-Hee stamp set, and all the stamped images are fussy cut (such a shame there arent any framelits for this stamp set 🙁 )
I also used the same cardstock and DSP to create a box to gift these cards and their envelope together
I loved making this project, you never know, maybe I’ll do some more Halloween crafting next year!
Hannah Wilks
Stampin’ Up! UK Independent Demonstrator
If you like the project, or any of the products used, would like a catalogue, or to join my team, please contact me, or click on the ‘Shop NOW’ button at the top of the page. You can also find me on Twitter, Facebook, YouTube, Google+, About.me, and Tumblr (Links in the sidebar)