Make It Monday | 2 Step Stamping

Make It Monday Video Tutorial 2 Step Stamping Picture Perfect from Stampin' Up! UK

Make It Monday with Stampin' Up!

Welcome to another week of Make It Monday!

I have been loving playing with the Picture Perfect stamp set recently, and have a few cards to share with you using this stamp set over the next week or so. I am so pleased that this stamp set is in our new Annual catalogue too. (I do have a few spare catalogues, let me know if you want one!)

Make It Monday Video Tutorial 2 Step Stamping Picture Perfect from Stampin' Up! UK

How pretty is this rose? Little known fact about me, one of my middle names is Rose – I rebelled against it for a LONG time, but these days I love it and really embrace the Rose in my name. James went through a period a few years ago of buying me heaps of Roses (flower not chocolates, although he has bought me plenty of those too!) but recently I haven’t had any flowers, maybe I should send him this blog post as I reminder!

Video Tutorial featuring Picture Perfect from Stampin' Up!

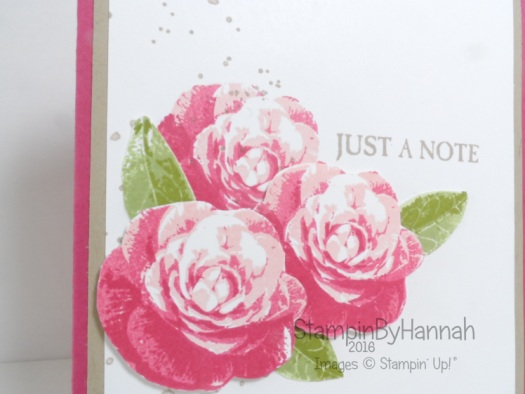
Back to the stamping …. These roses look really complex, but are super simple to stamp. They are a 3 layer stamped image, which means that there are 3 stamps stamped one on top of the other, in different colours to create the full flower. The leaves are the formed in the same way. You can see exactly how to stamp these in the video tutorial below

I adore this colour combination, Rose Red and Crumb Cake. The roses are stamped in Blushing Bride and Rose Red, while the leaves are a combination of Pear Pizzazz and Old Olive.

Make It Monday Featuring Stampin Up Picture Perfect Video Tutorial

I arranged the flowers before I stuck everything down, I do this a lot when I’ve fussy or die cut elements, just to check my composition works. I found that this card was missing something, Stampin’ Up! have some great stamp sets for this event, but Gorgeous Grunge is my favourite! So I added some Crumb Cake spatter using Gorgeous Grunge, and that was the card complete!

Measurements:

Card Base – Rose Red – 14.85 x 21 cm (half a sheet of A4) Scored at 10.5 cm

Crumb Cake Layer – 14.3 x 10 cm

Whisper White Layer – 13.8 x 9.5 cm


Stampinbyhannah Stampin' Up! Annual Catalogue Launch Event 2016


Product List


Shop Now button-001Join my team button-001

To purchase any of the items featured in my projects please use the links above. To join my team of Stampin’ Friends select ‘Join My Team’ or send me a message!

Please support StampinByHannah, and join my Code Club, by using the Hostess code featured in the top right hand of my blog. For orders of over £150 please do not use this code, as you are entitled to your own Hostess benefits!

Sign up to my newsletter here – http://eepurl.com/2if59

Hannah McCurley

Stampin’ Up! UK Independent Demonstrator

Make It Monday | Watercolour Lifting

Make It Monday Watercolour Lifting Using Crazy About You from Stampin' Up! UK

Make It Monday with Stampin' Up!

I loved making this card! You all know how much I love playing with ink and water, but this technique is super cool! I cannot take any credit for this, the wonderful Jennifer McGuire showcased this one a couple of months ago, and it has taken me this long to get round to having a go!

Make It Monday Watercolour Lifting Using Crazy About You from Stampin' Up! UK

I finally managed to work out what went wrong with my camera last week! I had somehow managed to change the focus setting to Macro – so nothing was in focus! sorted now, but I am still playing about with the White Balance settings so be prepared for some more interesting photography!

Luckily the ‘movie’ setting has been working just great this week, so are you ready for the video tutorial?!

As you can see the watercolour lifting technique is super simple.

  1. Watercolour a piece of Watercolour Paper, get creative use multiple colours if you fancy!
  2. Leave your Watercolour Paper to dry or speed up the process using a heat tool but make sure it is totally dry before moving on to Step 3!
  3. Stamp your desired images onto your Watercoloured piece in VersaMark ink and cover in Clear Embossing Powder, use your Heat Tool to melt the embossing powder.
  4. Grab your Stampin’ Spritzer and cover your Watercolour Piece with water, grab a few layers of Kitchen roll (or other paper towel type stuff!) and press over, this wicks away that water taking some ink with it. You can repeat this several times, to create a more dramatic effect.

Watercolour Lifting Video Tutorial using Stampin' Up! inks

Sorry for the short post today, but I will admit to having to rush to get the the video uploaded and post written today! Bank holiday weekend is always a little bit mental but I have spent most of the morning (I’m writing this on Sunday!) trying to sort my final end of year accounts, organising and packaging my April Customer thank you cards and gifts, and I still have to make a Congratulations card for my brother and sister in law before 3pm! So, time to get on. Speak again soon


Product List


Shop Now button-001Join my team button-001

To purchase any of the items featured in my projects please use the links above. To join my team of Stampin’ Friends select ‘Join My Team’ or send me a message!

Please support StampinByHannah, and join my Code Club, by using the Hostess code featured in the top right hand of my blog. For orders of over £150 please do not use this code, as you are entitled to your own Hostess benefits!

Sign up to my newsletter here – http://eepurl.com/2if59

Hannah McCurley

Stampin’ Up! UK Independent Demonstrator

Make It Monday | Watercolour Wash

Make It Monday Watercolour Wash video tutorial

Make It Monday with Stampin' Up!

I did it! I finally got round to making another video tutorial for a Make It Monday! Yay!

This week here at StampinByHannah I have a heap of projects using Watercolour to share with you. I love watercolour, I love playing with inks and getting a little messy, creating one off pieces and generally having fun with ink! Yesterday I attended a Team Training day (more on that coming this week, but I will admit that this blog post was written last week!) and held an inspiration station based around watercolouring, so I have a mountain of samples to share with you, featuring a range of watercolouring techniques. But I thought I would keep it simple for Monday, and demonstrate a watercolour wash

Make It Monday Watercolour Wash video tutorial

This was my original card, and the wash here is in Island Indigo, Bermuda Bay and Pool Party, super pretty. This card would be perfect for a masculine birthday and so the sentiment it taken from Big News and has been heat embossed in white.

The key to an effective watercolour wash for me is to use an Aqua-Painter. I tend to prefer a traditional paint brush when watercolouring images, but for a wash like this one, the Aqua-Painter really comes into it own. The great thing about an Aqua-Painter is that the handle of the brush is full of water, which comes out onto your paper via the bristles of the brush which means that as you ‘wash’ over your card stock with the brush more water feeds out, diluting your ink further and giving you a super easy ombre effect.

Stampin' Up! UK Watercolour Wash Video Tutorial Thank you card

Now for these cards as the colour starts to fade on your wash, I have added in a different colour to create a gradient and multi-colour wash. As usual there are no rules here, you could use just one colour or you could create a whole rainbow, who says you stick to just blues!


Don’t forget to shop using the Code Club Code to receive some great FREE product!

7AXEMZNA

I will be closing this order on the 30th April 2016


Product List


Shop Now button-001Join my team button-001

To purchase any of the items featured in my projects please use the links above. To join my team of Stampin’ Friends select ‘Join My Team’ or send me a message!

Please support StampinByHannah, and join my Code Club, by using the Hostess code featured in the top right hand of my blog. For orders of over £150 please do not use this code, as you are entitled to your own Hostess benefits!

Sign up to my newsletter here – http://eepurl.com/2if59

Hannah McCurley

Stampin’ Up! UK Independent Demonstrator

Butterfly Basics Week – Make It Monday

Stampin' Up! UK Make It Monday Blender Pen colouring Butterfly Basics

Make It Monday with Stampin' Up!

Welcome to a whole week of posts focusing on Butterfly Basics. I LOVE this stamp set, its super pretty and great for a host of techniques including; watercolour, stamp layering, blender pens on vellum, and die cutting (seeing as it coordinates with TWO die sets!) and can be found on page 124 of the Annual catalogue in the Artistic Expression section. I love this part of the catalogue, its the run wild section for me, where you can find stamp sets specifically designed for techniques and where your imagination can run away with you.

Make It Monday Butterfly Basics Vellum Blender Pens

I know I did promise a video this week, but time ran away with me again – 3 shifts at work this week and then I’m off for 9 days! So, fingers crossed I get some filming done then!

Stampin' Up! UK Stamping on Vellum

So, today we are using our Blender Pens to colour on Vellum. I really enjoy this technique, and its a great way to introduce yourself to the joy of the blender pen! Blender pens contain a clear ‘ink’ that means that you can blend out the ink from your stamping, or use them to pick up coloured ink to colour an image. Blender pens work great on our Whisper White card stock, BUT you have to work fast, which is why I’ve used vellum today. Vellum is really slippy (non-porous) and ink takes much longer to dry on it, which makes it great for trying our your Blender Pens!

Stampin' Up! UK Blender Pens on Vellum

I’ve used my Stampin’ Write Markers today too. Scribble some marker onto a clear block and use the Blender Pen to pick up the ink – much less messy that doing the same with an ink pad!

Stampin' Up! UK Blender Pens Stampin' Write Makers Vellum Colouring

Ok, so after you have stamped your image onto the vellum (I’ve used our Archival Basic Black ink) allow the ink to dry and then turn the Vellum over. Then, using your blender pens, colour the reverse side of the image. I used four colours here; Wild Wasabi, Always Artichoke, Bermuda Bay and Crushed Curry.

Stampin' Up! UK Vellum tips and tricks

Because ink takes so long to dry on Vellum I used my Heat Tool to speed up the process. But you have to be super careful when heating Vellum that it doesn’t burn, use the first setting on the Heat Tool and keep taking the Vellum out of the heat every few seconds. The ink will dry much quicker this way.

Stampin' Up! UK Vellum Birthday Card

Time for some finishing touches. Attaching Vellum to card stock can be tricky. I’ve used Fast Fuse here, because its clear and I’m attaching the Vellum to Whisper White Card stock it is easily hidden under the stamping. Stampin' Up! UK Make It Monday Blender Pen colouring Butterfly Basics

The bow clip in the top corner helps to keep the free edge tidy, and I’ve added some Gold Wink of Stella to the flower to mirror the Gold in the Clip

Stampin' Up! UK Butterfly Basics Birthday Card

What do you think? I love the soft colours you get when you colour on the reverse of the Vellum. You could just as easily colour the front, you just get more vibrant colour

Thanks for stopping by for this weeks Make It Monday, check back tomorrow for another card made using the Butterfly Basics Stamp set!


Don’t forget to shop using the Code Club Code to receive some great FREE product!

7AXEMZNA

I will be closing this order on the 30th April 2016


Product List


Shop Now button-001Join my team button-001

To purchase any of the items featured in my projects please use the links above. To join my team of Stampin’ Friends select ‘Join My Team’ or send me a message!

Please support StampinByHannah, and join my Code Club, by using the Hostess code featured in the top right hand of my blog. For orders of over £150 please do not use this code, as you are entitled to your own Hostess benefits!

Sign up to my newsletter here – http://eepurl.com/2if59

Hannah McCurley

Stampin’ Up! UK Independent Demonstrator

Make It Monday | Layering Stamps

Stampin' Up! UK Stamp Layering Birthday Card

Make It Monday with Stampin' Up!

Hello! Welcome to another edition of Make It Monday! I was hoping to have another video for you this week but alas I completely ran out of time. Thinking of making a 3D project for next week though, so I will certainly film that.

This past few weeks have been hella stressful (nothing new there then!) with my hectic new job, unwell relatives, James starting back at university, and the end of Sale-a-bration I haven’t had a whole heap of time to craft. So I was overjoyed when James said he was working on Saturday morning – time to get my backside back in that craft room! You will see what I made in my Saturday morning craft session later on in the week, I had heaps of ideas for cards that I have been sat on for weeks, but trying to come up with an idea for Make It Monday was a struggle. I did however have a glamorous assistant!

Freda

I did what I always do when I’m struggling for inspiration – I grabbed a random stamp set off the shelf and pull out a pile of inks. I knew I wanted to use Watercolour Paper, but that was about as fair as I got in planning! Stampin' Up! UK Awesomely Artistic Stamp Layering

So, this was my jumping off point. As I have discussed on the blog before I love getting really inky, and adding heaps of ink and water to this piece of Watercolour paper seemed like a good idea, at the end of the day most of my crafting is a bit of an experiment anyway!

I set about creating a background on my piece of Watercolour paper, adding a boarder of that gorgeous foliage stamp from Awesomely Artistic in Mint Macaron, Bermuda Bay and Lost lagoon, adding several spritzs’ of water after each stamping and using my Heat Tool to dry everything off. Once the boarder was stamped I grabbed for my Aquapainter and hit the centre of the Watercolour Paper with more ink and water, and finally splattering ink all over the place!
Stampin' Up! UK Make it monday Stamp Layering

Stamp Layering is a super quick and easy technique, we have stamp sets designed just for this technique (ones with lots of smaller images are great, as are floral and foliage type stamps). So once I had my background dry I then added another layer of stamping in Lost Lagoon and Bermuda Bay using the fern stamps and that fabulous little splatter stamp!

At this point I have to admit, I had no idea what the hell this card was going to be used for! But Birthday seemed like a good idea, I am loving the Number of Years stamp set at the moment with those great number dies. These stamps are designed to look watercoloured, but if you add the ink to them with a Sponge Dauber (rather than the normal method of sticking the stamp in the inkpad) you can add multiple colours of ink and create a great blended effect. These numbers are inked in Mint Macaron and Bermuda Bay and spritzed with water before stamping.

Stampin' Up! UK Awesomely Artistic Number of Years Birthday Card

It still needed a little something, a little something sparkly – Wink Of Stella in Gold! Lovely

Stampin' Up! UK Stamp Layering Birthday Card

Ok, So, time for a challenge –  I would love to see what you create with either the technique or these colours! Leave a link in the comments below and I will select one winner to receive this card and a Gold Wink of Stella Brush!

Stampin' Up! UK Colour Inspiration Color Combination Stampinbyhannah

Entries will close at 06:30AM BST on 11th April 2016 (Thanks when the next Make It Monday will go live!) and I will select a winner and contact them in due course

Good Luck!


Product List


Shop Now button-001Join my team button-001

To purchase any of the items featured in my projects please use the links above. To join my team of Stampin’ Friends select ‘Join My Team’ or send me a message!

Please support StampinByHannah, and join my Code Club, by using the Hostess code featured in the top right hand of my blog. For orders of over £150 please do not use this code, as you are entitled to your own Hostess benefits!

Sign up to my newsletter here – http://eepurl.com/2if59

Hannah McCurley

Stampin’ Up! UK Independent Demonstrator

Make it Monday | Reactive Watercolour

Make it Monday Reactive Watercolour with Stampin' Up! f

Make It Monday with Stampin' Up!

Hello! Welcome to another week of Make it Monday! I hope you are enjoying this series of posts as much as I am. Last week I made a card an photographed each stage, but this week I thought I would make a video. I haven’t made any video tutorials for a while so I am a little rusty, so please forgive any mistakes or issues. I had so much fun making this card, using some of those great Sale-a-bration products for the last time!

Make it Monday Reactive Watercolour with Stampin' Up! f

Sale-a-bration ends on March 31st (that’s Thursday!), but until then you get to choose from 11 gifts when you spend £45 (and you get to pick extras each time you hit that £45, so you get 2 free things if you order comes to £90!) or you could get the best deal ever and join my team of Stampin’ Friends for just £99 and choose £160 worth of great Stampin’ goodies! Awesome!

Reactive Watercolour is a great technique, and its super simple too! Just stamp your image in Stampin’ Up! ink and spritz with a little water – then sit back and watch the ink move and bleed. The more water you add the more the ink moves.

On this card, once the ink had dried I over stamped the images again as I may have gone a little over board with the water the first time around!

Stampin' Up! UK Sale-a-bration flowering fields Perfect Pairings

Finished with a stripe of the Metallic Glitter Tape in Silver and this card is done!

I hope you enjoyed this weeks Make It Monday, and I’ll see you here again next week for another great project! Don’t forget to place those last Sale-a-bration orders soon, or your favourite items may already have sold out!


Stampin' Up! Sale-a-bration


Product List


Shop Now button-001Join my team button-001

To purchase any of the items featured in my projects please use the links above. To join my team of Stampin’ Friends select ‘Join My Team’ or send me a message!

Please support StampinByHannah, and join my Code Club, by using the Hostess code featured in the top right hand of my blog. For orders of over £150 please do not use this code, as you are entitled to your own Hostess benefits!

Sign up to my newsletter here – http://eepurl.com/2if59

Hannah McCurley

Stampin’ Up! UK Independent Demonstrator


Make It Monday – My Heart Smiles ….

Stampin' Up! UK Suite Sayings Endless Thanks Card

Make It Monday with Stampin' Up!

Welcome, to a brand new series on my blog – Make It Monday!

Each week on a Monday I’m going to guide you through making a card (or some other papercrafting project!) in either photos or maybe even a video. I’ve got out of the habit of filming my makes over the past few months and really need to pick it back up again.

StampinByHannah Where I create

I thought I would start this week by showing you my little work space. I actually had to tidy before I could even start to create today, I’m a naughty crafter and I don’t always tidy up when I’ve finished making something! I haven’t actually stepped foot into my craft room / office for well over a week and so the remnants of crafty 2 weeks ago where still on the desk! oops! Oh well, it’s tidy now… ish!

Make it Monday

I needed to make a card for my Granddad (Pops) today, the reason I haven’t crafted in over  a week is because we went to visit him last week. Pops lives about 300 miles away and isn’t all that well at the moment, but we had a lovely few days with him and I love sending a card to him once we get home to let him know.

So, I needed a manly-ish card today, and grabbed for Suite Sayings for the sentiment. I have been wanted to play with small stamp stamping again recently, so also selected Endless Thanks, before selecting four colours; Pacific Point, Watermelon Wonder, Crushed Curry and Garden Green

Stampin' Up! UK Using the Stamp-a-ma-jig SAMJ

I love this sentiment, and know that it something Pops feels too. I spent a lot of time with my grandparents when I was very small and I know that Pops remembers those years fondly, we love reminiscing about things we used to get up to; dressing the dog in Grandma’s beads or walking to the park at the end of the street.

In order to get the sentiment straight on the card I used my Stamp-a-ma-jig. I love this tool, and use it so much more than I thought I would. Its super easy too. I have a video on using the Stamp-a-ma-jig on my YouTube channel.

Stampin Up! Stamping tips and tricks

One of the joys of Make It Monday is being able to show you some of my Stampin’ Top Tips! I love using photopolymer stamps, but they tend to go missing on my messy desk, so…. I stick all the stamps I want to use on a dedicated clear block, that way they all stay together. I also use this idea when using alphabet stamps, and use a clear block to arrange my letters (and check my spelling!)

Make it Monday Using Small Stamps

OK, so the card. Once I had stamped the sentiment in the centre of the top two thirds of the card, I started to add a ring of small stamps around it, forming a loose wreath design. You could draw a faint circle in pencil as a guide, but I prefer to free hand stamp. Here I stamped the yellow flowers first, then the blue, before adding the leaves. These things also look better if each stamp is stamped in odd numbers, so there are 5 yellow flowers, 9 blue and 7 leaves. Then I go back and add in smaller pieces to add detailStampin' Up! UK Make it monday

It’s it cute! I’m sure that Pops will love it!

Stampin' Up! UK Suite Sayings Endless Thanks Card

I hope that you have enjoyed this first Make It Monday, I will be back with anther next Monday probably slightly fatter from eating too much Easter chocolate! I would love to hear your thought and suggestions, or something you would love to see on Make It Monday, just let me know in the comments section below.


Stampin' Up! Sale-a-bration


Product List


Shop Now button-001Join my team button-001

To purchase any of the items featured in my projects please use the links above. To join my team of Stampin’ Friends select ‘Join My Team’ or send me a message!

Please support StampinByHannah, and join my Code Club, by using the Hostess code featured in the top right hand of my blog. For orders of over £150 please do not use this code, as you are entitled to your own Hostess benefits!

Sign up to my newsletter here – http://eepurl.com/2if59

Hannah McCurley

Stampin’ Up! UK Independent Demonstrator